


Checking Automatic Inspection Levels
Overview
Check the level of stains on the image that are detected during automatic inspections, and adjust as necessary.
Use the 2 types of test chart to check the automatic inspection level for [Stain]. During actual automatic inspections, the appearance of the spots (size and density) may differ depending on the paper or image, so be sure to use the test charts when checking or adjusting the automatic inspection level.
There are no test charts for checking the inspection levels for [Streak] and [Spot]. Check the automatic inspection level using the results detected by the actual automatic inspection. If there is a problem with the detected results, make adjustments.
Use the 2 types of test chart detailed below to check the automatic inspection level for [Stain].
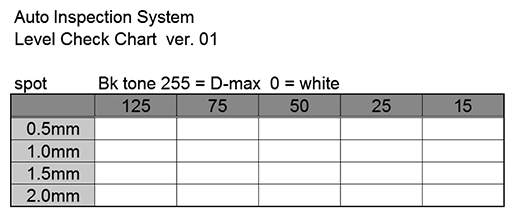
Reference chart
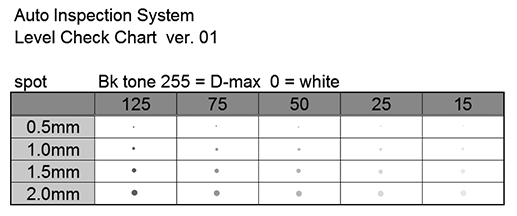
Inspection chart
Reference charts:
Reference charts are test charts for creating reference images for checking the inspection level. There are no dots on reference charts for indicating the stain level.
Inspection charts:
Inspection charts are charts for checking whether the automatic inspection was performed at the set level. There are dots on inspection charts for indicating the stain level.

Tips
- For details about how to acquire automatic inspection test charts, contact your service representative.
Check Procedure
1
Configure settings such as automatic inspection standards or actions to be performed when something is detected.
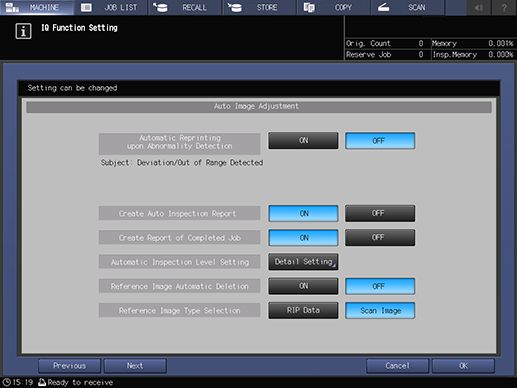
For details about the setting, refer to Configuring Advanced Automatic Inspection Settings in Advance. For details about setting examples, refer to "Setting example" (described after the procedure).
2
Press [Detail Setting] of [Automatic Inspection Level Setting] to display the [Auto Inspection Level Detailed Setting] screen.
3
Configure the inspection level settings.
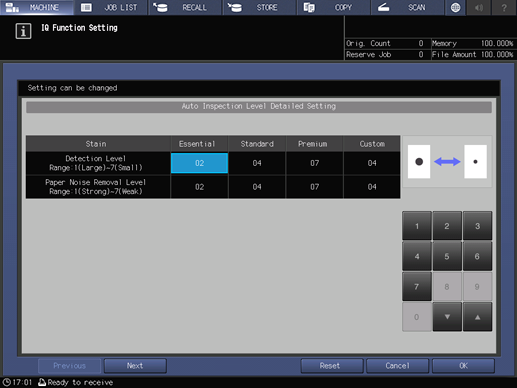
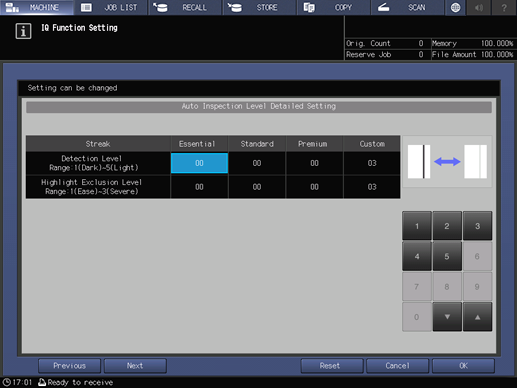
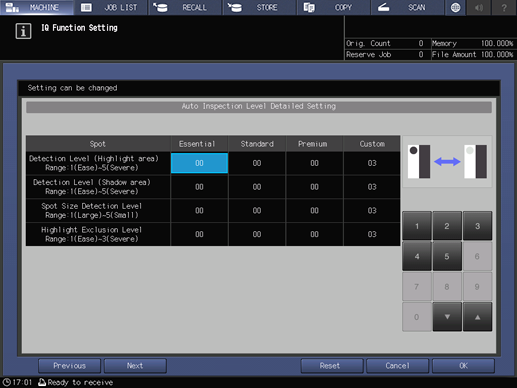
Here, change each setting for [Standard] to the value at which you want to confirm the inspection level.
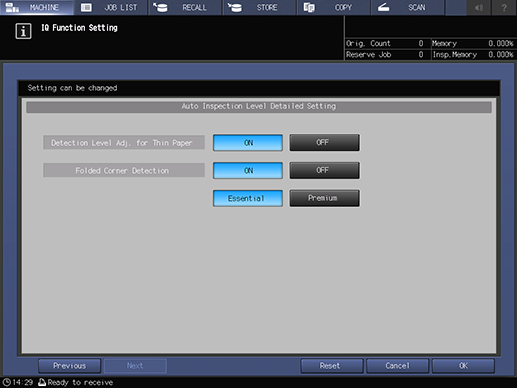
Set [Detection Level Adj. for Thin Paper] to [ON].
For details, refer to [Common Setting].
4
Use the reference chart to create a reference image.
Follow Step 5 to Step 9 below to create reference images.
This section describes the procedure to register a reference image with AccurioPro Print Manager.
5
Save the reference chart (PDF file) as a hold job of AccurioPro Print Manager.
6
In the [Hold] job list of AccurioPro Print Manager, select a reference chart, and press [Job Management] - [Job Settings].
7
Select [Create New Registered Image] of the [Quality] tab.

8
Press [Print] to create the reference image.
9
Check the output paper of the reference image printed as proof of any abnormalities such as stains or missing images.
If you need to re-create the reference image, execute Step 6 to Step 8 again.
After successfully printing the proof copy, the printed data is registered as a reference image. The reference image has the same file name as the original.
To check the registered reference images, select [MACHINE] - [Ref. Image Manage.] on the Touch panel of this system, or select Web Utilities - [Reference Image List] on Auto Inspection Unit AI-101. For details, refer to [Ref. Image Manage.] or [Reference Image List].
10
Execute the automatic inspection using the inspection chart.
Follow Step 11 to Step 14 below to perform the automatic inspection.
For the reference image, use the reference image of the reference chart you created in Step 5 to Step 9.
This section describes the procedure for performing the automatic inspection with AccurioPro Print Manager.
11
Save the inspection chart (PDF file) as a hold job of AccurioPro Print Manager.
12
Select the inspection chart in the [Hold] job list of AccurioPro Print Manager, and press [Job Management] - [Job Settings].
13
Select the [Quality] tab, and configure the items.
For details about the settings, refer to the [Quality] tab settings (described after the procedure).
14
Press [Print] to start the print job and begin automatic inspection.
Dots that represent stains on the inspection chart are detected as printing defects.
15
Check the automatic inspection report.
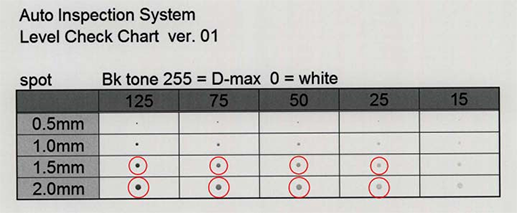
Check if the levels of those areas circled in red that were detected as dirt match the levels set in Step 3.
Check the automatic inspection reports on the browser or using the downloaded PDF file. For details, refer to Checking Automatic Inspection Reports Using the Browser.

NOTICE
- The results of the automatic inspection may differ if there are minor changes between each print. Repeat the automatic inspection 3 to 5 times, and then make an overall judgment of the results.
16
If it is necessary to adjust the inspection level, change the inspection level in Step 3, and then repeat Step 12 to Step 15.
Setting example
Item | Setting Value |
|---|---|
[Automatic Reprinting upon Abnormality Detection] | [OFF] |
[Create Auto Inspection Report] | [ON] |
[Reference Image Type Selection] | [Scan Image] |
[Quality] tab settings
Item | Setting Value |
|---|---|
[Auto Inspection] | Select [Use Registered Image], press [Change...], and on the subsequently displayed screen, select the reference image created in Step 8 |
[Inspection Level] | For example, select [Standard] |
 in the upper-right of a page, it turns into
  and is registered as a bookmark.