


Comparing with RIP Data for Automatic Inspection
Overview
The automatic inspection is performed using the original image (RIP data).

Tips
- Textured paper, unprinted insertion paper, paper with punch holes, tab paper, and insertion paper are not subject to automatic inspections.
Setting Procedure
1
Access AccurioPro Print Manager.
For details about how to access AccurioPro Print Manager, refer to AccurioPro Print Manager.
The same operations can also be performed from [CNTL] on the Touch panel of this system or PS Plug-in Driver.
2
Select a held print job, and then press [Job Management] followed by [Job Settings].
3
Select [Automatic Processing Mode by RIP Images] of the [Quality] tab.
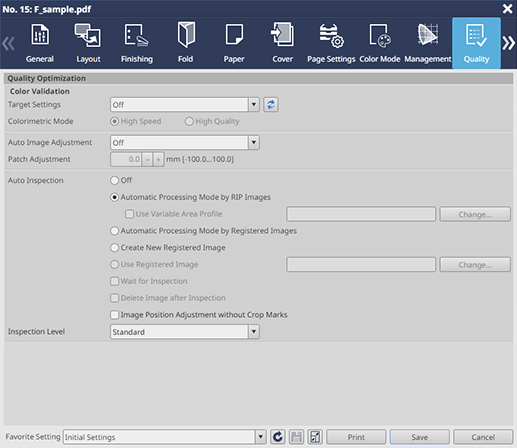
If you want to set an inspection area, use an inspection area profile (CSV file) for which the inspection area is set. Select the [Use Variable Area Profile] check box, and press [Change...] to select a file.
For details about configuring inspection area settings, refer to Setting Inspection Areas.
If the [Image Position Adjustment without Crop Marks] check box is selected, the image position can be corrected in real time without printing crop marks for Auto Image Adjustment. The positional misalignment correction value is calculated from the reference image and inspection image used for automatic inspection. This function is only available when [Auto Image Adjustment] is set to [Off]. For details about Auto Image Adjustment, refer to To Perform Auto Image Adjustment.
4
Select [Inspection Level].
Select [Standard] as an example.
5
Press [Print] to start the print job and begin automatic inspection.
If an abnormality is detected during the inspection, it is displayed on the [MACHINE] - [Inspection Result] screens on the system’s Touch panel. For details, refer to [Inspection Result].
You can check the automatic inspection reports using the system’s Touch panel or from Web Utilities on Auto Inspection Unit AI-101.

Reference
- For details about automatic inspection reports, refer to Automatic Inspection Reports.
 in the upper-right of a page, it turns into
  and is registered as a bookmark.