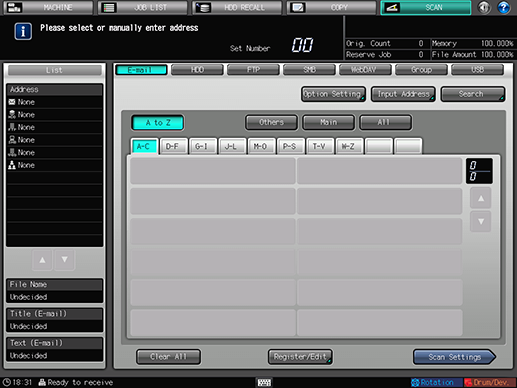
[SCAN] Screen
To display this screen, press [SCAN]. Set an address to send scan data.

Item | Description |
|---|---|
[A to Z] | Displays an address in which the initial character of the reference name is an alphabet. |
[Others] | Displays an address in which the initial character of the reference name is a symbol. |
[Main] | Displays only addresses which were registered as Main address. |
[All] | Displays all addresses. |
[ | Switches between pages which display addresses. |
[Option Setting] | Displays the [E-mail Option Setting] screen. |
[Input Address] | Displays the [Input Address] screen. |
[Search] | Displays the [Search] screen. |
[Clear All] | Clears all the addresses selected. |
[Register/Edit] | Displays [Add], [Change], and [Delete]. |
[Scan Settings] | Displays the Scan Settings screen. |
The [SCAN] screen (Group) does not provide [Option Setting], [Input Address], [Search], [A to Z], [Others], [Main], and [All].


