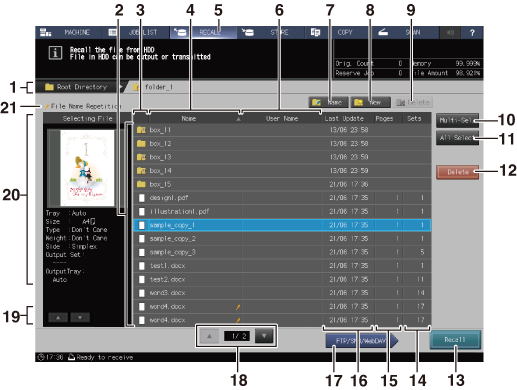
RECALL Screen

No. | Name | Description |
|---|---|---|
1 | Layer display area | Displays the directory of the HDD where the job is stored. The following three types of directories are provided for each layer. First layer (root directory) - second layer (folder) - third layer (box) Pressing the name of the upper layer (root directory or folder name) moves to the layer. |
2 | List display | Lists the HDD saved jobs, folders, or user boxes. Pressing a folder or user box lists the content. If the folder or user box is password-protected, enter the password. |
3 | Preview icon | Displays the HDD saved job, folder, or box as an icon. If the folder or user box is password-protected, a lock mark ( If a USB flash drive is connected, Pressing the title section of the icon sorts the list by type of the icon of HDD saved job, folder, and box. |
4 | Name | Displays the name of the HDD saved job, folder, or user box. Pressing the title Name sorts the list by name. |
5 | RECALL | Press this to display the RECALL screen. |
6 | User Name | Displays the user name of the HDD saved job, folder, or user box. Pressing the title User Name will sort the list by user name. |
7 | Name | Changes the name of the open folder or user box. You cannot change the name of the root directory or Public folders. |
8 | New | Creates a new folder or user box. |
9 | Delete | Deletes a folder or user box. Before deleting the folder or user box, delete all jobs in the folder or user box. |
10 | Multi-Sel. | Press before selecting multiple HDD saved jobs in the list. Press first, then select jobs by pressing jobs in the job list. Press Multi-Sel. again to cancel this function. You cannot select the folders or user boxes displayed. |
11 | All Select | Pressed to select all the stored jobs on the list. Press Multi-Sel. to cancel this function. You cannot select the folders or user boxes displayed. |
12 | Delete | Press before deleting the HDD saved job. You can select and delete multiple jobs. |
13 | Recall | Pressed to recall the stored job. The recall function provides three methods: Print, Print&Hold, and Hold. Also, when Print or Print&Hold is selected, select one from Normal, Proof, Proof(1st), and Wait in Output Method. You can change the print quantity specified for that job. |
14 | Sets | Displays the print quantity of the job saved on the HDD. Pressing the title Sets sorts the list in descending/ascending order of set count. |
15 | Pages | Displays the number of pages of the job saved on the HDD. Pressing the title Pages sorts the list in descending/ascending order of page count. |
16 | Last Update | Displays the date when the job was stored on the HDD. Pressing the title Last Update sorts the list by date. |
17 | FTP/SMB/WebDAV | Sends the job stored on the HDD to the FTP, SMB, or WebDAV destination specified on the SCAN screen. |
18 | Scroll keys | Used to scroll the list. The current page number and total page count of the list are displayed between the keys. |
19 | Key to operate a selected job | Scroll key down or up: Press to scroll a list of multiple selected jobs. |
20 | Selected file | Displays a preview image and the output conditions of the job selected in the list. If multiple jobs stored on the HDD are selected, a list of these jobs is displayed. |
21 | Duplication mark | Displayed when another job with the same name is created in the list. |
 ) is displayed with the preview icon.
 is displayed.