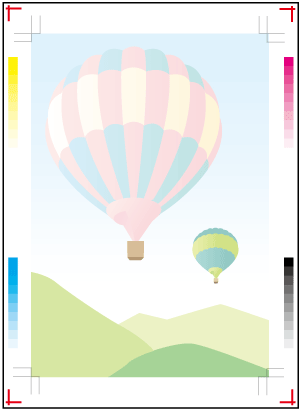
Auto Image Adjustment Function
Integrated Color Care Unit IQ-501 provides the Auto Image Adjustment function that automatically performs the image adjustment function.
The Auto Image Adjustment function checks the image quality on a daily basis using the trim margin. If an image misalignment or gradation error occurs, this function makes adjustments in real time, enabling the image stability in a job process. This function is set to OFF by default.
This function automatically prints adjustment crop mark and gradation patch in the trim margin.
The adjustment crop mark and gradation patch are read by Integrated Color Care Unit IQ-501 to adjust image misalignment or gradation error.
When Auto Image Adjustment is set to ON, you do not need to recognize settings in general use. However, if necessary, you can change adjustment settings to suit the machine environment.
For details on the settings of Auto Image Adjustment, refer to the relevant page of those following.
Automatic adjustment is available for the following sizes.
SRA3
13 19
12 18
SRA4 short edge feed (Auto Quality Adjustment Patch Size is only available in 6 mm 8 mm)
Custom paper of the following sizes
Auto Quality Adjustment Patch Size Switching | Select Chart Type (Auto Image Adj.) | |
Type1 | Type2 | |
6mm 8mm | 203.0 mm to 762.0 mm | 217.0 mm to 762.0 mm |
5mm 9.5mm | 236.0 mm to 762.0 mm | 250.0 mm to 762.0 mm |
Tips
If the length in the paper feed direction is 225.0 mm or more, Standard-size paper other than SRA3, 13 19, 12 18, and SRA4 short edge feed can be adjusted automatically. For details, contact your service representative.
If a crop mark is missed because the paper edge is folded or if the paper size is not suitable, data will not be able to be read normally, which will subsequently cause an error. If an error message is displayed, check the paper edge or size. Even if the paper size looks the same, it may be different from the actual size.
To automatically perform quality adjustment (gradation adjustment), perform control density control for the target paper, and set Color Density of Paper Setting to Default Adj. Data or Registered Adj. Data in advance.
To set the Auto Image Adjustment to ON, the both-sides adjustment must be completed once for the target tray. Before changing paper or starting the day's work, always make the both-sides adjustment.
Tips
If there is no trim margin, set Periodical Both Sides Adjustment to ON to automatically make the both-side adjustment for each specified output sheet count.
Auto Image Adjustment and Periodical Both Sides Adjustment cannot be set to ON simultaneously. When Auto Image Adjustment is set to ON, Periodical Both Sides Adjustment is disabled.
Reference
For details about Periodical Both Sides Adjustment, refer to Periodical Both Sides Adjustment Function.