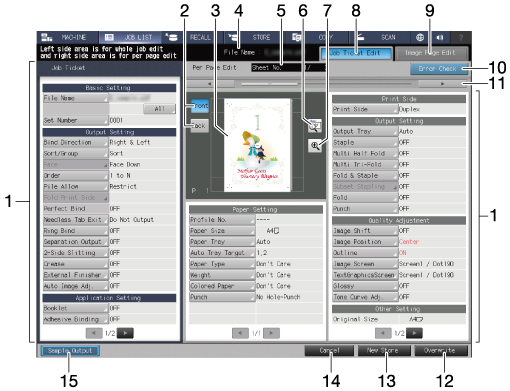
Job Ticket: Editing a Job Print Setting
Job Ticket Edit Screen
This section describes an outline of the operation of the Job Ticket Edit screen. Edit a job by operating in combination with the Image Page Edit screen.
If images with different type of job (copy/print) or the controller image compression setting (Gradation Priority/Resolution Priority) are attached on the image data in the Image Page Edit screen, you cannot select Booklet, Adhesive Binding or Combine of Application Setting cannot be selected in the Job Ticket Edit screen.
Reference
The description of Register Crop Mark is provided in another section. For details, refer to Adjusting the Crop Mark of Hold Job.
For details about the controller image compression setting, refer to Controller Image Comp. Set.
For details about the operation overview of the Image Page Edit screen, refer to Image Page Edit: Editing a Job Page.

No. | Name | Description |
|---|---|---|
1 | Image sheet setting items and set contents | Displays setting items and set contents of the preview image data. Press the key available for selection to change the setting. Use and right at the bottom of each area to scroll the items and contents. |
2 | Front, Back | Press to preview the front and back side of a 2-sided original. |
3 | Preview image display | Displays the preview image of the file selected on the Hold Job screen or Secure Job screen. |
4 | File Name display | Displays the name of the file selected on the Hold Job screen or Secure Job screen. |
5 | Sheet No. display | Displays the total sheet count of the file selected on the Hold Job screen or Secure Job screen, and also the sheet count of the preview images. |
6 | Rotation/Output direction key | Pressed to rotate the preview image, or to check the output direction of the image. |
7 | Enlarged preview key | Press to enlarge a preview image. On the enlarged preview screen, you can set a crop mark or the Image Shift function. |
8 | Job Ticket Edit tab | Press to display the Job Ticket Edit screen. |
9 | Image Page Edit tab | Press to display the Image Page Edit screen. |
10 | Error Check | Turns orange if a setting that is unavailable for output is detected. Press this key to display the cause. |
11 | right | Pressed to scroll the preview image. |
12 | Overwrite | Overwrites to save the setting changes along with the image data. |
13 | New Store | Newly stores the setting changes along with the image data. |
14 | Cancel | Press to not save the setting changes. |
15 | Sample Output | Press this button to output and check the changed setting. One set, a sheet in the preview, or a sheet can be specified as an output target. |
Basic Setting
File Name
Set Number
Output Setting
Auto Inspection
Bind Direction
Sort/Group
Face
Order
Pile Allow
Fold Print Side
Perfect Bind*1
Needless Tab Paper Exit
Ring Binding
Separation Output
2-Side Slitting
Crease
External Finisher
Auto Image Adjustment*2
*1: Available only when Perfect Binding is specified to hold a job.
*2: Available only for hold jobs from Image Controller IC-605.
Reference
For details about Auto Inspection, refer to What is Automatic Inspection?.
Application Setting
Booklet
Adhesive Binding
Combine
Image Repeat
Page Margin
Register Crop Mark
180 Deg. Rotation
Image Centering
Stamp Numbering
Stamp Page No.
Stamp Date/Time
Other Setting
The following items cannot be changed.
Book Copy
NoImage Area Erase
Frame Erase
Annotation
Full Image Area
Copy Density
Background Removal
Color Adj.(R/G/B)
Hue
Saturation
Brightness
Sharpness
Contrast
Distinction(Text)
Distinction(Color)
Color Balance