Direct Print: Printing with Right-click Menu of the File
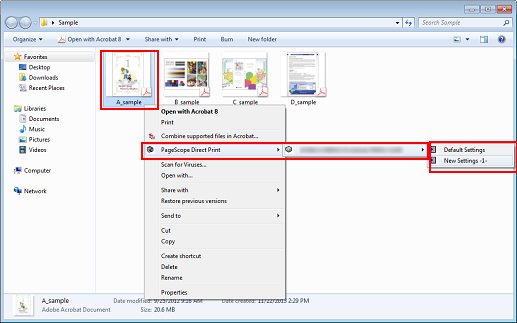
You can start printing by selecting the job setting of Direct Print in the right-click menu of the file.
• Examples Introduced in This Section
If you add the printer (this machine) to Direct Print and register a job setting, you can select the printer and job setting in the right-click menu of the file and start printing.
It is recommended that you register several job settings in advance according to the use applications.
You can change the print settings on the [Job Setting] screen when printing from the right-click menu.
•Intended Environment
Operating system | Windows 7 |
Application | Direct Print |
Image Controller | Built-in image controller |
* The sample screen may be different from the actual display depending on your system environment and application version/revision.
• Related Section
•Precautions
Direct Print is supported on each edition (including 64 bit version) of Windows Vista (SP 2 or later) / Windows 7 (SP 1 or later) / Windows 8.1 / Windows 10.
Start Direct Print and add the printer (this machine).
Refer to STEP 1 (Direct Print: Printing a File by Copying to the Hot Folder) in (Adding the Printer (This Machine) to Direct Print).
Add a job setting in Direct Print.
For details about how to add a job setting, refer to STEP 2 (Direct Print: Printing a File by Copying to the Hot Folder) in (Adding a Job Setting).
Right-click the file to print, select [Direct Print] from the menu and select the printer and job setting.

The file is sent to the printer (this machine) and printed.
If you checked [Edit Job Setting for each drag-and-drop printing] on the main screen, you can edit the job setting when printing.
