
Scan
- Scan-to-Send Function
- Operations Available with Scan-to-Send Function
- How to Send
- Specifying a Destination
- Scan Option Settings
- Sending Original Data as an E-mail Attachment (Scan to E-mail)
- Scan to E-mail Function
- Preparation for Scan to E-mail (for the Administrators)
- How to Send
- Application Functions
- Sending a File to a Shared Folder of a Computer (SMB Send)
- SMB Send Function
- Preparation for SMB Send
- How to Send
- Application Functions
- Sending to an FTP server (FTP Send)
- FTP Send Function
- Preparation for FTP Send (for the Administrator)
- How to Send
- Application Functions
- Sending to a WebDAV server (WebDAV Send)
- WebDAV Send Function
- Preparation for WebDAV Send (for the Administrator)
- How to Send
- Application Functions
- Saving a file in a User Box of this Machine (Save in User Box)
- Sending with Web Service (WS Scan)
- Importing Images by TWAIN Scan
- Distributing Data via a Scan Server
- Scan Server
- Preparation to Send Data via a Scan Server (for the Administrator)
- How to Send
- Managing Destinations
Checking the Finish before Sending
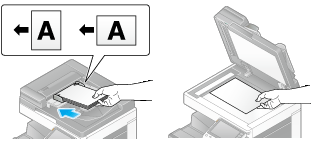
Load the original.
Tap [Scan/Fax].

Specify the destination.
Configure Scan option settings as necessary.
Tap [Preview].

Select the original direction.
When the original is loaded into the ADF:
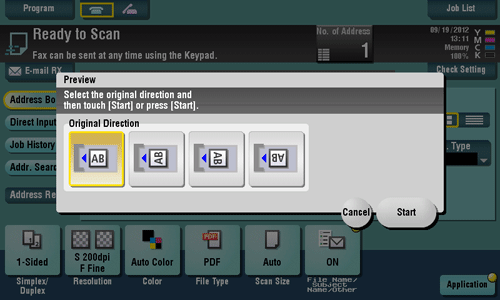
When the original is loaded onto the Original Glass:
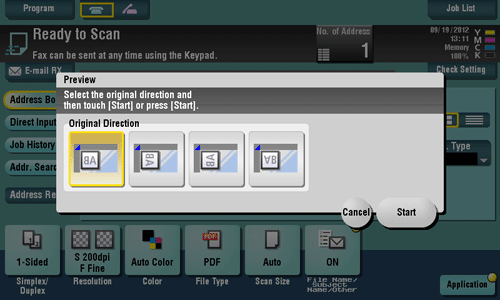
Tap [Start] or press the Start key.
The original is scanned, and the Preview screen appears.
Check the preview display, and rotate the page or change settings as required.
To continue to scan originals, load the original, and tap [Start Scan].
To start a transmission, tap [Send Now] or press the Start key.

Tapping
 displays Utility keys to allow you to rotate or delete a page.

After all originals are scanned, tap [Send Now] or press the Start key.
Transmission begins.


Normally, preview images are displayed after all the original data has been scanned. When necessary, you can use the real-time preview, which displays preview images on a page basis while scanning the originals (default: [OFF]). For details, refer to Here.
You can select whether to display the screen to select the original loading direction (default: [ON]) after tapping [Preview]. For details, refer to Here.
You can select conditions to display a preview image (default: [Preview Settings Screen]). For details, refer to Here.
Home
Print
Scan
Scan-to-Send Function
Sending Original Data as an E-mail Attachment (Scan to E-mail)
Sending a File to a Shared Folder of a Computer (SMB Send)
Sending to an FTP server (FTP Send)
Sending to a WebDAV server (WebDAV Send)
Saving a file in a User Box of this Machine (Save in User Box)
Sending with Web Service (WS Scan)
Importing Images by TWAIN Scan
Distributing Data via a Scan Server
Managing Destinations
Fax
Fax
Fax Functions
Setting up for Faxing (for the Administrator)
How to Send a Fax
Sending Options
How to Receive a Fax
Receiving Options
Printing Fax Reports
Managing Destinations
PC-FAX
PC-Fax TX Function
Preparation for PC-Fax TX (via Network Connection)
Preparation for PC-Fax TX (via USB Connection)
PC-Fax TX Operations
Sending Options
Fax Driver Settings
Delete the Fax Driver
Network Fax
Copy
Copy Operations
Recalling frequently used functions with simple action
Specifying the Color and Image Quality for Copying
Saving the Number of Print Sheets
Specifying the Size or Type of the Paper to Be Copied
Binding Copied Paper
Specifying the Original Size and Scan Method
Copying Various Types of Originals
Adjusting the Layout for Copying
Inserting a Cover Sheet or Blank Sheet into Copied Documents
Adding Text or an Image to the Original
Erasing an Unnecessary Portion for Copying
Deterring Unauthorized Copying
Saving Original Images to a User Box
Box
About the Boxes
Store Documents as Files in MFP and Use Them Again When Necessary
Receive Fax in Memory and Print It Later (Memory RX)
Retransmit Fax If Redialing Has Failed (File Re-TX)
Print Classified Documents (Secure Print)
Annotate Files (Annotation)
Print an Encrypted PDF (Password Encrypted PDF)
Registering a File for Polling (Polling TX)
Store File for Polling (Bulletin)
Use as Fax Transponder (Relay User Box)
Print on MFP under Authentication Control (ID & Print)
Use a USB Memory Device (External Memory)
Use Bluetooth Devices (Mobile/PDA)
Appendix