
Periodical Adjustment (Automatic Adjustment)
Basic
For periodical adjustment (automatic adjustment), the following settings are required:
Adjustment Execution Timing: Select whether to make adjustments in During Job Runs or only in Before Job Start. For details, refer to Step 6.
Chart Tray Setting: When selecting a tray to feed output charts, select ON, then set the tray.
Adjustment Interval: When specifying the adjustment interval, select ON, then set any number of sheets between 100 and 9999.
Concurrent Execution of BothSidesAdj.: Simultaneously performs Color Density Control and Both Sides Adjust when Integrated Color Care Unit IQ-501 is installed on the machine.
NOTICE
Color Density Control adjustment cannot be performed when outputting a list such as Job List, log report, or test chart.
Press Adjustment on the MACHINE screen to display the Adjustment Menu screen.
Press Quality Adjustment and Color Density Control in sequence.
The Color Density Control screen is displayed.
Press Basic Setting.

Select ON or OFF at the right of Use Color Density Control.

supplementary explanationWhen performing the color density control, select ON. When using the IDC sensor in the machine, select OFF.
Select ON or OFF at the right of Periodical Adj. Execution.
supplementary explanationWhen periodically perform the color density control, select ON. Otherwise (when manually making adjustments), select OFF. If ON is selected, this machine automatically judges the timing to perform the periodical adjustment (automatic adjustment).
supplementary explanationIf you do not select periodical adjustment (automatic adjustment), you need to carry out Color Density Control manually.
supplementary explanationIf you select to carry out periodical adjustment (automatic adjustment), you basically do not need to carry out manual adjustment. However, if you find significant fluctuation in colors for some reasons, manual adjustment may solve this problem.
supplementary explanationIf ON is selected, adjustments are made based on the sensor adjustment values specified in Color Density of Paper Setting. For details, refer to Setting Paper in a Paper Tray.
supplementary explanationOn the MACHINE screen, you can select ON or OFF for Periodical Adj. Execution. For details, contact your service representative.
If you select ON for Periodical Adj. Execution in step 5, select During Job Runs or Before Job Start at the right of Adjustment Execution Timing to determine which operation is to be performed when the periodical adjustment (automatic adjustment) time is reached when a job is being printed.
supplementary explanationWhen During Job Runs is selected, adjustment is performed even when a job is being printed.
supplementary explanationWhen Before Job Start is selected, no adjustment is performed when a job is being printed. In this case, adjustment is not performed until when the proper timing is achieved.
NOTICE
When Color Density Control is performed, the correction values are determined based on the combination of the following three items.
Each Paper Type Color Adjustment Value
Paper type
Screen type
If even one of the three conditions above is changed, this machine re-selects and applies the appropriate adjustment value at the time when the condition is changed.The machine may use one or more correction values for one job depending on print settings.
When the adjustment value is re-selected in a single job, if it reaches the adjustment (automatic adjustment) time, select whether to perform the periodical adjustment (automatic adjustment) even when a job is being printed in Adjustment Execution Timing.If Before Job Start is selected, the periodical adjustment (automatic adjustment) is not performed when a job is being printed.
Color Density Manual Control must be performed in advance.
If you select ON for Periodical Adj. Execution in step 5, select ON or OFF at the right of Chart Tray Setting.
supplementary explanationWhen feeding paper from a tray different from the currently selected tray, select ON. Otherwise, select OFF.
supplementary explanationIf OFF is selected, the periodical adjustment (automatic adjustment) is not performed when small-size charts are used.
supplementary explanationIf ON is selected, Concurrent Execution of BothSidesAdj. is grayed out, so it is not available.
NOTICE
When ON is selected for Chart Tray Setting, the output paper and chart paper must have the same characteristics.
While charts are output to small-size paper in a copy job, no adjustments are made even if During Job Runs is selected in Adjustment Execution Timing.
When ON is selected for Chart Tray Setting in step 7, select At All Times or For Small Size at the right of Chart Tray Condition.
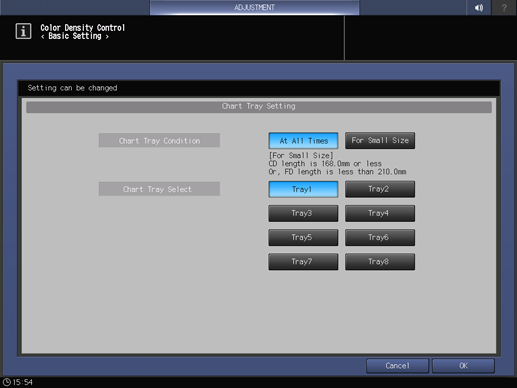
supplementary explanationWhen feeding paper from the tray specified in Chart Tray Select to output all charts for color density control, select At All Times. When feeding paper from the tray specified in Chart Tray Select to output small-size charts, select For Small Size.
If you select ON for Chart Tray Setting in step 7, use the button at the right of Chart Tray Select to select a paper feed tray.
supplementary explanationPress OK on the Chart Tray Setting to return to the Basic Setting screen.
Press Next.
If you select ON for Periodical Adj. Execution in step 5, select ON or OFF at the right of Adjustment Interval.

If you select ON for Adjustment Interval in step 11, press Change of Adjustment Interval, and enter the adjustment interval.
supplementary explanationPress OK on the Change Adjustment Interval screen to return to the Basic Setting screen.
supplementary explanationPress OK to return to the Color Density Control screen.
Select Concurrent Execution of BothSidesAdj..
supplementary explanationWhen simultaneously performing the both sides adjustment when Integrated Color Care Unit IQ-501 is installed on the machine, select ON.
supplementary explanationIf ON is selected and Color Density Control is performed simultaneously with Both Sides Adjust, the sheet count specified in Adjustment Intervalof Periodical Both Sides Adj. is reset.
supplementary explanationWhen both-side adjustment is performed, the result is reflected to Both Sides on the MACHINE screen - AutoMeasure tab screen.
Press Close to return to the Quality Adjustment Menu screen.
You can check the adjustment result of Color Density Control (Color Control) on the screen.
The adjustment result is indicated by a graph, comparing the target value with the measurement value after adjustment.
Checking the Adjustment Result of Color Density Control
Press Color Dens. Result on the MACHINE screen.
The Color Density Control Result screen is displayed.

supplementary explanationYou cannot check it during a job run.
supplementary explanationIf a color problem persists even after the periodical adjustment (automatic adjustment), first perform Color Density Manual Control. If Color Density Manual Control could not solve the problem, perform Quality Adjustment. For details, refer to Density Adjustment Using Image Controller.
Press Close to return to the MACHINE screen.