
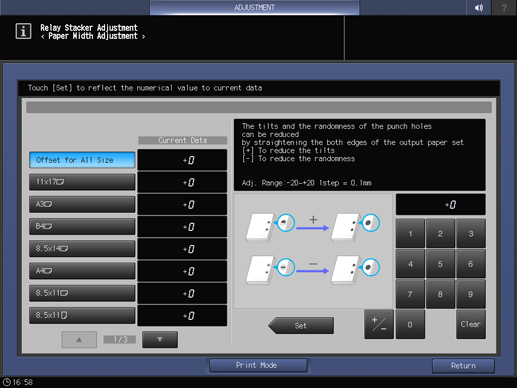
Paper Width Adjustment
Adjust the alignment plate position in the crosswise direction of Relay Unit RU-510. Perform this adjustment when paper distortion or skew is detected in the finisher following Relay Unit RU-510. For example, adjust a misalignment of punch holes in the crosswise direction.
Objects of Adjustment: Offset for All Size, 11 17 short edge feed, A3 short edge feed, B4 short edge feed, 8.5 14 short edge feed, A4 short edge feed,8.5 11 short edge feed, 8.5 11 long edge feed, A4 long edge feed, B5 long edge feed, A5 long edge feed, 5.5 8.5 long edge feed, 8 13 short edge feed, 8K short edge feed, 16K long edge feed, 16K short edge feed, 12 18 short edge feed,SRA3 short edge feed, SRA4 short edge feed, 9 11 long edge feed, Postcard, Custom(220~379 mm), Custom(100~219 mm)
NOTICE
If a numeric value is specified for Offset for All Size, it is applied to all paper sizes. With a specific paper size selected,the set value becomes the sum of the entered value and the value previously specified for Offset for All Size.
Press Adjustment on the MACHINE screen to display the Adjustment Menu screen.
Press Finisher Adjustment, Relay Stacker Adjustment, and Paper Width Adjustment in sequence.

Select the size to be adjusted using down or up.
Press Print Mode.
Load the paper size selected in step 3, then select that tray key.
Set the print quantity to 10 sets, and press Start on the control panel. For example, output punched test patterns.
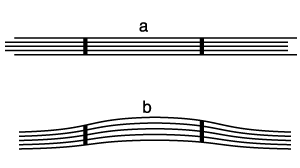
Check the punch hole position.
supplementary explanationIf the punch hole is misaligned, the pitch of the alignment plate is wider than the paper width.
supplementary explanationIf the punch hole is curved, the pitch of the alignment plate is narrower than the paper width.
Press Exit PrintMode to return to the Paper Width Adjustment screen.
If any adjustment is required, use the touch panel keypad to enter the set value.
Adj. Range: -20~+20 1 step = 0.1 mm
[-] To reduce the randomness [+] To reduce the tilts
supplementary explanationUse +/- to specify the value to be positive or negative.
supplementary explanationPress Set to change the Current Value.
supplementary explanationTo make adjustments, set the paper width adjustment value to the maximum (to reduce distortion), adjust in the direction to reduce distortion, and find a point at which the punch through hole is not misaligned.
Repeat steps 4 to 9 until the desired result is obtained.
Press Return.
This returns to the Relay Stacker Adjustment Menu screen.