
[Add/Edit]
Overview
Register a new paper profile, or edit a registered paper profile.
- Paper profiles registered with [ChangeIndividualSet.] of [Paper Setting] can also be edited.
Setting Items
Screen access
Touch panel - [MACHINE] - [Reg./Del.PaperSet.] - [Add/Edit] - [Paper Setting] - [New Setting]
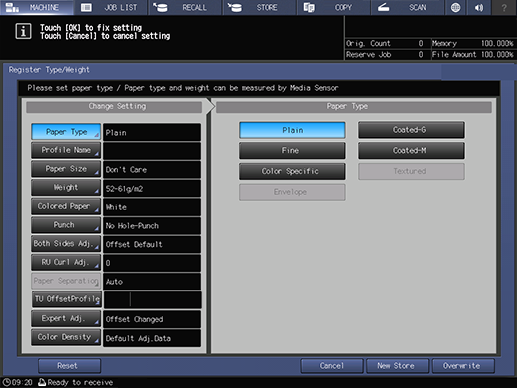
Setting item | Description |
|---|---|
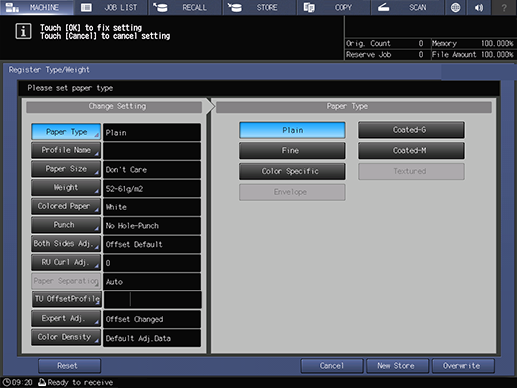
Select the desired paper type from the list. Paper is classified by surface processing or texture. Set the appropriate paper type for your requirements. | |
Set the paper profile name. We recommend that you set a paper profile name that makes it easy to distinguish the content and usage. | |
Set the standard size or custom size for paper or paper profile, or the paper size for tab paper. | |
Set the weight for paper or paper profile. Setting an incorrect weight may cause paper jams or double feeding. | |
Set the color for paper or paper profile. Setting the paper color is useful to prevent an incorrect paper tray from being selected when making copies or using Auto Tray Switch. | |
Set this function when using the punched paper. | |
Adjust any misalignment of printing positions on the front and back sides that occurs during 2-sided printing. When you change the paper to load into a paper tray, always perform [Both Sides Adj.]. | |
Pass paper through the curved route for curl correction in order to reduce paper curling. | |
[Paper Separation] is not available in [Reg./Del.PaperSet.]. | |
Set the TU offset profile to the paper or paper profile. You can register the advanced settings (TU offset profile) of the processing performed in Trimmer Unit TU-510. | |
Set the advanced adjustment items such as the transfer, separation, or fusing process. Adjusting the [Expert Adj.] items allows you to deal with various situations or finishing conditions. | |
Set the sensor adjustment value used for output density adjustment. By utilizing the registered [Registered Adj. Data], it is possible to make corrections that take into account different paper characteristics such as plain paper and coated paper. | |
[Reset] | Returns all the settings to the default. |
Setting Procedure (Registering a New Paper Profile)
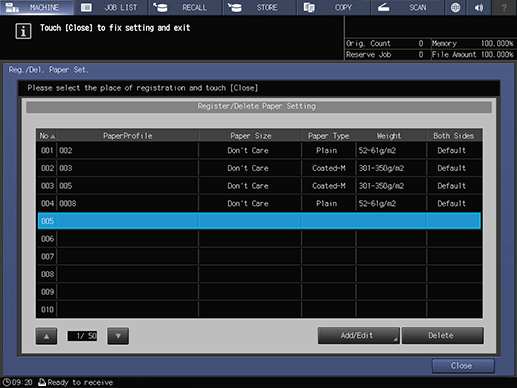


When the [Register Type/Weight] screen is displayed, set each item.

The paper profile is registered.
Setting Procedure (Updating a Paper Profile)
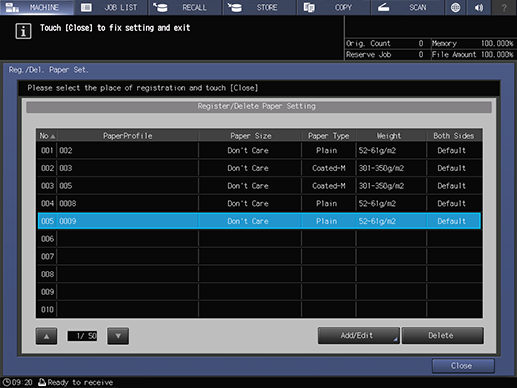

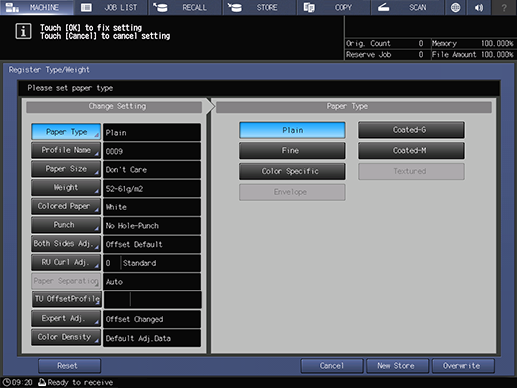
When the [Register Type/Weight] screen is displayed, set each item.

The paper profile is updated.
- If you pressed [New Store] in step 3, the [Profile Name] screen is displayed. Edit the paper profile name and press [OK] to register the new paper profile in the unregistered line with the small No. This is useful when you want to create paper profiles of a similar type.
Setting Procedure (Registering a New Paper Profile With Intelligent Media Sensor IM-101)
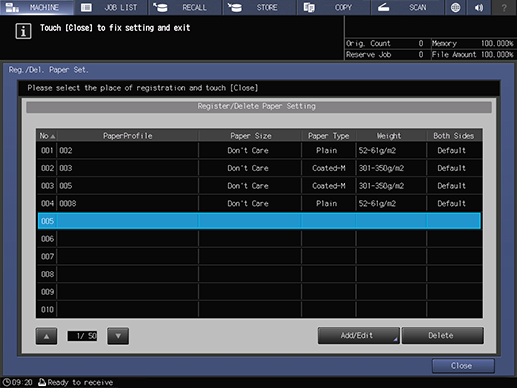
If no line is selected, the new paper profile is registered in the unregistered line with the small No.

For information about the display of Status Indicator Lamp in Intelligent Media Sensor IM-101, refer to Checking the Status of Intelligent Media Sensor IM-101..
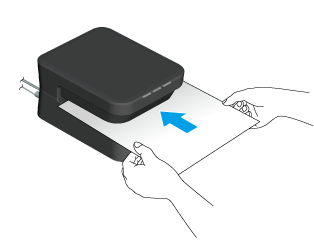
Match the center of the paper to the center of the opening of Intelligent Media Sensor IM-101, and insert the paper in the same direction as the actual feed direction.
The READY Lamp lamp of the Status Indicator Lamp lights up when paper is being measured.

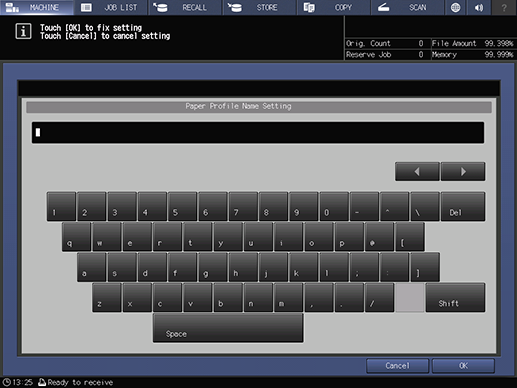
Up to 50 single-byte characters (25 double-byte characters) can be entered.
For details about how to enter characters, refer to Entering Text.

The paper profile is registered.
- [Paper Type] and [Weight] can only be registered with Intelligent Media Sensor IM-101. When registering items other than [Paper Type] and [Weight], perform the registration manually.
Setting Procedure (Updating a Paper Profile With Intelligent Media Sensor IM-101)
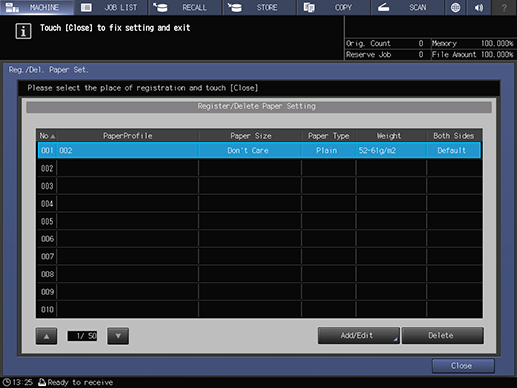
When paper is measured, paper profile information is overwritten for updating purposes. Be careful not to select an incorrect paper profile.

For information about the display of Status Indicator Lamp in Intelligent Media Sensor IM-101, refer to Checking the Status of Intelligent Media Sensor IM-101..


Match the center of the paper to the center of the opening of Intelligent Media Sensor IM-101, and insert the paper in the same direction as the actual feed direction.
The READY Lamp lamp of the Status Indicator Lamp lights up when paper is being measured.

[Paper Type] and [Weight] of the paper profile are updated.
About IM measurement values
- After step 3, if paper used for performing an update on the [Register/Delete Paper Setting] screen was inserted into the Intelligent Media Sensor IM-101 and measured, only the IM measurement values are updated.
- For a paper profile without the IM measurement value, update paper information on Intelligent Media Sensor IM-101; the IM measurement value is added.
- Paper profiles with added IM measurement values are more likely to be extracted as results in paper profile searches or as prospective measurement results for [Paper Measuring].
- [Paper Type] and [Weight] can only be updated with Intelligent Media Sensor IM-101. To update items other than [Paper Type] and [Weight], perform the operation manually.
- If you pressed [New Store] in step 8, the [Profile Name] screen is displayed. Edit the paper profile name and press [OK] to register the new paper profile in the unregistered line with the small No. This is useful when you want to create paper profiles of a similar type.

 in the upper-right of a page, it turns into
  and is registered as a bookmark.