
Description of Setup Buttons (Administrator Settings)
Page Number Print Position[Utility]
To display:
- [Utility]
- [Administrator Settings]
- [System Settings]
- [Page Number Print Position]
- [System Settings]
- [Administrator Settings]
Select the printing position in the back side of paper relative to the printing position of the page number in the front side for printing on both sides and when specifying both of the booklet format and page number printing at a time.
| Settings | Description |
|---|---|
[Left & Right Bind : All the Same Top & Bottom Bind : All the Same] | Page numbers are printed at the user defined position regardless of the binding position. For example, if you set the page number print position on the lower right, page numbers are printed on all pages in the lower right. [Left & Right Bind : All the Same Top & Bottom Bind : All the Same] is specified by default. |
[Left & Right Bind : Symmetrical Top & Bottom Bind : All the Same] | Specify different page number print positions for Left & Right Bind and Top & Bottom Bind.
|
[Left & Right Bind : Symmetrical Top & Bottom Bind : Symmetrical] | Specify different page number print positions for Left & Right Bind and Top & Bottom Bind.
|
Paper Alignment Plate Settings[Utility]
To display:
- [Utility]
- [Administrator Settings]
- [System Settings]
- [Expert Adjustment]
- [Finisher Adjustment]
- [Paper Alignment Plate Settings]
- [Finisher Adjustment]
- [Expert Adjustment]
- [System Settings]
- [Administrator Settings]
If paper is not discharged with the edges aligned, use this option to adjust the effective width of the paper alignment plate for making discharged paper stored neatly.
| Settings | Description |
|---|---|
[ Alignment Plate Position (Back)] / [Alignment Plate Position (Front)] | Select the paper alignment plate to adjust the position. |
[Adjust Value] | Enter an adjustment value between -10.0 mm and 10.0 mm by tapping [-] and [+]. [0.0 mm] is specified by default. |
Tips
- This adjustment is possible when the Finisher FS-533 is installed.
Paper Separation Adjustment[Utility]
To display:
- [Utility]
- [Administrator Settings]
- [System Settings]
- [Expert Adjustment]
- [Paper Separation Adjustment]
- [Expert Adjustment]
- [System Settings]
- [Administrator Settings]
Adjust the paper separation position on each side of paper for 2-sided printing.
Adjust balance between the properties related to paper separation and image transfer when paper jams are occurring or images are defective due to the environment being overly hot or humid.
| Settings | Description |
|---|---|
[Front (Except Thin Paper)]/[Back (Except Thin Paper)]/[Front (Thin Paper)]/[Back (Thin Paper)] | Select the paper and side on which to adjust the paper separation. |
[Adjust Value] | Enter an adjustment value between -10.0 mm and 10.0 mm by tapping [-] and [+]. Increase the value if paper jams are occurring, and decrease it if the image is transferred unevenly. [0.0 mm] is specified by default. |
Paper Size/Type Counter[Utility]
To display:
- [Utility]
- [Administrator Settings]
- [System Settings]
- [List/Counter]
- [Paper Size/Type Counter]
- [List/Counter]
- [System Settings]
- [Administrator Settings]
Register a combination of paper size and paper type to manage counting of used sheets.
Tap the number to register and then tap [Paper Size] to select the paper size subject to counting. To combine paper types, tap [Paper Type] to select paper types to combine. If you do not specify paper types, select [No Selection].
Tap [Counter Clear] to clear the selected counter.
Tips
- If you change a combination of paper size and paper type, the counter is reset.
Password Copy[Utility]
To display:
- [Utility]
- [Administrator Settings]
- [Security Settings]
- [Security Details]
- [Password Copy]
- [Security Details]
- [Security Settings]
- [Administrator Settings]
Select whether to use Password Copy.
Password Copy is a copy protection function that prints concealed security watermarks such as "Private" or a date in the background to prevent unauthorized copying, and embeds a password for password copy function on all printed sheets.
[No] is specified by default.
Tips
- To use the Password Copy function, the Security Kit is required.
Password for Non-Business Hours[Utility]
To display:
- [Utility]
- [Administrator Settings]
- [System Settings]
- [Weekly Timer Setting]
- [Password for Non-Business Hours]
- [Weekly Timer Setting]
- [System Settings]
- [Administrator Settings]
Specify whether to restrict the use of this machine in the Power Save mode by requesting a password.
To request a password in order to restrict operation, enter the password for a user to enter (using up to eight characters).
[No] is specified by default.
Password for Non-Business Hours[Utility]
To display:
- [Utility]
- [Administrator Settings]
- [System Settings]
- [Weekly Timer Settings]
- [Password for Non-Business Hours]
- [Weekly Timer Settings]
- [System Settings]
- [Administrator Settings]
Specify whether to restrict the use of this machine in the Power Save mode by requesting a password.
To request a password in order to restrict operation, enter the password for a user to enter (using up to eight characters).
[OFF] is specified by default.
Password Rules[Utility]
To display:
- [Utility]
- [Administrator Settings]
- [Security Settings]
- [Security Details]
- [Password Rules]
- [Security Details]
- [Security Settings]
- [Administrator Settings]
Configure whether to enable the password rules. Once you enable it, the number of characters and text types that are available for passwords is restricted. If necessary, change the minimum number of password characters.
| Settings | Description |
|---|---|
[Enable]/[Invalid] | Select whether to enable Password Rules. Before enabling Password Rules, change the current password to the one that complies with the password rules. [Invalid] is specified by default. Once Password Rules is enabled, the following rules are applied to any password that is configured on this machine.
The password rules are applied to:
|
[Set Minimum Password Length] | If you enable Password Rules, change the minimum number of characters for a password, as required. |
PBX Connection Setting[Utility]
To display:
- [Utility]
- [Administrator Settings]
- [Fax Settings]
- [PBX Connection Setting]
- [Fax Settings]
- [Administrator Settings]
Configure the settings for using this machine in a Private Branch Exchange (PBX) environment.
| Settings | Description |
|---|---|
[Outside Line] | To connect this machine to a PBX environment, tap [No] to deselect it. Enter the outside line number. [No] is specified by default. |
PC (SMB)[Utility]
To display:
- [Utility]
- [Administrator Settings]
- [One-Touch/User Box Registration]
- [Create One-Touch Destination]
- [Address Book (Public)]
- [PC (SMB)]
- [New]
- [PC (SMB)]
- [Address Book (Public)]
- [Create One-Touch Destination]
- [One-Touch/User Box Registration]
- [Administrator Settings]
Register destination computer names (host name) or IP addresses.
| Settings | Description |
|---|---|
[No.] | Destination registration number. [No.] is automatically registered using an unused smaller number. If you want to specify a number, tap [No.] and enter the number within the range of 1 to 2000. |
[Name] | Enter the destination name to be displayed on the Touch Panel (using up to 24 characters). Assign a name that helps you easily identify the destination. |
[Sort Character] | Enter the same name as the registered name (using up to 24 characters). You can sort destinations by registration name. |
[Index] | Select a corresponding character so that the destination can be index-searched by registration name.
|
[User ID] | Using up to 64 characters, enter the name of a user, who has privileges to access the folder specified in [File Path].
|
[Password] | Enter the password of the user specified in [User ID]. |
[Host Address] | Enter a computer name (host name) or IP address as a destination with up to 253 bytes.
|
[File Path] | Enter the shared folder name of the computer specified in [Host Address] with up to 255 bytes. The shared folder name is generally referred to as a shared name.
When specifying a folder in the shared folder, insert a symbol, "\", between the folder names.
|
[Reference] | On the Touch Panel, search for a computer to send a file to, and select a target shared folder. When the authentication screen appears, enter the name and password of a user who has privileges to access the selected folder. After authentication, [Host Address] or [File Path] is entered automatically. The Reference function may fail under the following conditions.
|
Tips
- To check the settings for a registered destination, select its registered name, then tap [Check Job Set.].
- To change the settings for a registered destination, select its registered name, then tap [Edit].
- To delete a registered destination, select its registered name, then tap [Delete].
PC-Fax Permission Setting[Utility]
To display:
- [Utility]
- [Administrator Settings]
- [Fax Settings]
- [Function Settings]
- [PC-Fax Permission Setting]
- [Function Settings]
- [Fax Settings]
- [Administrator Settings]
Select whether to allow PC-Fax TX using the fax driver.
[Allow] is specified by default.
PC-Fax RX Setting[Utility]
To display:
- [Utility]
- [Administrator Settings]
- [Fax Settings]
- [Function Settings]
- [PC-Fax RX Setting]
- [Function Settings]
- [Fax Settings]
- [Administrator Settings]
Configure the settings for using the PC-Fax RX function.
PC-Fax RX is a function that automatically saves a received fax to the Compulsory Memory RX User Box or a user box specified in F-Code (SUB Address). A stored fax job can be read from a user box into a computer.
| Settings | Description |
|---|---|
[Allow]/[Restrict] | Select whether to use the PC-Fax RX function. [Restrict] is specified by default. |
[Receiving User Box Destination] | Select either [Memory RX User Box] or [Specified User Box] (a User Box specified in F-Code (SUB Address)) as the location to save received faxes. |
[Print] | Select whether to print a received fax after it has been received. [OFF] is specified by default. |
[Password Check] | If you select [Specified User Box] for [Receiving User Box Destination], select whether to check the communication password (sender ID) for PC-Fax reception. If [ON] is selected, enter the requested password (a number containing up to eight digits). |
PC-Fax TX Error Report[Utility]
To display:
- [Utility]
- [Administrator Settings]
- [Fax Settings]
- [Report Settings]
- [PC-Fax TX Error Report]
- [Report Settings]
- [Fax Settings]
- [Administrator Settings]
Select whether to print a report if PC-Fax TX using the fax driver has failed.
[OFF] is specified by default.
PDF Settings[Utility]
To display:
- [Utility]
- [Administrator Settings]
- [System Settings]
- [PDF Settings]
- [System Settings]
- [Administrator Settings]
Change the default settings of the PDF processing function and searchable PDF function.
| Settings | Description |
|---|---|
[PDF/A Default Settings] | Change the default setting to create a PDF file based on PDF/A using the PDF processing function. For details, refer to Here. |
[PDF Web Optimization Default Settings] | Change the default setting to create a PDF file optimized for displaying in a Web browser using the PDF processing function. For details, refer to Here. |
[Searchable PDF Settings] | Specify conditions to automatically select a document name from the OCR character recognition result when creating a text-searchable PDF using the searchable PDF function. For details, refer to Here. |
Tips
- To use the PDF processing function, the Upgrade Kit UK-204 or i-Option LK-102 v3 is required.
- To use the searchable PDF function, the Upgrade Kit UK-204 or i-Option LK-105 v3 is required.
PDF Web Optimization Default Settings[Utility]
To display:
- [Utility]
- [Administrator Settings]
- [System Settings]
- [PDF Settings]
- [PDF Web Optimization Default Settings]
- [PDF Settings]
- [System Settings]
- [Administrator Settings]
Change the default setting to create a PDF file optimized for displaying in a Web browser using the PDF processing function.
[Invalid] is specified by default.
Tips
- To use the PDF processing function, the Upgrade Kit UK-204 or i-Option LK-102 v3 is required.
PDF/A Default Settings[Utility]
To display:
- [Utility]
- [Administrator Settings]
- [System Settings]
- [PDF Settings]
- [PDF/A Default Settings]
- [PDF Settings]
- [System Settings]
- [Administrator Settings]
Change the default setting to create a PDF file based on PDF/A using the PDF processing function.
[Disable] is specified by default.
Tips
- To use the PDF processing function, the Upgrade Kit UK-204 or i-Option LK-102 v3 is required.
Peer[Utility]
To display:
- [Utility]
- [Administrator Settings]
- [Network Settings]
- [TCP/IP Settings]
- [IPsec Settings]
- [IPsec Settings]
- [Peer]
- [IPsec Settings]
- [IPsec Settings]
- [TCP/IP Settings]
- [Network Settings]
- [Administrator Settings]
Register the peer of this machine to use IPsec. Up to 10 peers can be registered.
Select a group, then press [Edit].
| Settings | Description |
|---|---|
[ON]/[OFF] | To register a peer, select [ON]. [OFF] is specified by default. |
[Group Name] | Enter a peer name (using up to 10 characters). |
[Addressing Mode] | Select the method to specify the peer address. Specify the IP address of the peer depending on the selected method. |
[Pre-Shared Key Text] | Enter the Pre-Shared Key text to be shared with the peer (using up to 64 characters). Specify the same text as that for the peer. |
[Key-ID String] | Enter the Key-ID to be specified for the Pre-Shared Key (using up to 64 characters). |
Tips
- To check the registered peer settings, select a group name, then press [Mode Check].
Personal Data Security Settings[Utility]
To display:
- [Utility]
- [Administrator Settings]
- [Security Settings]
- [Security Details]
- [Personal Data Security Settings]
- [Security Details]
- [Security Settings]
- [Administrator Settings]
Specify whether to hide personal information, such as destination and file name, in [In Progress.] and [Log] on the [Job List] screen.
| Settings | Description | |
|---|---|---|
[Job History] | Specify whether to hide personal information, such as destination and file name, in [Job History] in the [Job List] screen. The default is [No] (without user authentication/account track) or [Yes] (with user authentication/account track). | |
[Display Settings] | When you have selected [Yes], select items you want to hide.
| |
[Public User]/[User Authentication]/[Authentication Track] | Select how to display items you specified in [Display Settings] per Public User, User Authentication, and Authentication Track.
| |
[Current Job] | Specify whether to hide personal information, such as destination and file name, in [In Progress] in the [Job List] screen. The default is [No] (without user authentication/account track) or [Yes] (with user authentication/account track). | |
[Display Settings] | When you have selected [Yes], select items you want to hide.
| |
[Public User]/[User Authentication]/[Authentication Track] | Select how to display items you specified in [Display Settings] per Public User, User Authentication, and Authentication Track.
| |
Tips
- When logged in as an administrator or user box administrator, all personal information is displayed regardless of the settings.
PING Confirmation[Utility]
To display:
- [Utility]
- [Administrator Settings]
- [Network Settings]
- [Detail Settings]
- [PING Confirmation]
- [Detail Settings]
- [Network Settings]
- [Administrator Settings]
Configure settings to send a ping to the device communicating with this machine to check that the connection has been set up correctly.
| Settings | Description |
|---|---|
[PING TX Address] | Enter the address used to send a ping. Use one of the following entry formats.
|
[Check Connection] | Send a ping to check that this machine has been correctly connected. |
Post Inserter Tray Size Adjustment[Utility]
To display:
- [Utility]
- [Administrator Settings]
- [System Settings]
- [Expert Adjustment]
- [Finisher Adjustment]
- [Post Inserter Tray Size Adjustment]
- [Finisher Adjustment]
- [Expert Adjustment]
- [System Settings]
- [Administrator Settings]
If the size of the paper loaded into the Post Inserter is not detected correctly, use this option to adjust it so that it is detected correctly.
Select a paper tray and paper size to be adjusted, and load paper. Press Start to start adjustment.
Tips
- This adjustment is possible when the Finisher FS-535 and Post Inserter are installed in ineo+ 554.
Power Consumption in Sleep Mode[Utility]
To display:
- [Utility]
- [Administrator Settings]
- [System Settings]
- [Power Supply/Power Save Settings]
- [Power Consumption in Sleep Mode]
- [Power Supply/Power Save Settings]
- [System Settings]
- [Administrator Settings]
Specify whether to reduce the power consumption in the Sleep mode.
| Settings | Description |
|---|---|
[Enable] | Further reduces the power consumption in Sleep mode. Select [Enable] in normal conditions. [Enable] is specified by default. |
[Disable] | Select this option when a smooth network communication is not established while [Enable] is enabled. |
Power Key Setting[Utility]
To display:
- [Utility]
- [Administrator Settings]
- [System Settings]
- [Power Supply/Power Save Settings]
- [Power Key Setting]
- [Power Supply/Power Save Settings]
- [System Settings]
- [Administrator Settings]
Configure the settings on how to use the Power key and the machine action in the power save mode.
| Settings | Description |
|---|---|
[Sub Power OFF] | Press the Power key to shift to Sub Power Off mode. If the Power key is held down, Power Save mode shifts to ErP Auto Power Off mode (close to Main Power Off mode), which offers a higher power saving effect than Sub Power Off mode. [Sub Power OFF] is specified by default. |
[Power Save] | Press the Power key to shift to Power Save mode (Low Power or Sleep mode). Hold down the Power key to shift to sub power off mode. |
Power Save Settings[Utility]
To display:
- [Utility]
- [Administrator Settings]
- [System Settings]
- [Power Supply/Power Save Settings]
- [Power Save Settings]
- [Power Supply/Power Save Settings]
- [System Settings]
- [Administrator Settings]
Select the type of Power Save mode to enter when the Power key on the Control Panel is pressed if [Power Save] has been selected for [Power Key Setting].
| Settings | Description |
|---|---|
[Low Power] | Switches to the Low Power mode. Turns off the display of the Touch Panel to reduce power use. [Low Power] is specified by default. |
[Sleep] | Switches to the Sleep mode. Sleep mode provides a greater power saving effect than Low Power mode. However, the time required to return to the normal mode is longer than the time required to recover from Low Power mode. |
Power Saving Fax/Scan[Utility]
To display:
- [Utility]
- [Administrator Settings]
- [System Settings]
- [Power Supply/Power Save Settings]
- [Power Saving Fax/Scan]
- [Power Supply/Power Save Settings]
- [System Settings]
- [Administrator Settings]
Specify whether to give priority to power saving when returning from the Sleep or sub power off mode to a mode other than the copy mode.
When returning to a non-printing mode such as the Scan/Fax mode, the temperature of the Fusing Unit in this machine is not adjusted, by which power consumption is reduced.
You can set this option when you have selected an option other than [Copy] in [Priority Mode] that is selected by [Administrator Settings] - [System Settings] - [Reset Settings] - [System Auto Reset].
| Settings | Description |
|---|---|
[Power Save] | The temperature of Fusing Unit is not adjusted when the machine returns to the normal mode. |
[Standard] | The temperature of Fusing Unit is adjusted when the machine returns to the normal mode. [Standard] is specified by default. |
Power Supply/Power Save Settings[Utility]
To display:
- [Utility]
- [Administrator Settings]
- [System Settings]
- [Power Supply/Power Save Settings]
- [System Settings]
- [Administrator Settings]
Configure the settings on how to use the Power key and the machine action in the power save mode.
| Settings | Description |
|---|---|
[Low Power Mode Settings] | Change the time to elapse before entering the Low Power mode after the last action on this machine. For details, refer to Here. |
[Sleep Mode Settings] | Change the time period before the machine enters the Sleep mode after the last action is carried out. For details, refer to Here. |
[Power Key Setting] | Specify whether to use the Power key on the Control Panel as a sub power off key or power save key. For details, refer to Here. |
[Power Save Settings] | Select the type of Power Save mode to enter when the Power key on the Control Panel is pressed if [Power Save] has been selected for [Power Key Setting]. For details, refer to Here. |
[Enter Power Save Mode] | Select the timing for the machine to return to the Power Save mode after printing a job it has received in the Power Save mode from a fax machine or computer. For details, refer to Here. |
[Power Consumption in Sleep Mode] | Specify whether to reduce the power consumption in the Sleep mode. For details, refer to Here. |
[Power Saving Fax/Scan] | Specify whether to give priority to power saving when returning from the Sleep or sub power off mode to a mode other than the copy mode. When returning to a non-printing mode such as the Scan/Fax mode, the temperature of the Fusing Unit in this machine is not adjusted, by which power consumption is reduced. For details, refer to Here. |
[Awake from Power Save Mode by Touching Control Panel] | Select whether to return to the normal mode without touching the Touch Panel when the machine is in Low Power mode or Sleep mode. For details, refer to Here. |
Prefix/Suffix Automatic Setting[Utility]
To display:
- [Utility]
- [Administrator Settings]
- [System Connection]
- [Prefix/Suffix Automatic Setting]
- [System Connection]
- [Administrator Settings]
When using a fax server that communicates in the E-mail format, specify whether to automatically add a prefix and a suffix to the destination number.
[OFF] is specified by default.
Tips
- The setting in Registration No. 01 ([Utility] - [Administrator Settings] - [Network Settings] - [Detail Settings] - [Prefix/Suffix Setting] - [Prefix/Suffix Registration]) is applied.
- If Prefix/Suffix Automatic Setting is set to [ON], the other settings will be restricted.
- [Utility] - [Administrator Settings] - [Fax Settings] are not available (excluding [Destination Check Display Function], [PC-FAX Permission Setting], [Confirm Address (TX)] and [Confirm Address (Register)]).
- In Web Connection, setting is disabled for [Store Address] - [Application Registration].
- Bulletin Board User Box, Polling TX User Box, Compulsory Memory RX User Box, and Re-Transmission User Box are disabled.
- Bulletin Board User Box and Relay User Box cannot be registered.
- Confidential RX is not available.
- The Off-Hook key is not available.
- [Fax Header Settings], [Line Setting], [Quick Memory TX], [Polling TX], [Polling RX], [Timer TX], [Password TX], [F-Code TX] are not available in the scan/fax mode.
- The network fax function is not available.
- [Outside], [Tone], [Pause], [-], and [Line Setting] are not available when registering a fax destination in the address book.
- You cannot output a report by selecting [Job List] - [Comm. List].
- A number excluding a prefix and suffix is displayed in [Address] of [Job History].
- [Report Type] in [Comm. List] defaults to [Scan].
- [Address Type] that appears when you select [Comm. List] - [Log] - [Details] defaults to [E-mail].
- [Meter Count] is updated only when [Scans] is enabled in [Scan/Fax]; however, [Fax TX] is not updated.
Prefix/Suffix Setting[Utility]
To display:
- [Utility]
- [Administrator Settings]
- [Network Settings]
- [Detail Settings]
- [Prefix/Suffix Setting]
- [Detail Settings]
- [Network Settings]
- [Administrator Settings]
Register a prefix or suffix of an E-mail address. Also, configure the setting for recalling the registered prefix and suffix when entering an E-mail address.
| Settings | Description |
|---|---|
[ON/OFF Setting] | Select whether to use Prefix/Suffix Setting. If you select [ON], you can recall the registered prefix and suffix which are registered in [Prefix/Suffix Setting] when entering an E-mail address. [OFF] is selected by default. |
[Prefix/Suffix Setting] | Register a prefix and suffix to complement E-mail address entry. You can register up to 8 prefixes and suffixes.
|
Preview Display Conditions (Registered Application)[Utility]
To display:
- [Utility]
- [Administrator Settings]
- [System Settings]
- [Preview Settings]
- [Preview Display Conditions (Registered Application)]
- [Preview Settings]
- [System Settings]
- [Administrator Settings]
Select conditions to display preview images when using an OpenAPI application.
| Settings | Description |
|---|---|
[Job Executed] | Shows a preview image when pressing Start to execute a job as well as when pressing Preview. |
[Preview Settings Screen] | Shows a preview image only when Preview is pressed. [Preview Settings Screen] is specified by default. |
[Use Standard App. Settings] | Follows the setting of [Preview Display Conditions (Standard Application)]. |
Preview Display Conditions (Standard Application)[Utility]
To display:
- [Utility]
- [Administrator Settings]
- [System Settings]
- [Preview Settings]
- [Preview Display Conditions (Standard Application)]
- [Preview Settings]
- [System Settings]
- [Administrator Settings]
Select the conditions for displaying preview images.
| Settings | Description |
|---|---|
[Job Executed] | Shows a preview image when pressing Start to execute a job as well as when pressing Preview. |
[Preview Settings Screen] | Shows a preview image only when Preview is pressed. [Preview Settings Screen] is specified by default. |
Preview Settings[Utility]
To display:
- [Utility]
- [Administrator Settings]
- [System Settings]
- [Preview Settings]
- [System Settings]
- [Administrator Settings]
Specify the preview function settings, such as the display mode of preview images that appear when Preview is pressed on the Control Panel.
| Settings | Description |
|---|---|
[Original Direction Confirmation Screen] | Specify whether to display the screen for selecting the original loading direction after pressing Preview when scanning an original in fax/scan mode. For details, refer to Here. |
[Realtime Preview] | Select whether or not to display a preview image for each page when scanning an original in Scan/Fax mode. For details, refer to Here. |
[Preview Display Conditions (Standard Application)] | Select the conditions for displaying preview images. For details, refer to Here. |
[Preview Display Conditions (Registered Application)] | Select conditions to display preview images when using an OpenAPI application. For details, refer to Here. |
Print Counter List[Utility]
To display:
- [Utility]
- [Administrator Settings]
- [User Authentication/Account Track]
- [Print Counter List]
- [User Authentication/Account Track]
- [Administrator Settings]
A print counter list is printed. You can print a list if user authentication or account track has been adopted.
In [Print Item], specify whether to print all information or only to print typed information. Change print settings as required, then tap [Start] to start printing.
Print Data Capture[Utility]
To display:
- [Utility]
- [Administrator Settings]
- [Security Settings]
- [Security Details]
- [Print Data Capture]
- [Security Details]
- [Security Settings]
- [Administrator Settings]
Select whether to allow capturing of printer data being received by this machine when you start the analysis of printer-related failure. For details, contact your service representative.
[Allow] is specified by default.
Print Document[Utility]
To display:
- [Utility]
- [Administrator Settings]
- [System Settings]
- [User Box Settings]
- [External Memory Function Settings]
- [Print Document]
- [External Memory Function Settings]
- [User Box Settings]
- [System Settings]
- [Administrator Settings]
Select whether to allow users to print files from a USB memory.
[ON] (Allow) is specified by default.
Print E-mail Message Body[Utility]
To display:
- [Utility]
- [Administrator Settings]
- [Fax Settings]
- [Report Settings]
- [Print E-mail Message Body]
- [Report Settings]
- [Fax Settings]
- [Administrator Settings]
Select whether to print a report notifying that an Internet fax has been successfully received after it was received. The report has the subject and message text of an Internet fax.
[ON] is selected by default.
Print Jobs During Copy Operation[Utility]
To display:
- [Utility]
- [Administrator Settings]
- [Copier Settings]
- [Print Jobs During Copy Operation]
- [Copier Settings]
- [Administrator Settings]
Specify whether to print immediately or to print after copying is completed when a print job or fax job is received during copy operations on the Control Panel.
| Settings | Description |
|---|---|
[Accept] | Immediately prints a print or fax job. [Accept] is specified by default. |
[Receive Only] | A print or fax job is printed after copy operations are completed. |
Print Paper Selection[Utility]
To display:
- [Utility]
- [Administrator Settings]
- [Fax Settings]
- [TX/RX Settings]
- [Print Paper Selection]
- [TX/RX Settings]
- [Fax Settings]
- [Administrator Settings]
Select the criterion of selecting paper for printing a fax.
| Settings | Description |
|---|---|
[Auto Select] | Prints a fax on paper that is automatically selected to suit the fax received. [Auto Select] is specified by default. |
[Fixed Size] | Prints a fax on paper specified in [Print Paper Size]. |
[Priority Size] | Prints a fax on paper specified in [Print Paper Size]. If the machine runs out of specified paper, paper of the next closest size is used for printing. |
Print Paper Size[Utility]
To display:
- [Utility]
- [Administrator Settings]
- [Fax Settings]
- [TX/RX Settings]
- [Print Paper Size]
- [TX/RX Settings]
- [Fax Settings]
- [Administrator Settings]
Select the paper size to print received faxes on.
The initial value varies depending on the setting for [Letter/Ledger over A4/A3].
Tips
- To enable the setting for [Print Paper Size], set [Tray Selection for RX Print] to [Auto].
Print Receiver's Name[Utility]
To display:
- [Utility]
- [Administrator Settings]
- [Fax Settings]
- [Header/Footer Position]
- [Print Receiver's Name]
- [Header/Footer Position]
- [Fax Settings]
- [Administrator Settings]
Select whether to print a destination fax number as Header Position.
If [OFF] is selected, the fax number of this machine is printed instead of the fax number of the destination.
[ON] is selected by default.
Tips
- In the North American and Hong Kong models, [Print Receiver's Name] is hidden.
Print Separate Fax Pages[Utility]
To display:
- [Utility]
- [Administrator Settings]
- [Fax Settings]
- [TX/RX Settings]
- [Print Separate Fax Pages]
- [TX/RX Settings]
- [Fax Settings]
- [Administrator Settings]
Select whether to print a fax longer than the standard size on separate pages.
This option is not available if [Duplex Print (RX)] is set to [ON].
[OFF] is specified by default.
Print Settings[Utility]
To display:
- [Utility]
- [Administrator Settings]
- [Network Settings]
- [SMB Settings]
- [Print Settings]
- [SMB Settings]
- [Network Settings]
- [Administrator Settings]
Configure settings to perform SMB printing on this machine.
| Settings | Description |
|---|---|
[ON]/[OFF] | Select whether to use the SMB print function. [OFF] is specified by default. |
[NetBIOS Name] | Enter the NetBIOS name of this machine to be displayed as a shared name (using up to 15 upper case characters). |
[Print Service Name] | Enter a print service name (using up to 12 upper case characters). |
[Workgroup] | Enter a work group name or domain name (using up to 15 upper case characters). [WORKGROUP] is specified by default. |
Print Simple Auth.[Utility]
To display:
- [Utility]
- [Administrator Settings]
- [User Authentication/Account Track]
- [Print Simple Auth.]
- [User Authentication/Account Track]
- [Administrator Settings]
Specify whether to allow authentication based only on the user name (quick authentication for printing) when the printer driver is used for printing in an environment where user authentication is employed. When external server authentication is implemented, register the authentication server for quick authentication for printing.
| Settings | Description | |
|---|---|---|
[Authentication Setting] | Specify whether to allow authentication based only on the user name (quick authentication for printing) when the printer driver is used for printing in an environment where user authentication is employed. [Restrict] is specified by default. | |
[Register Authentication Server] | When external server authentication is implemented, register the LDAP server to check user names. Tap [Check Connection] to try connecting to the LDAP server using the entered information and check if the information registered is correct. Tap [Reset All Settings] to reset all the information entered. | |
[External Server Authentication] | Select the external server name to be used as a part of user information when authentication using the LDAP server is successfully completed from the external servers registered on this machine. The external server selected here is used for the following purposes.
| |
[Timeout] | Change the timeout time of communication with the LDAP server if necessary. [60 sec.] is specified by default. | |
[Search Attributes] | Enter the search attribute to be used for search of a user using the LDAP server (using up to 64 characters). The attribute must start with an alphabet character. [uid] is specified by default. | |
[Server Address] | Enter the LDAP server address. Use one of the following entry formats.
| |
[Search Base] | Specify the starting point to search for a user to be authenticated (using up to 255 characters). This option also searches in subdirectories under the entered starting point. Example of entry: "cn=users,dc=example,dc=com" | |
[SSL Setting] | Specify whether or not to use SSL for communication with the LDAP server. [OFF] is specified by default. | |
[Port Number] | If necessary, change the LDAP server port number. Normally, you can use the original port number. [389] is specified by default. | |
[Port Number (SSL)] | If necessary, change the SSL communication port number. Normally, you can use the original port number. [636] is specified by default. | |
[Certificate Verification Level Settings] | To validate the certificate during SSL communication, select items to be verified.
| |
[Authentication Type] | Select the authentication method to log in to the LDAP server. Select one appropriate for the authentication method used for your LDAP server.
[Simple] is specified by default. | |
[Referral Setting] | Specify whether to use the referral function as required. Make an appropriate choice that fits the LDAP server environment. [ON] is specified by default. | |
[Login Name] | Log in to the LDAP server, and enter the login name to search for a user (using up to 64 characters). | |
[Password] | Enter the password of the user name you entered into [Login Name] (using up to 64 characters). | |
[Domain Name] | Enter the domain name to log in to the LDAP server (using up to 64 characters). If [GSS-SPNEGO] is selected for [Authentication Type], enter the domain name of Active Directory. | |
Print without Authentication[Utility]
To display:
- [Utility]
- [Administrator Settings]
- [User Authentication/Account Track]
- [Print without Authentication]
- [User Authentication/Account Track]
- [Administrator Settings]
Select whether to allow users to start print jobs without authentication information (jobs for which the print command is executed even though user authentication or account track is not correctly configured in the printer driver).
| Settings | Description |
|---|---|
[Full Color/Black] | Both color printing and black-and-white printing are allowed. Print jobs are counted as public user jobs. |
[Black Only] | Only black-and-white printing is allowed. Print jobs are counted as public user jobs. |
[Restrict] | Printing is restricted. Canceling [Restrict] allows everybody to perform printing. Select [Restrict] to control user access and ensure security. [Restrict] is specified by default. |
Print XPS/OOXML Errors[Utility]
To display:
- [Utility]
- [Administrator Settings]
- [Printer Settings]
- [Print XPS/OOXML Errors]
- [Printer Settings]
- [Administrator Settings]
Select whether to print error information when an error occurs during XPS/OOXML (docx, xlsx, pptx) file printing.
[Yes] is specified by default.
Print/Fax Output Settings[Utility]
To display:
- [Utility]
- [Administrator Settings]
- [System Settings]
- [Output Settings]
- [Print/Fax Output Settings]
- [Output Settings]
- [System Settings]
- [Administrator Settings]
Select when to start printing received print/fax data.
| Settings | Description |
|---|---|
[Print] | Select when to start printing received print data.
[Page Print] is specified by default. |
[Fax] | Select when to start printing received fax data.
For Internet Fax, Batch Print is always selected. [Batch Print] is specified by default. |
Printer Adjustment[Utility]
To display:
- [Utility]
- [Administrator Settings]
- [System Settings]
- [Expert Adjustment]
- [Printer Adjustment]
- [Expert Adjustment]
- [System Settings]
- [Administrator Settings]
Adjust the print start position and defective print images.
| Settings | Description |
|---|---|
[Leading Edge Adjustment] | Adjust the print start position at the leading edge of the paper relative to the paper discharge direction. For details, refer to Here. |
[Centering] | Adjust the print start position on the left edge of the paper relative to the paper discharge direction. For details, refer to Here. |
[Leading Edge Adjustment (Duplex Side 2)] | Adjust the print start position at the leading edge of the back side of the paper relative to the paper discharge direction for printing the back side in 2-sided printing. For details, refer to Here. |
[Centering (Duplex 2nd Side)] | Adjust the print start position at the left edge of the paper relative to the paper discharge direction for printing the back side in 2-sided printing. For details, refer to Here. |
[Erase Leading Edge] | Adjust leading edge erase width. For details, contact your service representative. |
[Vertical Adjustment] | Adjust the feed direction zoom ratio of paper types. For details, contact your service representative. |
[Media Adjustment] | Adjust print defects (voids, white spots, roughness) that are caused by paper properties for each paper type. For details, refer to Here. |
Printer Information[Utility]
To display:
- [Utility]
- [Administrator Settings]
- [System Connection]
- [Printer Information]
- [System Connection]
- [Administrator Settings]
Register the name, installation location, and other information on this machine that the connected system is to be notified of.
The settings in [Printer Information] are linked to [Printer Information] found under [Utility] - [Administrator Settings] - [Network Settings] - [HTTP Server Settings].
This can be set if the Bluetooth interface is enabled.
Tips
- The Local Interface Kit EK-607 is required to use the Bluetooth function.
- The settings by the service representative are required to use the Bluetooth function. For details, contact your service representative.
Printer Settings[Utility]
To display:
- [Utility]
- [Administrator Settings]
- [Printer Settings]
- [Administrator Settings]
Specify the time-out time to limit a communication between this machine and a computer, or configure settings of a communication with the printer driver.
| Settings | Description |
|---|---|
[USB Timeout] | When this machine is connected via USB to the computer, change the communication timeout time if necessary. For details, refer to Here. |
[Network Timeout] | When this machine is connected via a network to the computer, change the communication timeout time if necessary. For details, refer to Here. |
[Print XPS/OOXML Errors] | Select whether to print error information when an error occurs during XPS/OOXML (docx, xlsx, pptx) file printing. For details, refer to Here. |
[Assign Account to Acquire Device Info] | Select whether to request the user to enter the password when the user obtains the information on this machine using a printer driver for Windows. For details, refer to Here. |
Printer Settings (DPWS Settings)[Utility]
To display:
- [Utility]
- [Administrator Settings]
- [Network Settings]
- [DPWS Settings]
- [Printer Settings]
- [DPWS Settings]
- [Network Settings]
- [Administrator Settings]
Configure settings to perform Web service printing.
| Settings | Description |
|---|---|
[ON]/[OFF] | Select whether to use the WS print function. [OFF] is specified by default. |
[Printer Name] | Enter the name of this machine when using it as the WS printer (using up to 63 characters). |
[Printer Location] | Enter a printer location if necessary (using up to 63 characters). |
[Printer Information] | Enter printer information if necessary (using up to 63 characters). |
Program List[Utility]
To display:
- [Utility]
- [Administrator Settings]
- [One-Touch/User Box Registration]
- [One-Touch/User Box Registration List]
- [Program List]
- [One-Touch/User Box Registration List]
- [One-Touch/User Box Registration]
- [Administrator Settings]
Print the list of programs registered on this machine.
| Settings | Description |
|---|---|
[List Output Number] | Specify the range of destinations you want to print.
|
[Print Destination List by Type] | Select the type of destinations you want to print. You can further narrow down destinations to be printed from the print range you specified in [List Output Number]. |
[Print] | Moves to a screen used to configure print settings. Change print settings as required, then tap [Start] to start printing. |
Prohibited Function Login Setting[Utility]
To display:
- [Utility]
- [Administrator Settings]
- [User Authentication/Account Track]
- [General Settings]
- [Prohibited Function Login Setting]
- [General Settings]
- [User Authentication/Account Track]
- [Administrator Settings]
Specify whether to request switching of the user by displaying the login screen when a public user attempts to use any restricted function.
For example, if color copy is restricted for public users, the Login screen appears when a public user attempts a color copy operation. In this case, the user can use the color copy function by logging in to this machine as another user authorized to perform color copy operations.
[Do Not Request] (not request) is specified by default.
Prohibited Functions When Authentication Error[Utility]
To display:
- [Utility]
- [Administrator Settings]
- [Security Settings]
- [Security Details]
- [Prohibited Functions When Authentication Error]
- [Security Details]
- [Security Settings]
- [Administrator Settings]
Define the severity of penalties applied if an incorrect password is entered during the authentication process.
| Settings | Description |
|---|---|
[Prohibited Functions When Auth. Error] | Select the severity of penalties applied if an incorrect password is entered during the authentication process.
[Mode 1] is specified by default. |
[Release] | Select an item to be released from Access Lock during authentication failure. |
[Release Time Settings] | If necessary, change the time that elapses before an access lock state in the Administrator Setting mode is canceled. If a predetermined time has elapsed after the machine was restarted, an access lock state is canceled. [5] minutes is specified by default. |
Protocol Setting[Utility]
To display:
- [Utility]
- [Administrator Settings]
- [Network Settings]
- [TCP/IP Settings]
- [IPsec Settings]
- [IPsec Settings]
- [Protocol Setting]
- [IPsec Settings]
- [IPsec Settings]
- [TCP/IP Settings]
- [Network Settings]
- [Administrator Settings]
Specify a protocol used for IPsec communication. Up to 10 protocols can be specified.
Select a group, then press [Edit].
| Settings | Description |
|---|---|
[ON]/[OFF] | To register protocol settings, select [ON]. [OFF] is specified by default. |
[Group Name] | Enter the protocol name (using up to 10 characters). |
[Protocol Identification Setting] | Select a protocol used for IPsec communication. [Do Not Set] is specified by default. |
[Port Specification Method] | If [TCP] or [UDP] has been selected in [Protocol Identification Setting], specify the port number used for IPsec communication. |
Tips
- To check the registered protocol settings, select a group name, then press [Mode Check].
Proxy Setting for Remote Access[Utility]
To display:
- [Utility]
- [Administrator Settings]
- [Network Settings]
- [WebDAV Settings]
- [Proxy Setting for Remote Access]
- [WebDAV Settings]
- [Network Settings]
- [Administrator Settings]
To use the remote diagnosis system via a proxy server, register the proxy server currently used.
| Settings | Description | |
|---|---|---|
[ON]/[OFF] | Select whether to use a proxy server when using the remote diagnosis system. [OFF] is specified by default. | |
[WebDAV Client Settings and Synchronization] | Select this option to use the proxy server registered in [WebDAV Client Settings] as a proxy server for remote diagnosis. [WebDAV Client Settings and Synchronization] is specified by default. | |
[Individual Settings] | Select this option to register a proxy server for remote diagnosis separately from the proxy server registered in [WebDAV Client Settings]. | |
[Proxy Server Address] | Enter the proxy server address. Use one of the following entry formats.
| |
[Proxy Server Port Number] | If necessary, change the proxy server port number. Normally, you can use the original port number. [8080] is specified by default. | |
[User Name] | Enter the user name to log in to the proxy server (using up to 63 characters). | |
[Password] | Enter the password of the user name you entered into [User Name] (using up to 63 characters). | |
PS Designer Settings[Utility]
To display:
- [Utility]
- [Administrator Settings]
- [System Settings]
- [Expert Adjustment]
- [PS Designer Settings]
- [Expert Adjustment]
- [System Settings]
- [Administrator Settings]
This option is available when [Simulation Profile] for the PS driver is set to [Auto].
Selecting [No] uses a simulation profile based on your processing to correct an entered image with the same density as when an image is output using the PCL driver.
Selecting [Yes] does not use a simulation profile to output CMYK data.
[No] is specified by default.
Public User Access[Utility]
To display:
- [Utility]
- [Administrator Settings]
- [User Authentication/Account Track]
- [General Settings]
- [Public User Access]
- [General Settings]
- [User Authentication/Account Track]
- [Administrator Settings]
Specify whether to permit users other than the registered in an environment where user authentication is employed. Any user who is going to use this machine without performing authentication operation is called a "public user".
When permitting public users to use this machine, select the login method.
| Settings | Description |
|---|---|
[Restrict] | Usage of this machine by public users is prohibited. [Restrict] is specified by default. |
[ON (With Login)] | Permits that public users use this machine. When a public user uses this machine, tap [Public User] on the Login screen to log in to this machine. |
[ON (Without Login)] | Permits that public users use this machine. A public user can use this machine without logging in to this machine. Using this option eliminates the login operations, providing advantages in an environment with a large number of public users. |
Public/Personal User Box[Utility]
To display:
- [Utility]
- [Administrator Settings]
- [One-Touch/User Box Registration]
- [Create User Box]
- [Public/Personal User Box]
- [New]
- [Public/Personal User Box]
- [Create User Box]
- [One-Touch/User Box Registration]
- [Administrator Settings]
Register a Public User Box. If user authentication or account track is installed on this machine, you can register Personal and Group User Boxes.
| Settings | Description |
|---|---|
[User Box No.] | Registration number of the User Box. [User Box No.] is automatically registered from a lower number that is not used. When specifying a number, tap [User Box No.], and enter the value between 1 and 999999999. |
[User Box Name] | Enter the User Box name that appears on the Touch Panel (using up to 20 characters). Assign a name that helps you easily identify the User Box. |
[Password] | To use a password to restrict usage of the User Box, enter the password (using up to 64 characters). |
[Index] | Select a corresponding character so that a User Box can be index-searched with [User Box Name].
|
[Type] | Select [Public], [Personal], or [Group] depending on User Authentication or Account Track settings.
|
[Auto Document Delete Time] | Specify the period from the date/time when a file was saved in, last printed, or sent form a User Box to the date/time when it is to be deleted automatically.
[1 day] is selected by default. |
[Confidential RX] | This item is available when the Fax Kit is installed. Select whether to add the confidential RX function to the User Box. To add the confidential RX function, tap [Confidential Rx] and enter the password for confidential fax reception (using up to eight characters). Enter the password twice for confirmation. The entered password is required for sending a fax using Confidential RX to this machine. Inform the sender of the password you entered here. |
Tips
- To change the User Box settings you have registered, select the User Box name and tap [Edit].
- To delete an existing User Box, select the User Box name and tap [Delete].
- To delete all User Boxes that have no files, tap [Delete Empty User Box(es)].
Punch Edge Sensor Adjustment[Utility]
To display:
- [Utility]
- [Administrator Settings]
- [System Settings]
- [Expert Adjustment]
- [Finisher Adjustment]
- [Punch Edge Sensor Adjustment]
- [Finisher Adjustment]
- [Expert Adjustment]
- [System Settings]
- [Administrator Settings]
Use this option to adjust the sensor of the Punch function to detect the edge of the paper.
Press Start to start adjustment.
Tips
- This adjustment is possible when the Finisher FS-535 and Punch Kit PK-521 are installed in ineo+ 554.
Punch Horizontal Position Adjustment[Utility]
To display:
- [Utility]
- [Administrator Settings]
- [System Settings]
- [Expert Adjustment]
- [Finisher Adjustment]
- [Punch Horizontal Position Adjustment]
- [Finisher Adjustment]
- [Expert Adjustment]
- [System Settings]
- [Administrator Settings]
If the positions of the punch holes on the paper are displaced sideways, use this option to adjust the punch hole positions.
Copy after configuration, then repeat adjustments as required.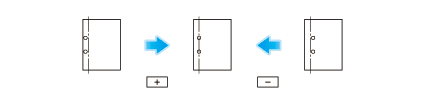
In ineo+ 554: This adjustment is possible when the Finisher FS-535 and Punch Kit PK-521 are installed.
| Settings | Description |
|---|---|
[Finisher]/[Post Inserter] | Select the position subject to punch hole position adjustment.
|
[Adjust Value] | Enter an adjustment value between -5.0 and 5.0 mm by tapping [-] and [+].
[0.0 mm] is specified by default. |
This adjustment is possible when the Finisher FS-534 and Punch Kit PK-520 are installed.
| Settings | Description |
|---|---|
[Paper Type] | Select the type of paper subject to punch hole position adjustment. |
[Adjust Value] | Enter an adjustment value between -10 and 10 by tapping [-] and [+].
[0] is specified by default. |
Tips
- Make adjustment while checking a sheet of paper having punched holes that are not in the correct po-sitions.
Punch Regist Loop Size Adjustment[Utility]
To display:
- [Utility]
- [Administrator Settings]
- [System Settings]
- [Expert Adjustment]
- [Finisher Adjustment]
- [Punch Regist Loop Size Adjustment]
- [Finisher Adjustment]
- [Expert Adjustment]
- [System Settings]
- [Administrator Settings]
If the positions of the punch holes on the paper are not in parallel with the paper edge, use this option to correct the obliquity of the paper to make them parallel.
In ineo+ 554: This adjustment is possible when the Finisher FS-535 is installed.
| Settings | Description |
|---|---|
[Finisher]/[Finisher (Z-Fold)]/[Post Inserter Feeder Upper Tray]/[Post Inserter Feeder Lower Tray] | Select the position subject to paper inclination adjustment.
|
[Paper Type] | Select the type of paper that is used to adjust the inclination. |
[Adjust Value] | Enter an adjustment value by tapping [-] and [+].
The available adjustment value is between -5.0 mm and 5.0 mm (other than [Finisher (Z-Fold)]) or between -16.0 mm and 16.0 mm ([Finisher (Z-Fold)]). [0.0 mm] is specified by default. |
This adjustment is possible when the Finisher FS-534 and Punch Kit PK-520, or the Finisher FS-533 and Punch Kit PK-519 are installed.
| Settings | Description |
|---|---|
[Paper Type] | Select the type of paper that is used to adjust the inclination. |
[Adjust Value] | Enter an adjustment value between -4 and 4 by tapping [-] and [+].
[0] is specified by default. |
Tips
- Make adjustment while checking paper punched at a displaced position.
Punch Unit Size Detect Sensor[Utility]
To display:
- [Utility]
- [Administrator Settings]
- [System Settings]
- [Expert Adjustment]
- [Finisher Adjustment]
- [Punch Unit Size Detect Sensor]
- [Finisher Adjustment]
- [Expert Adjustment]
- [System Settings]
- [Administrator Settings]
Use this option to adjust the sensor of the Punch function to detect the edge of the paper.
Press Start to start adjustment.
Tips
- This adjustment is possible when the Finisher FS-535 and Z Folding Unit ZU-606 are installed in ineo+ 554.
Punch Vertical Position Adjustment[Utility]
To display:
- [Utility]
- [Administrator Settings]
- [System Settings]
- [Expert Adjustment]
- [Finisher Adjustment]
- [Punch Vertical Position Adjustment]
- [Finisher Adjustment]
- [Expert Adjustment]
- [System Settings]
- [Administrator Settings]
If the positions of the punch holes on the paper are displaced vertically, use this option to adjust the punch hole positions.
Copy after configuration, then repeat adjustments as required.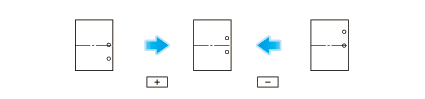
| Settings | Description |
|---|---|
[Paper Size] | Select the size of paper subject to punch hole position adjustment. |
[Adjust Value] | Enter an adjustment value between -5.0 and 5.0 mm by tapping [-] and [+].
[0.0 mm] is specified by default. |
Tips
- This adjustment is possible when the Finisher FS-535 and Punch Kit PK-521 are installed in ineo+ 554.
- Make adjustments while checking paper punched at a displaced position.
- The value you set by selecting [All] in [Paper Size] will be added to the setting for each paper size.