
Adjusting Printing Troubles (For Administrators)
To adjust the level to highlight the original background ([AE Level Adjustment])
To display:
- [Utility]
- [Administrator Settings]
- [System Settings]
- [Expert Adjustment]
- [AE Level Adjustment]
- [Expert Adjustment]
- [System Settings]
- [Administrator Settings]
Adjust the AE (Auto Exposure) level.
Tap [Higher] or [Lower] to adjust the automatic exposure to one of the five levels. The larger the number, the darker the background.
[2] is specified by default.
To adjust the print starting position or print image troubles ([Printer Adjustment])
To display:
- [Utility]
- [Administrator Settings]
- [System Settings]
- [Expert Adjustment]
- [Printer Adjustment]
- [Expert Adjustment]
- [System Settings]
- [Administrator Settings]
Adjust the print start position and defective print images.
Settings | Description |
|---|---|
[Leading Edge Adjustment] | Adjust the print start position at the leading edge of the paper relative to the paper discharge direction. For details, refer to Here. |
[Centering] | Adjust the print start position on the left edge of the paper relative to the paper discharge direction. For details, refer to Here. |
[Leading Edge Adjustment (Duplex Side 2)] | Adjust the print start position at the leading edge of the back side of the paper relative to the paper discharge direction for printing the back side in 2-sided printing. For details, refer to Here. |
[Centering (Duplex 2nd Side)] | Adjust the print start position at the left edge of the paper relative to the paper discharge direction for printing the back side in 2-sided printing. For details, refer to Here. |
[Erase Leading Edge] | Adjust leading edge erase width. For details, contact your service representative. |
[Vertical Adjustment] | Adjust the feed direction zoom ratio. For details, contact your service representative. |
[Media Adjustment] | Adjust print defects (voids, white spots, roughness) that are caused by paper properties for each paper type. For details, refer to Here. |
To adjust a finisher output failure ([Finisher Adjustment])
To display:
- [Utility]
- [Administrator Settings]
- [System Settings]
- [Expert Adjustment]
- [Finisher Adjustment]
- [Expert Adjustment]
- [System Settings]
- [Administrator Settings]
Adjust a failure that occurs while outputting sheets to the Finisher.
Settings | Description |
|---|---|
[Paper Curl Adjustment] | Correct paper curls to smoothly output paper to the Processing Tray. For details, refer to Here. |

This function is only available in ineo+ 3851FS.
To correct the misalignment or tilt of a scanning area in order to stabilize high-quality printing ([Image Stabilization])
To display:
- [Utility]
- [Administrator Settings]
- [System Settings]
- [Expert Adjustment]
- [Image Stabilization]
- [Expert Adjustment]
- [System Settings]
- [Administrator Settings]
Correct the misalignment or tilt of scanning area caused by changes in the temperature or humidity in the machine to ensure high quality printing.
Settings | Description |
|---|---|
[Image Stabilization Only] | Adjusts the displacement or inclination of the scanning section. Select a method for image stabilization and then press the Start key to execute image stabilization.
[Image Stabilization Only] is specified by default. |
[Image Stabilization Setting] | Change the timing for executing image stabilization as well as the type of image stabilization, as required. Make selection according to the printing frequency and the color/black use ratio.
[Standard] is specified by default. |
To adjust the balance of the paper separation or image transfer performance when a paper jam or image failure occurs during double-sided printing ([Paper Separation Adjustment])
To display:
- [Utility]
- [Administrator Settings]
- [System Settings]
- [Expert Adjustment]
- [Paper Separation Adjustment]
- [Expert Adjustment]
- [System Settings]
- [Administrator Settings]
Adjust the paper separation position on each side of paper for 2-sided printing.
Adjust balance between the properties related to paper separation and image transfer when paper jams are occurring or images are defective due to the environment being overly hot or humid.
Settings | Description |
|---|---|
[Front]/[Back] | Select the paper and side on which to adjust the paper separation. |
[Adjust Value] | Enter an adjustment value between -10.0 and 10.0 mm by tapping [-] and [+]. Increase the value if paper jams are occurring, and decrease it if the image is transferred unevenly. [0.0 mm] is specified by default. |
To adjust a color misalignment caused as the printing result ([Color Registration Adjust])
To display:
- [Utility]
- [Administrator Settings]
- [System Settings]
- [Expert Adjustment]
- [Color Registration Adjust]
- [Expert Adjustment]
- [System Settings]
- [Administrator Settings]
Adjust the print position for each paper type with respect to each color if color shifts are detected in the print result.
Load paper into the Bypass Tray and press the Start key to start printing the test pattern. Make adjustments while checking the test pattern. Repeat adjustments as necessary.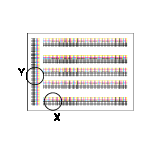
The example shows the color registration adjustment for cyan.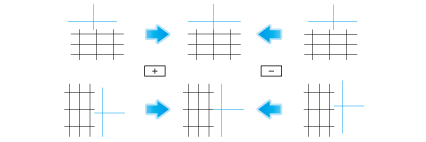
Settings | Description |
|---|---|
[X] | If the print position of the desired color is out of line to the left or right with respect to the printing position of black, tap [-] and [+] to enter an adjustment value in the range between -6 dots and +6 dots.
[0 dot] is specified by default. |
[Y] | If the print position of the desired color is out of line vertically with respect to the printing position of black, tap [-] and [+] to enter an adjustment value in the range between -6 dots and +6 dots.
[0 dot] is specified by default. |
To adjust to the regular gradation ([Gradation Adjustment])
To display:
- [Utility]
- [Administrator Settings]
- [System Settings]
- [Expert Adjustment]
- [Gradation Adjustment]
- [Expert Adjustment]
- [System Settings]
- [Administrator Settings]
Restart this machine.
Check that [Image Stabilization Only] is selected in [Expert Adjustment] - [Gradation Adjustment] and then press the Start key.
The image stabilization operation starts. Now adjustment items on the right are available for selection.
Select items to be adjusted.
[Printer (600dpi)]: Select this option when the image printed with resolution 600dpi has irregular gradation.
[Print (1200dpi) Gradation]: Select this option when the image printed with resolution 1200dpi has irregular gradation. The gradation is corrected preferentially.
[Print (1200dpi) Resolution]: Select this option when the image printed with resolution 1200dpi has irregular gradation. The resolution is corrected preferentially.
[Copy]: Select this option when a copied image has irregular gradation.
Select a paper type for printing a test pattern.
Bypass Tray cannot be selected.
Press the Start key.
A test pattern is printed.
Place the test pattern on the Original Glass in the orientation indicated on the Touch Panel.
Place ten or more blank sheets of paper to prevent bleeding of the test pattern.
Close the ADF.
Press the Start key.
The test pattern is scanned and the gradation level is automatically adjusted.
Repeat steps 3 to 9 twice. (Total of three times)
To adjust the area to scan an original on the original glass ([Scanner Area])
To display:
- [Utility]
- [Administrator Settings]
- [System Settings]
- [Expert Adjustment]
- [Scanner Area]
- [Expert Adjustment]
- [System Settings]
- [Administrator Settings]
Adjust the scan range of the scanner. For details, contact your service representative.
To adjust the area to scan an original on the ADF ([ADF Adjustment])
To display:
- [Utility]
- [Administrator Settings]
- [System Settings]
- [Expert Adjustment]
- [ADF Adjustment]
- [Expert Adjustment]
- [System Settings]
- [Administrator Settings]
Make adjustments for scanning images in the ADF. For details, contact your service representative.
To register unregistered special paper as user paper ([User Paper Settings])
To display:
- [Utility]
- [Administrator Settings]
- [System Settings]
- [Expert Adjustment]
- [User Paper Settings]
- [Expert Adjustment]
- [System Settings]
- [Administrator Settings]
Register special paper with [User Paper 1] through [User Paper 5]. Configure setting for the basic weight and media adjustment.
For details, contact your service representative.
To specify how to erase the area other than the original when enabling [Non-Image Area Erase] for copying ([Erase Adjustment])
To display:
- [Utility]
- [Administrator Settings]
- [System Settings]
- [Expert Adjustment]
- [Erase Adjustment]
- [Expert Adjustment]
- [System Settings]
- [Administrator Settings]
Specify the operation and erase method when erasing the area outside the original by setting [Non-Image Area Erase].
Settings | Description | |
|---|---|---|
[Non-Image Area Erase Operation Settings] | Specify how to erase the area outside the original when making copies with [Non-Image Area Erase] set to [ON]. | |
[Erase Operation] | Select either the option for erasing the non-image area by the optimal method automatically selected for the background density of the original or the option for erasing by the pre-specified method. [Specify] is specified by default. | |
[Erase Method] | Select an erase method after selecting [Specify] for [Erase Operation].
[Rectangular] is specified by default. | |
[Original Density] | Adjust the density of the original. | |
To directly print CMYK data without using a simulation profile when printing data using the PS driver ([PS Designer Settings])
To display:
- [Utility]
- [Administrator Settings]
- [System Settings]
- [Expert Adjustment]
- [PS Designer Settings]
- [Expert Adjustment]
- [System Settings]
- [Administrator Settings]
This option is available when [Simulation Profile] for the PS driver is set to [Auto].
Selecting [No] uses a simulation profile based on your processing to correct an entered image with the same density as when an image is output using the PCL driver.
Selecting [Yes] does not use a simulation profile to output CMYK data.
[No] is specified by default.

You can specify the default setting for a simulation profile to be displayed on the printer driver. For details on how to configure the settings, refer to Here.
To disconnect the finisher on which a failure occurs ([Isolation])
To display:
- [Utility]
- [Administrator Settings]
- [System Settings]
- [Expert Adjustment]
- [Isolation]
- [Expert Adjustment]
- [System Settings]
- [Administrator Settings]
When a use of the device cannot be continued due to a failure that occurs in the Finisher, temporarily disconnect the Finisher to continue using the device.
[OFF] is specified by default.
This function is only available in ineo+ 3851FS.