
Basic
You can specify the basic print function such as the paper size, paper type and output method.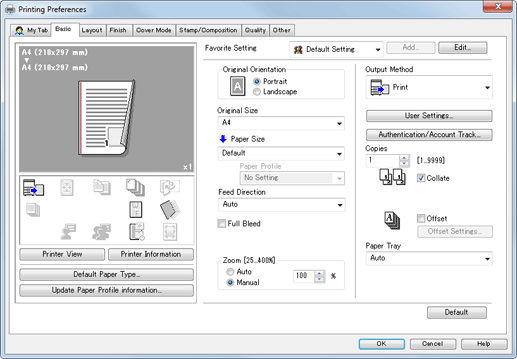
Function | Option | Description | |
|---|---|---|---|
[Default Paper Type] | [Paper Type] | No Setting | |
Plain Paper | |||
Fine | Select this to use non-coated paper used mainly on offset printing. | ||
Book/News | Select this to use paper such as book or newspaper. | ||
Embossed | Select this to use rough-textured paper. | ||
Blank Insert | Select this to insert paper such as Tab paper. | ||
[Paper Weight] | [No Setting], (When the weight unit is [g/m2]) | Set weight of output paper. You can not use [301-350 g/m2] when the Paper Source Unit is not specified in the [Configure] tab. | |
[Paper Color] | [No Setting], [White], [Blue], [Goldenrod], [Gray], [Green], [Ivory], [Orange], [Pink], [Red], [Yellow], [Cream], [Clear], [Others], [User Color] | Specify color of print paper. | |
[Color Name] | - | Specify the user color name. | |
[Pre-Punched] | [Off], [On] | Select this check box to print on pre-punched paper. | |
[Unit for Paper Weight] | [g/m2], [Duodecimo], [A-Book], [B-Book], [Octavo], [Bond], [Book], [Bristol], [Cover], [Index], [Tag] | Set a unit of weight. | |
[Update Paper Profile Information] | Communicates with the machine and updates the paper profile information registered in the device when you click the [Acquire Device Information] in the [Update Paper Profile Information]. | ||
[Original Orientation] | [Portrait], [Landscape] | Set the orientation for the original. | |
[Original Size] | The paper sizes registered as the standard paper sizes and custom sizes | Select the paper size of the original. | |
[Custom Size] | Set a custom paper size. | ||
[Paper Size] | The available paper sizes registered as the standard paper sizes and custom sizes | Set a paper size to print. When the original size is different size and the [Auto] is specified as Zoom, enlarges or reduces according to the paper size. | |
[Custom Size] | You can register the custom paper sizes. | ||
[Feed Direction] | [Auto], [Long Edge], [Short Edge] | Select the direction to feed paper in the tray. | |
[Full bleed] | Off, On | Print in the original image without blank borders. This option is available when the paper size is larger than the original size of 5 mm / 0.20'' or more in terms of both width and height. | |
[Zoom] | [Auto], [Optional] (25 to 400%) | Select an enlarge or reduce ratio. | |
[Output Method] | [Print] | When the [Print] is selected, the print job is printed without it being stored in a hard disk. | |
[Secure Print] | When the [Secure Print] is selected, you cannot output until you input the Secure Print ID and password on the touch panel on this machine. Select this to print a confidential documents for protection. For details about Secure Print, refer to Secure Print. | ||
[Proof Print] | When the [Proof Print] is selected, you can print one copy to check the output. Select this option when you print a large volume document for sample printing, such as multiple sets of pages to prevent misprints. | ||
[Proof and Print (1st sheet)] | When the [Proof and Print (1st sheet)] is selected, you can print the first page to check the output. Select this option when you print a large volume document for sample printing, such as a large number of sheets to prevent misprints. | ||
[Wait Mode] | When [Wait Mode] is selected, you can pause the printing job to checks current setting from the touch panel on this machine. | ||
[Spool] | When [Spool] is selected, the print job is saved in the HDD in the machine temporarily, and then printed. [Spool] can prevent the intermittent printing that may be observed when printing jobs with a lot of pictures, etc. | ||
[Save in User Box] | When [Save in User Box] is selected, the print job is saved on the HDD. | ||
[Save in User Box/Print] | When [Save in User Box/Print] is selected, the print job is saved on the HDD, and [Print] is carried out simultaneously. | ||
[Save in User Box/Print (Proof)] | When [Save in User Box/Print (Proof)] is selected, the print job is saved on the HDD, and [Proof Print] is carried out simultaneously. | ||
[Save in User Box/Print (Proof / 1st Sheet)] | When [Save in User Box/Print (Proof / 1st Sheet)] is selected, the print job is saved on the HDD, and [Proof Print (1st Sheet)] is carried out simultaneously. | ||
[Save in User Box/Print (Wait)] | When [Save in User Box/Print (Wait)] is selected, the print job is saved on the HDD, and [Wait] is carried out simultaneously. | ||
[Save to Hard Drive] | When [Hold] is selected, the print job is held. | ||
[Save to Hard Drive/Print] | The print job is held, and [Print] is carried out simultaneously. | ||
[Save to Hard Drive/Print(Proof)] | The print job is held, and [Proof Print] is carried out simultaneously. | ||
[Save to Hard Drive/Print (Proof / 1st Sheet)] | The print job is held, and [Proof and Print (1st Sheet)] is carried out simultaneously. | ||
[Save to Hard Drive/Print (Wait)] | The print job is held, and [Wait] is carried out simultaneously. | ||
[User Settings] | - | Specify the Secure Print ID and password for [Secure Print], and also specify the User Box name, folder name, and folder password for [Save in User Box]. To enable a change in the print job name, select the [Display file name entry dialog box when printing] check box. | |
[Authentication/Account Track] | - | Specify the user name and password when the [User Authentication] is enabled in this machine and the account name and password when the [Account Track] is enabled in the machine. For details, refer to Printing Method When Using User Authentication / Account Track. | |
[Copies] | 1 to 9999 | You can specify the number of copies. | |
[Collate] | Off, On | Set this to collate pages sequentially when printing multiple sets of copies. | |
[Offset] | Off, On | You can stagger the output slightly by one copy when you output multiple copies. | |
[Offset Settings] | - | Configures offset settings by copy or by sheet depending on sort settings. For details, refer to "Offset Settings" shown below. | |
[Paper Tray] | [Auto], [Tray 1], [Tray 2], [Tray 3], [Tray 4], [Tray 5], [Bypass Tray], [PI Tray 1], [PI Tray 2] | Select a paper tray to be used. Selectable items vary depending on the mounted optional device. | |

The custom paper size can be set on [Custom Size] within the following range:
Width: 95.0 to 324.0 mm / 3.74'' to 12.76'', Height: 139.0 to 483.0 mm / 5.47'' to 19.02''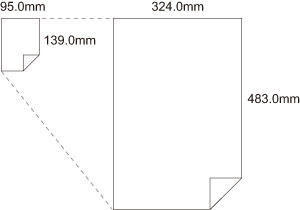
Offset Settings
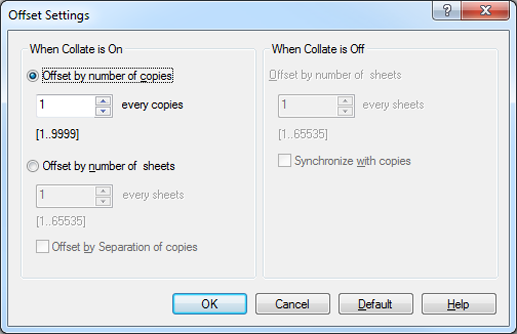
When Sort is On:
Function | Option | Description |
|---|---|---|
[Offset by number of copies] | 1 - 9999 | Offsets by copy. |
[Offset by number of sheets] | 1 - 65535 | Offsets by sheet. |
[Offset by number of sheets] - | Off, On | Specify whether to offset by sheet at a set separator. |
When Sort is Off:
Function | Option | Description |
|---|---|---|
[Offset by number of sheets] | 1 - 65535 | Offsets by sheet. |
[Synchronize with Copies] | Off, On | Specify whether to synchronize with the number of copies. |