Viewing the Operation Conditions and Settings of this Machine
Settings Anyone can Change
To check the IP address or function version of this machine ([Device Information])
To display:
- [Utility]
- [Device Information]
Tap this button to display the function version, IP address (IPv4/IPv6), serial number, contact information (telephone), contact information (fax), or version information of this machine.
If [QR Code Setting] is set to [Display], the QR code can be displayed. For details on [QR Code Setting], refer to Here.
To check the consumable life ([Check Consumable Life])
To display:
- [Utility]
- [Check Consumable Life]
Tap this button to check the status of consumables (consumption level) in this machine. When necessary, print the status of consumables in list form.
To check the counter information or eco information (economy level) of this machine ([Meter Count])
Checking counters
The counter indicates the total number of pages printed on this machine on a function or color basis. Check counter information on the Control Panel of this machine. When necessary, counter information can be printed in list form.
The counter also allows you to check the ratio of color print jobs to all print jobs, the ratio of paper saving as a result of two-sided printing or the page combine function, a transition of power consumption (Eco Info), and other values, depending on user's operation conditions. This information will help you gain an understanding of the usage status of this machine.
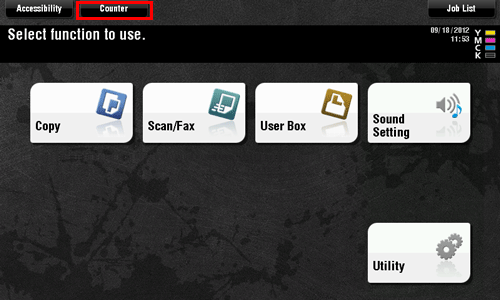
Tap [Counter].

Check the total number of pages printed after the count starting date.
To print the counter list, tap [Print List], select paper, and then press the Start key.
Tapping [Eco Info] allows you to check the ratio of color print jobs to all print jobs, and the ratio of paper saving as a result two-sided printing or the page combine function, and a transition of power consumption.
Counter information of this machine can be sent to a specified E-mail address. Arrange a notification schedule, for example, weekly or monthly, around your system environment. How to configure the setting is explained using Web Connection. For details, refer to Here.
To check the active jobs on this machine or the job history ([Job List])
Viewing Current Job or Job History
Displaying the Job screen
A job refers to an individual operation unit such as printing, sending, receiving, or saving.
Tap [Job List] on the main menu or on the main screen of each mode to view current job or job history, or to print a sending-receiving result report.
When User Authentication or Account Track is enabled on this machine, the name of the current login user or account track is displayed in the message field on the top section.
Viewing Current Jobs
Tap [Active] to display current or standby jobs on this machine. As necessary, you can reorder print jobs or delete a standby job.
Item | Description |
|---|---|
[Communication Type/Line] | Used to filter jobs to be displayed in the list based on the following conditions.
|
[Select Job Ty] | Used to filter jobs to be displayed in the list based on the job type such as a print job or send job. |
[Delete] | Tap this button to delete a job selected in the list. |
[Increase Priority] (Print Job) | Tap this button to change the printing priority when print jobs are queued. Select a job to be printed first in the list of queued print jobs, then tap [Start].
|
[Release Held Jobs] (Print Job) | Tap this button to configure the proof print function and display a list of executed print jobs using the printer driver. When printing, select a desired print job, then tap [Start]. If necessary, you can change print settings or delete a job.
|
[Redial] | Tap this button to manually send a redial waiting fax you select from the list. A redial waiting fax is sent automatically by the auto redial function after the specified time lapsed; however, you can manually start sending without waiting for automatic sending. |
[Settings] | Tap this button to view the setting of a job selected in the list. |
[Forward] | Tap this button to forward a fax received by the in-memory proxy reception function to another destination. Select a destination in the address book or directly enter it, then tap [Start].
|
[Details..] | Tap this button to view detailed information of a job selected in the list. |
[Warning Display] | Displays the warning screen for an error when you select a job in which the error occurs. |
Viewing the job history
Tap [Log] to display a list of jobs processed on this machine up till then. You can check a job that could not be ended due to an error.
Item | Description |
|---|---|
[Communication Type/Line] | Used to filter jobs to be displayed in the list based on the following conditions.
|
[Select Job Ty] | Used to filter jobs to be displayed in the list based on the job type such as a print job or send job. Jobs can be further filtered in combination with [Limitation Filter]. |
[Limitation Filter] | Used to filter jobs to be displayed in the list based on the selected conditions.
|
[Details..] | Tap this button to view detailed information of a job selected in the list. |
If user authentication is installed on this machine, change the authentication method and clear all management data; the job history is deleted.
Printing a communication report
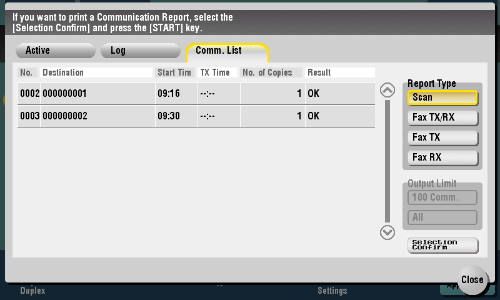
Tap [Comm. List] to print a fax report that contains the results of Scan, Fax TX, Fax RX, and fax communication (TX/RX) jobs. For a fax report, you can specify the number of destinations.
To print a fax report, select a target for [Report Type], tap [Selection Confirm], then press the Start key.

Settings only the Administrators can Change
To print a list of user settings or administrator settings of this machine ([Management List])
To display:
- [Utility]
- [Administrator Settings]
- [System Settings]
- [List/Counter]
- [Management List]
- [List/Counter]
- [System Settings]
- [Administrator Settings]
Prints a list of job settings on this machine.
Settings | Description |
|---|---|
[Job Settings List] | Prints a list of settings for [User Settings] and [Administrator Settings] among others. Change print settings as required, then tap [Start] to start printing. |
To count the usage by paper type or size ([Paper Size/Type Counter])
To display:
- [Utility]
- [Administrator Settings]
- [System Settings]
- [List/Counter]
- [Paper Size/Type Counter]
- [List/Counter]
- [System Settings]
- [Administrator Settings]
Register a combination of paper size and paper type to manage counting of used sheets.
Tap the number to register and then tap [Paper Size] to select the paper size subject to counting. To combine paper types, tap [Paper Type] to select paper types to combine. If you do not specify paper types, select [No Selection].
Tap [Counter Clear] to clear the selected counter.
If you change a combination of paper size and paper type, the counter is reset.
To check the MAC address of this machine or specify the speed of the connected network ([Device Setting])
To display:
- [Utility]
- [Administrator Settings]
- [Network Settings]
- [Detail Settings]
- [Device Setting]
- [Detail Settings]
- [Network Settings]
- [Administrator Settings]
Check the MAC address of this machine, enable or disable LLTD (Link Layer Topology Discovery), and specify the network speed.
Settings | Description |
|---|---|
[MAC Address] | Displays the MAC address of this machine. |
[LLTD Setting] | Select whether to use LLTD (Link Layer Topology Discovery). Using LLTD allows you to display this machine on the network map if your computer is equipped with Windows Vista or later (Windows Vista/7/8/8.1/Server 2008/Server 2008 R2/Server 2012/Server 2012 R2). [Enable] is specified by default. |
[Network Speed] | Select the network speed according to your environment. The default is [Auto (10M/100M/1Gbps)]. |
To register a destination where to notify the time to replace consumables on this machine or warning information ([Status Notification Setting])
To display:
- [Utility]
- [Administrator Settings]
- [Network Settings]
- [Detail Settings]
- [Status Notification Setting]
- [Detail Settings]
- [Network Settings]
- [Administrator Settings]
Configure the setting for notifying to the registered E-mail address when a warning such as for toner replacement or a paper jam occurs on this machine.
Settings | Description | |
|---|---|---|
[Register Notification Address] | Register an address where to notify a warning that occurred on this machine. | |
[IP Address 1] to [IP Address 5] | Select this item when specifying a notification destination with an IP address or host name.
| |
[IPX Address] | Select this item when specifying a notification destination with an IPX address.
| |
[E-mail 1] to [E-mail 10] | Select this item when specifying a notification destination with an E-mail address.
| |
To register a destination where to notify the counter information of this machine or a notification schedule ([Total Counter Notification Settings])
To display:
- [Utility]
- [Administrator Settings]
- [Network Settings]
- [Detail Settings]
- [Total Counter Notification Settings]
- [Detail Settings]
- [Network Settings]
- [Administrator Settings]
Configure the setting for sending counter information managed by this machine to a registered E-mail address.
Settings | Description |
|---|---|
[Notification Schedule Setting] | Specify the notification schedule by [Daily], [Weekly], or [Monthly]. Up to two schedules can be registered. You can use different schedules for different purposes. |
[Notification Address Setting] | Register notification addresses. Also, select a notification schedule to be applied.
|
[Model Name] | Enter a model name to be included in the notification mail message (using up to 20 characters). Assign a name that helps you easily identify the device. |
[Send Now] | Send counter information to the registered E-mail address. |
To allow users to send the usage frequency or configuration information of this machine ([Fax Activity Summary Information])
To display:
- [Utility]
- [Administrator Settings]
- [System Settings]
- [List/Counter]
- [Fax Activity Summary Information]
- [List/Counter]
- [System Settings]
- [Administrator Settings]
Specify whether to permit sending of information on the use frequency of the machine and function settings to our company.
The information about this machine will be used by us to improve service and functions in future.
[Restrict] is specified by default.


