
Receiving a Fax
Viewing a Received Fax before Printing
To forcibly save a received fax in a User Box (Memory RX)
Forcibly Saving a Received Fax in a User Box (Memory RX)
Memory RX
Memory RX is a function to save a received fax to Memory RX User Box of this machine.
You can check the contents of incoming faxes and print only those you need to print, by which you can reduce the printing cost. This prevents fax data from being stolen or lost after being printed. Because the security is enhanced, you can handle important fax data securely.
If necessary, you can manually forward a required fax. This is convenient for forwarding a fax to a different destination every time depending on the contents of a received fax.


The Memory RX function cannot be used together with the following functions.
Forward TX, PC-Fax RX, TSI Routing
Preparation required to use this function (for the administrator)
Enable the Memory RX function. In addition, specify the password for restricting access to Memory RX User Box.
For details on the setting procedure, refer to Here.
Printing a received fax
To print a fax saved in the Memory RX User Box, browse data in the Memory RX User Box.
For details on the printing procedure, refer to Here.
Forwarding a received fax
To forward a fax saved in the Memory RX User Box, browse data in the Memory RX User Box.
For details on the transmission procedure, refer to Here.
To save a received fax to the specified User Box (PC-Fax RX)
Saving a Received Fax to a Specified User Box (PC-Fax RX)
PC-Fax RX
PC-Fax RX is a function that automatically saves a received fax to the Compulsory Memory RX User Box or the User Box specified in F-Code (SUB Address).
A saved fax job can be read from the User Box and into a computer.

This function cannot be used together with the following functions.
Memory RX, Forward TX, TSI RoutingConfidential faxes and those faxes for which relaying is requested are saved in the Confidential or Relay User Box.
When Specified User Box is designated as the receiving User Box destination, faxes with no User Box specified in F-Code are saved in the Memory RX User Box.
When the Memory RX User Box is specified as the receiving User Box destination, faxes with a User Box specified in F-Code result in a communication failure.
Preparation required to use this function (for the administrator)
Enable PC-Fax RX. In conjunction with this, specify a User Box for saving incoming faxes.
For details on the setting procedure, refer to Here.
To perform password check on the Specified User Box designated as the receiving User Box destination, specify a communication password instead of a password for the User Box. The communication password can be used commonly for a number of User Boxes used for PC-FAX RX.
Printing a received fax or importing it to a computer
To print a fax saved in a User Box by PC-Fax RX or import it as data to a computer, browse data in that User Box.
For details on how to print faxes from the Public, Personal, or Group User Box, refer to Here.
Using Web Connection allows you to download faxes saved in the Public, Personal, or Group User Box to a computer. For details on the download procedure, refer to Here.
For details on how to print files from the Memory RX User Box, refer to Here.
Managing Received Faxes
To add receipt information such as the receiving date and time
Printing by Adding the Date and Time Received ([Footer Position])
Reception information
Reception information contains the date and time of fax reception, the number assigned according to the order of reception (reception number), and page number.
Reception information is added as necessary when a document is printed.

Preparation required to use this function (for the administrator)
To enable printing of the reception information, select the location where to print the reception information.
For details on the setting procedure, refer to Here.
To convert the received fax to a file to forward it to the specified destination for management (Forward TX)
Forwarding Received Faxes to Another Destination (Forward TX)
Forward TX
Forward TX transfers a received fax to a pre-specified destination.
Faxes can be forwarded to personal E-mail addresses or saved in a shared folder in a computer. Received faxes can be converted to files that can be handled by a computer, which saves printing costs.

If the forwarding destination is not a fax address, the received fax can be converted in the specified file format to be forwarded to a destination. The file types able to be specified are PDF, XPS, and TIFF.
To specify other file types, ask your service representative to configure settings. For details, contact your service representative.This function cannot be used together with the following functions.
Memory RX, PC-Fax RX, TSI Routing
Preparation required to use this function (for the administrator)
Enable the Forward TX function. In conjunction with this, register forwarding destinations for received faxes.
To specify a destination, directly enter the fax number, or select the desired number of destinations registered on this machine. When selecting the desired number of destinations registered on this machine, you can specify the following forward destinations.
Fax
E-Mail Address
SMB
FTP
WebDAV
User Box
Internet Fax
IP Address Fax
IP Fax (SIP)
Group
For details on the setting procedure, refer to Here.
To convert received faxes to files and sorting them by fax number to be managed (TSI Routing)
Automatically Sorting Incoming Faxes (TSI Routing)
TSI Routing
TSI (Transmitting Subscriber Identification) Routing is a function that automatically sorts incoming faxes into preset User Boxes or redirects them to shared folders in computers or E-mail addresses based on the fax numbers of the senders. There is no need to sort printed faxes for each recipient and no risk of missing a fax. To use the TSI Routing function, it is necessary to preset User Boxes to which faxes are to be sorted, as well as forwarding destinations. Routing destinations can be registered for up to 256 fax numbers (TSIs).

A file is sent to routing destinations in the default file type specified by the transmission method. If an option is installed, you can specify the file type for each routing destination. For details on the required option, refer to Here.
By default, a received fax is printed without being forwarded if it was not successfully distributed.
This function cannot be used together with the following functions.
Memory RX, Forward TX, PC-Fax RX
Preparation required to use this function (for the administrator)
Enabling the TSI Routing function. Also, register fax numbers (TSIs) of senders targeted for forwarding, forwarding destinations, and file type. You can specify the following forwarding destinations.
Fax
E-Mail Address
SMB
FTP
WebDAV
User Box
Internet Fax
IP Address Fax
IP Fax (SIP)
Group
For details on the setting procedure, refer to Here.
To temporarily save a fax in memory or forward a fax when it cannot be printed immediately (In-memory Proxy Reception)
Saving/Forwarding a Fax Which Cannot Be Printed (In-memory Proxy Reception)
In-memory proxy reception
When the machine cannot print a received fax due to paper jam or exhaustion of consumables, the received fax is stored in the memory until this machine is ready to print.
If it is not possible to promptly deal with the problem, the saved fax can be forwarded to another destination.
In-memory proxy reception functions automatically.

Memory proxy reception is disabled when there is no remaining memory space.
When the troubleshooting is complete for paper jam etc., the machine starts printing a saved fax.
Forwarding fax received and stored in the memory (in-memory proxy reception)
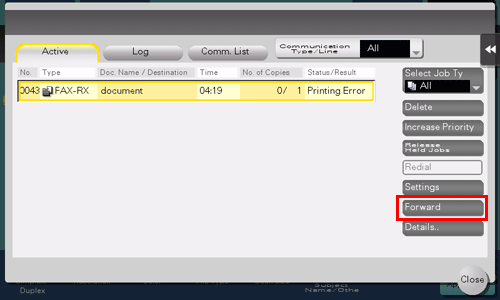
Tap [Job List] on the home screen.
Select a job received using in-memory proxy reception, and tap [Forward].
Use [Select Job Ty] to narrow down jobs to be displayed in the list.
Select a job to be forwarded, specify the forwarding destination and also tap [OK].
You can either directly enter a forwarding destination by tapping the input area or the keyboard icon, or select one from destinations registered in the machine by selecting the list icon.
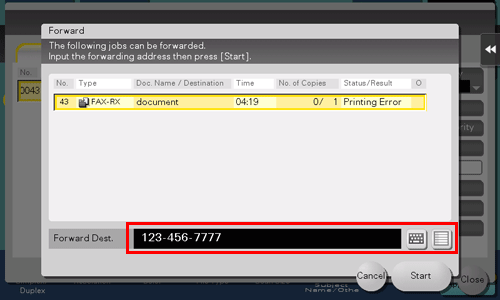
Tap [Start].
Forwarding starts.
When a fax saved is forwarded to a non-fax address, the fax is converted into the file format that is specified as the default in the scan/fax mode.
Receiving an Important Fax
To receive a confidential fax (Confidential RX)
Receiving a Confidential Fax (Confidential RX)
About confidential communication
The confidential communication function is designed for communications with specific people using a Confidential User Box that requires a registered number and a password.
This ensures fax communications are sent with enhanced security.


Sending a Confidential Fax (F-Code TX) (Here)
Operations required to use Confidential RX
Register confidential user boxes on this machine. Add the Confidential RX function to a Public, Personal, or Group User Box. Specify a communication password for Confidential RX.
For details on how to register a Confidential User Box, refer to Here.
Printing a received fax
To print a fax received by Confidential RX, browse data in the Confidential User Box.
For details on the printing procedure, refer to Here.
Forwarding a received fax
To forward a fax saved in the Confidential User Box, browse data in the Confidential User Box.
For details on the transmission procedure, refer to Here.
To restrict communication peers by password (Closed Network RX)
Restricting Communication Peers by Password (Closed Network RX)
Closed Network RX
Closed Network RX is a function that restricts fax senders by passwords.
When receiving a fax, the machine checks the password sent from the sender against the password preset for this machine and, if they match, accepts transmission.

You can use this function only when the remote machine is one of our models that has Password TX function.
Sending a Fax with a Password (Password TX) (Here)
Preparation required to use this function
Enable the Closed Network RX function. Specify the password to restrict the communication.
For details on the setting procedure, refer to Here.
Receiving a Polling File on the Recipient
To receive a polling file registered on the recipient (Polling RX)
Receiving a Fax for Polling (Polling RX)
About Polling RX
Polling RX is a function that receives a file for polling saved in a transmitting machine by sending a request from this machine.
The communication fee is charged to the recipient.

This function cannot be used together with the following functions.
Relay Distribution, Confidential Communication, ECM OFF, Quick Memory TX, Overseas TX, Password TX, Polling TX, Polling TX (Bulletin Board), Polling RX (Bulletin Board), F-Code TX
Registering a file for polling (Here)
Operation flow
Display the Fax screen of classic style.
For details on how to display the screen, refer to Here.
Specify the destination.
Tap [Application] - [Fax Setting] - [Polling RX], and tap [ON].
Check that [Normal] is highlighted, and tap [OK].
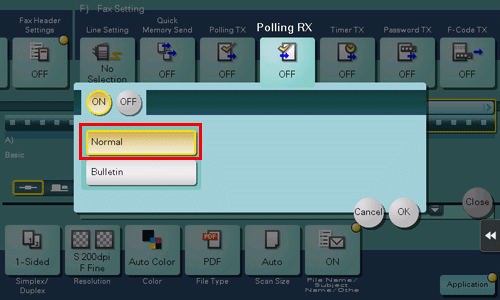
Use the Start key to start transmission.
To receive a file registered on a bulletin board of the recipient (Polling RX)
Receiving a File Registered on the Bulletin Board (Polling RX)
About Polling RX (Bulletin)
Polling RX (Bulletin) is a function that receives a file for polling saved in the Bulletin Board User Box in a transmitting machine by sending a request from this machine.
The communication fee is charged to the recipient.

When the Polling TX (Bulletin Board) function is enabled, the following functions cannot be used together.
Relay Distribution, Confidential Communication, ECM OFF, Quick Memory TX, Overseas TX, Password TX, Polling TX, Polling TX (Bulletin Board), Polling RX, F-Code TX
Registering a file for polling on the bulletin board (Polling TX) (Here)
Operation flow
Display the Fax screen of classic style.
For details on how to display the screen, refer to Here.
Specify the destination.
Tap [Application] - [Fax Setting] - [Polling RX], and tap [ON].
Tap [Bulletin], enter the number of the Bulletin Board User Box in the receiving machine, and tap [OK].
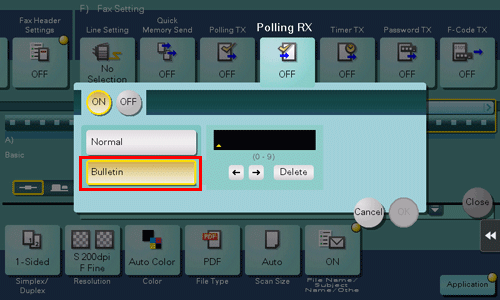
Use the Start key to start transmission.