
Operate a User Box via Web Connection
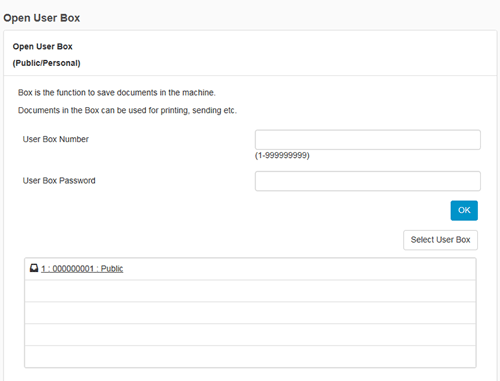
Open User Box
Log in to the Web Connection user mode, and open a User Box.
Access to the Web Connection, using the Web browser.
For details on how to access Web Connection, refer to Here.
Log in to the user mode.
For details on how to login to the user mode, refer to Here.
Click [Box] - [Open User Box].
Click and select a User Box to open from the list.
If the User Box list does not include the desired User Box, first click [Select User Box], select the check box for the User Box to be displayed in the list, then click [OK] in advance.
You can also open a desired User Box by entering its number directly in the [User Box Number] column.
If the User Box is password-protected, you need to enter the password.
Printing a file in a User Box
Access to Web Connection using the Web browser.
Log in to the user mode.
Click [Box] - [Open User Box].
Click the desired User Box from the User Box list.
Click a file to print, and also select [Print].
Change the print settings as necessary.
Setting
Description
[Combine]
This option is displayed when multiple files are selected.
You can combine multiple files into a single file and print them at the same time. If you select multiple files and set [OFF], you cannot use the [Basic Setting] and [Application Setting] options.
[Basic Setting]
You can set a number of copies, 2-sided Print, and Finishing if necessary.
[Application Setting]
Configure more detailed setting such as Page Margin or Stamp.
[Save Print Settings]
Specify to save the current print settings or not.
This option is not displayed when multiple files are selected.
[Change order]
This option is displayed when multiple files are selected.
You can change the print sequence if necessary. Select files, and change their print sequence by clicking [Top], [Up], [Down], [Bottom], or [Undo].
To display files as thumbnails, click [Thumbnail View].
Click [OK].
Printing starts.
Click [OK].
The file list screen appears again.
Sending files in a User Box
Access to Web Connection using the Web browser.
Log in to the user mode.
Click [Box] - [Open User Box].
Click the desired User Box from the User Box list.
Click a file to send, and select [TX].
Specify the destination. If necessary, change the send settings.
Setting
Description
[Specify destination]
Click [Search from List], and select the destination from the Address Book. When checking the destination list, click [Check Destination].
[Bind TX]
This option is displayed when multiple files are selected.
You can combine multiple files into a single file and send them at the same time. If you select multiple files and set [OFF], you cannot use the [File Type] and [Application Setting] options.
[File Type]
Specify the file type and encryption contents for a file to be sent.
[Communication Setting]
Configure E-mail settings or specify the URL notification destination.
[Application Setting]
Configure more detailed setting such as Stamp or Send & Print.
[Change order]
This option is displayed when multiple files are selected.
You can change the file transfer sequence if necessary. Select files, and change their print sequence by clicking [Top], [Up], [Down], [Bottom], or [Undo].
To display files as thumbnails, click [Thumbnail View].
Click [OK].
Transmission begins.
Click [OK].
The file list screen appears again.
Download files in a User Box to the PC
The file size of up to 400 MB can be downloaded at one time. If the file size exceeds 400 MB, specify the page range setting before downloading to limit the file size to download at one time to less than 400 MB.
Access to Web Connection using the Web browser.
Log in to the user mode.
Click [Box] - [Open User Box].
Click the desired User Box from the User Box list.
Select the check box of the file you want to download, and click [Download].
Set the download options.
When a file is selected:
Setting
Description
[Change the settings.]
This option is displayed when downloading files from a Public User Box that has the Share SMB File function specified.
If the Share SMB File function is enabled and a general format file exists in an SMB sharing folder, clear the [Change the settings.] check box. You will then be able to directly download files from the SMB sharing folder. This allows higher speed downloading.
If no general format file exists in an SMB sharing folder, select the [Change the settings.] check box. You will then be able to download files by converting them into a general format.
[File Format]
Select a type of the file to save.
[Outline PDF]
Select whether to use Outline PDF when [Compact PDF] is selected in [File Format].
[Page Range]
You can download all pages of file or the specified range of pages to the PC.
[Page Separation]
This option is displayed when a file containing multiple pages is selected. Select whether to separate a file every the specified number of pages.
When multiple files are selected:
Setting
Description
[Download format]
Select whether to compress multiple files in zip format or combine multiple files as a single file.
[File Format]
Select a type of the file to save. To set each file to the same file type as when they are saved in a User Box, select [Same as Scan or Same as "During Scan"].
[Outline PDF]
Select whether to use Outline PDF when [Compact PDF] is selected in [File Format].
[Page Separation]
This option is displayed when a file containing multiple pages is selected. Select whether to separate a file every the specified number of pages.
When [Combine two or more documents into one file and download.] is selected in [Download format], the file cannot be separated on a page basis.
[Change order]
This option is displayed when multiple files are selected.
You can change the file storage sequence if necessary. Select files, and change their print sequence by clicking [Top], [Up], [Down], [Bottom], or [Undo].
To display files as thumbnails, click [Thumbnail View].
When [Download multiple documents into a Zip format.] is selected in [Download format], the sequence cannot be changed.
Click [OK].
When [Preparation for download has been completed.] is displayed, click [Download].
The File Download page appears.
Click [Save].
Specify the storage location and file name, and click [Save].
Click [Back].
The file list screen appears again.
Move or copy files in a User Box to another User Box
Access to Web Connection using the Web browser.
Log in to the user mode.
Click [Box] - [Open User Box].
Click the desired User Box from the User Box list.
Select the check box of the file you want to move or copy, and click [Move/Copy].
You cannot select multiple files.
Set the move or copy options.
Setting
Description
[User Box Number]
Select the destination User Box from the User Box list.
[Copy]
Select this check box to copy a file to the selected User Box.
Click [OK].
The file is moved or copied to the destination User Box.
Click [OK].
The file list screen appears again.
Delete files from a User Box
Access to Web Connection using the Web browser.
Log in to the user mode.
Click [Box] - [Open User Box].
Click the desired User Box from the User Box list.
Select the file you want to Delete, and click [Delete].
Check the name of the file to delete, and click [OK].
When you select multiple files and display them as thumbnails, click [Thumbnail View].
Click [OK].
The file is deleted, and the file list screen appears again.