Q. Can frequently used destinations be registered?
How to set: Registering one-touch destinations in the address book
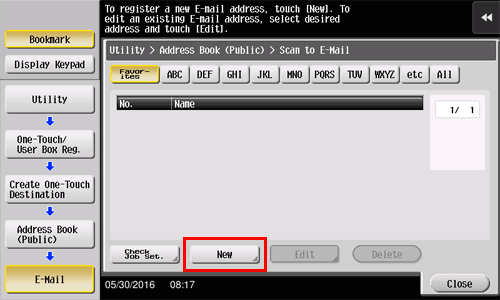
Tap [Utility], then select [One-Touch/User Box Registration].
Select [Create One-Touch Destination] - [Address Book (Public)].
Select the type of destinations to register, then tap [New].

Settings
Description
[E-Mail]
Register e-mail destinations.
[User Box]
Register a User Box to save documents in.
You need to create a User Box beforehand.
[PC (SMB)]
Register a computer to send files to.
[FTP]
Register the FTP server to send files to.
[WebDAV]
Register the WebDAV server to send files to.
Configure respective items, then tap [OK].
Common settings
Description
[No.]
Use the Keypad to enter the registration number for a one-touch destination. If no number is entered, the smallest number available is assigned to the destination.
[Name]
Enter the registration name for the one-touch destination. You can enter up to 24 characters.
[Sort Character]
Enter the same name as the one registered. You can enter up to 24 characters.
You can sort destinations by registration name.
[Index]
Select a search text. Destinations are displayed on the top screen in the fax/scan mode as sorted by index specified here. For a frequently used destination, specify the index characters and select [Favorites] at the same time. This allows you to find it more easily.
Settings for [E-Mail]
Description
[E-Mail Address]
Enter the E-mail address of the destination.
Settings for [User Box]
Description
[User Box]
Select one User Box for the destination.
Settings for [PC (SMB)]
Description
[User ID]
Enter the ID of a user authorized to access the shared folder on the destination computer.
[Password]
Enter the password of a user authorized to access the shared folder on the destination computer.
[Host Address]
Enter the host name, IPv4 address or IPv6 address as the host address for the destination computer.
[File Path]
Enter the name of the shared folder.
Settings for [FTP]
Description
[Host Address]
Enter the host name, IPv4 address or IPv6 address as the host address for the destination FTP server.
When entering the host name, check that the DNS settings are correct beforehand.
[File Path]
Enter the destination file path.
[User ID]
Enter the user ID for logging in to the FTP server on the destination side.
[Password]
Enter the password for logging in to the FTP server on the destination side.
[anonymous]
Tap [ON] if no user ID is required to log in to the FTP server.
[PASV]
Select whether to use the PASV mode.
[Proxy]
Select whether to use the proxy server.
[Port Number]
Enter a port number.
Settings for [WebDAV]
Description
[User ID]
Enter the user ID for logging in to the destination WebDAV server.
[Password]
Enter the password for logging in to the destination WebDAV server.
[Host Address]
Enter the host name, IPv4 address or IPv6 address as the host address for the destination WebDAV server.
When entering the host name, check that the DNS settings are correct beforehand.
[File Path]
Enter the destination file path.
[Proxy]
Select whether to use the proxy server.
[SSL Settings]
Select whether to use SSL.
[Port Number]
Enter a port number.
 Reference
 For details on the one-touch address registration procedure, refer to [Registering Frequently Used Destinations (Address Book)] .
How to set: Registering a group
Tap [Utility], then select [One-Touch/User Box Registration].
Select [Create One-Touch Destination] - [Group].
Tap [New].
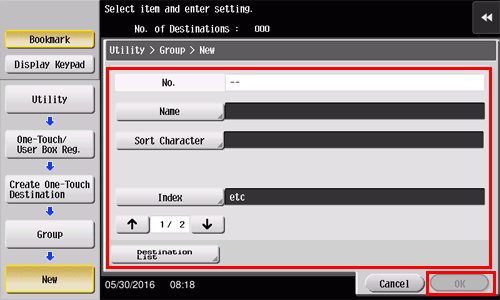
Configure the respective items for the group destination, then tap [OK].

Settings
Description
[Name]
Enter the registration name for the group destination. You can enter up to 24 characters.
[Sort Character]
Enter the same name as the one registered. You can enter up to 24 characters.
You can sort destinations by registration name.
[Index]
Select a search text. Group destinations are displayed on the top screen in scan/fax mode as sorted by index specified here. For a frequently used group, specify the index characters and select [Favorites] at the same time. This allows you to find it more easily.
[Select Destination]
Select addresses to register in the group from already registered one-touch destinations. You can select up to 500 destinations.
[Destination List]
Allows you to view a list of one-touch destinations registered in a group.