Image Repeat: Repeatedly Copying One Image onto One Paper
Overview of Repeat
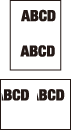
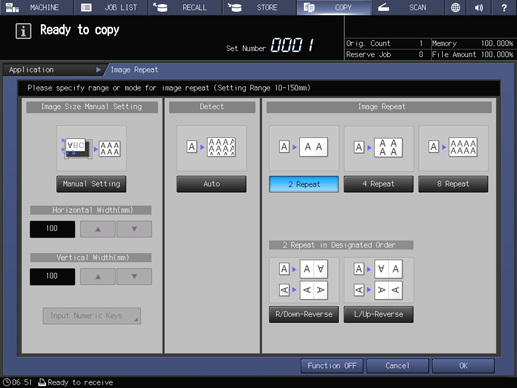
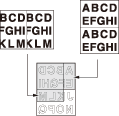
It will scan the image area specified by the selected paper size and mode (2 Repeat, 4 Repeat, 8 Repeat), then arrange the image by specified times in one copy paper.
Use 2 Repeat in designated order mode to have the same cut side when cutting copied sheets in two.
Original positioning | Output | ||
 | 2 Repeat | 4 Repeat | 8 Repeat |
 |  |  | |
Tips
The Auto Zoom button is dimmed and x1.0 is set automatically. Magnification can be changed manually, however, Image Rotation is unavailable. The scanning area will be a portion of the selected paper size equally divided according to the selected mode.
When 2 Repeat is selected, the direction of the image to be repeated can be specified.
Repeat operation
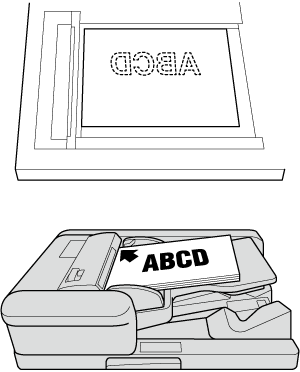
Position the original.
Both ADF and original glass are available. The scanning area varies according to the selected paper size, orientation of copy paper, and selected repeat mode.
supplementary explanationFor the scanning area and orientation of copy paper, refer to Scanning area of the original and orientation of copy paper.
Press Application on the COPY screen.
Press Image Repeat on the Application screen.
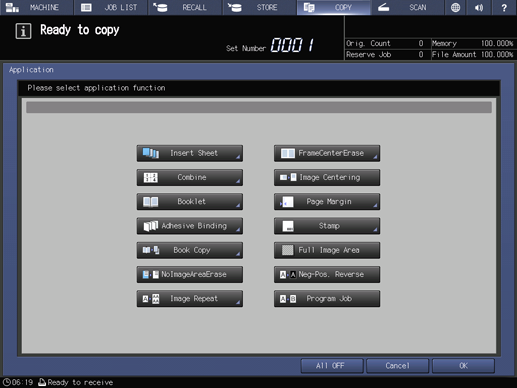
Select any of 2 Repeat, 4 Repeat or 8 Repeat.
supplementary explanationYou can select R/Down-Reverse or L/Up-Reverse under 2 Repeat in Designated Order and specify the direction of the repeated screen in 2 Repeat.
Press OK to complete the setting.
To resume the original settings, press Cancel.
To cancel the Image Repeat function with the current setting saved, press Function OFF.
Press OK on the Application screen to return to the COPY screen.
The Image Repeat icon and shortcut key are displayed under Application on the COPY screen.
Auto Zoom and Auto Paper are deselected.
Select an entry in the tray list under Paper.
Select additional copy conditions, as desired.
Enter the desired print quantity from the keypad on the control panel.
Press Start on the control panel.
supplementary explanationPrinting does not start without returning to the COPY screen. Be sure to display the COPY screen.
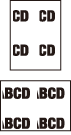
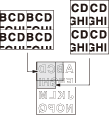
Scanning area of the original and orientation of copy paper
2 Repeat | 4 Repeat | 8 Repeat | |||
Paper in landscape orientation | Paper in portrait orientation | Paper in landscape orientation | Paper in portrait orientation | Paper in landscape orientation | Paper in portrait orientation |
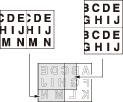 |  |  | |||
Repeated images of landscape original | Repeated images of landscape original | Repeated images of landscape original | |||
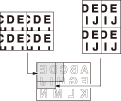
Paper in landscape orientation | Paper in portrait orientation | Paper in landscape orientation | Paper in landscape orientation | Paper in landscape orientation | Paper in landscape orientation |
 |  |  | |||
Repeated images of portrait original | Repeated images of portrait original | Repeated images of portrait original | |||
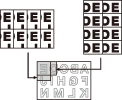
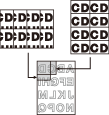
2 Repeat - Specifying the orientation of repeated image
Select R/Down-Reverse or L/Up-Reverse for 2 Repeat mode to obtain output images as illustrated below. This function allows you to have the same cut side when cutting copied sheets in two.
Reference
This function can be combined with Numbering, Page No., and Date/Time. For details, contact your service representative.
2 Repeat: R/Down-Reverse | 2 Repeat: L/Up-Reverse | ||
Landscape original | Repeated images | Landscape original | Repeated images |
|
|  |  |
Portrait original | Repeated images | Portrait original | Repeated images |
 |  | |  |