
Copying Various Types of Originals
To split the left and right pages of a book or catalog ([Book Original])
To display:
- [Copy]
- [Application]
- [No. of Originals]
- [Book Original]
- [No. of Originals]
- [Application]
You can copy two-page spreads such as books and catalogs separately into the left and right pages, or copy as one page. If you place a book or catalog on the Original Glass, you do not need to close the ADF to scan it.

Settings | Description |
|---|---|
[ON]/[OFF] | Select [ON] to specify Book Original. |
[Output Method] | Select the copy method of two-page spreads.
|
[Frame Erase] | Erases the shadow of the surrounding that is created when the original cover cannot be closed properly due to the thickness of the original. You can erase the four sides of the original to the same width. Additionally, you can erase the four sides of the original to different widths.
|
[Center Erase] | Erases the shadow created in the center when the original cover cannot be closed correctly due to the thickness of the original. Specify the width of the area to erase by tapping [+]/[-] for the inch area and by tapping [+]/[-] or Keypad for the centimeter area. To display the Keypad, tap the input area for the numeral. |
[Non-Image Area Erase] | If you select Book Original, this item is set automatically. When making copies with the ADF open and the original placed on the Original Glass, the machine detects the outline of the original and erases shadows outside the original. Cancel the setting if necessary. |
[Centering] | If you select Book Original, this item is set automatically. The original image is copied at the center of the page without enlarging it. Cancel the setting if necessary. |
[Binding Position] | If [Separation], [Front Cover] or [Front & Back Covers] is selected for [Output Method], select the two-page spread binding position. Select [Left Bind] for two-page spreads of left binding, and [Right Bind] for two-page spreads of right binding. Note that if the binding position is incorrectly specified, the page order of the two-page spread is reversed between the left- and right-hand pages. |
[Original Size] | If the size of the original is not detected correctly, select a key indicating the size of the original to be scanned. |
To split the left and right pages of two-page spreads ([Page Separation])
To display:
- [Copy]
- [Application]
- [No. of Originals]
- [Page Separation]
- [No. of Originals]
- [Application]
Split the left- and right-hand pages of two-page spreads for copying.

Settings | Description |
|---|---|
[ON]/[OFF] | Select [ON] to specify Book Separation. |
[Original Margin Position] | Select the two-page spread binding position from [Left Bind] and [Right Bind]. |
[Original Size] | If the size of the original is not detected correctly, select a key indicating the size of the original to be scanned. If the machine cannot detect the size of irregular sized originals or photos, manually specify the size. |

You can only use the ADF for loading originals.
You can print on 2 sheets of paper for 1-sided copy and the front and back sides of paper for 2-sided copy.
To copy an index original on index paper ([Tab Original])
To display:
- [Copy]
- [Application]
- [No. of Originals]
- [Tab Original]
- [No. of Originals]
- [Application]
Copy an index original onto index paper, including the index tab.
Place the index original on the Original Glass.

Settings | Description |
|---|---|
[ON]/[OFF] | Select [ON] to copy an index original. Also select the size of the index original. |

Load the index paper in the Bypass Tray. For details on how to load index paper, refer to Here.
To reproduce a catalog ([Booklet Original])
To display:
- [Copy]
- [Application]
- [No. of Originals]
- [Original Settings]
- [Booklet Original]
- [Original Settings]
- [No. of Originals]
- [Application]
Scan a catalog with the staples removed as a 2-sided original, make a 2-sided copy, and staple the center of the paper in the same manner as the original catalog.
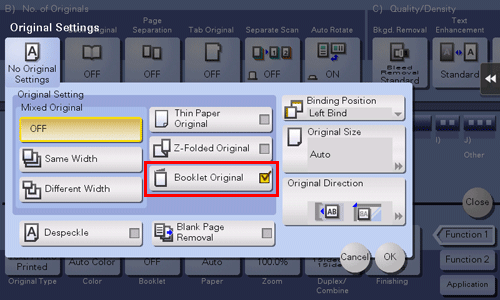
ineo+ 658/558/458:
To use this function, the optional Finisher FS-537 SD or the optional Finisher FS-536 SD is required.ineo+ 368/308/258:
To use this function, the optional Finisher FS-534 SD is required.
For details on how to copy a catalog, refer to Here.