Using HDD: Changing the Print Setting of Hold Job (Job Ticket Edit)
It is possible to edit the print setting of hold jobs using the touch panel of the main body or a computer. The function is called "Job Ticket Edit."
You can save the edited job overwriting the original job or newly save as a different job keeping the original job as is.
• Examples Introduced in This Section
Using the touch panel of the main body or Job Centro to edit the print setting of hold jobs.
Editing Job Tickets from the Main Body
Using touch panel of the main body to edit the print setting of hold jobs.Editing Job Tickets from Job Centro
Using Job Centro to edit the print setting of hold jobs.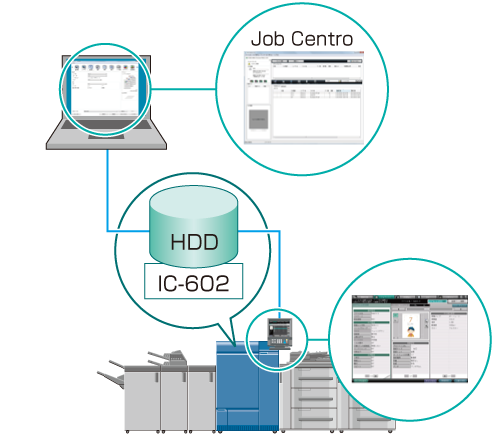
•Intended Environment
Operating system | Windows 7 |
Application | Job Centro |
Image Controller | Image Controller IC-602 |
* The sample screen may be different from the actual display depending on your system environment and application version/revision.
• Related Section
•Precautions
If images different in Job Type (copy/print) or Controller Image Comp. Set (gradation priority / resolution priority) have been imposed in the [Image Page Edit] screen, [Booklet]/[Adhesive Binding]/[Combine] of [Application Setting] cannot be selected in the [Job Ticket Edit] screen.
On the touch panel of the main body, you can edit both copy and print jobs. In Job Centro, you can only edit print jobs ([Job Type] is [Print]). To edit copy jobs ([Job Type] is [Copy]), use the touch panel of the main body.
You cannot edit HDD saved jobs. Recall and save them as hold jobs before editing. (Refer to Using HDD: Managing Jobs in Folders.)
Editing Job Tickets from the Main Body
You can use the touch panel of the main body to edit the print setting of hold jobs.
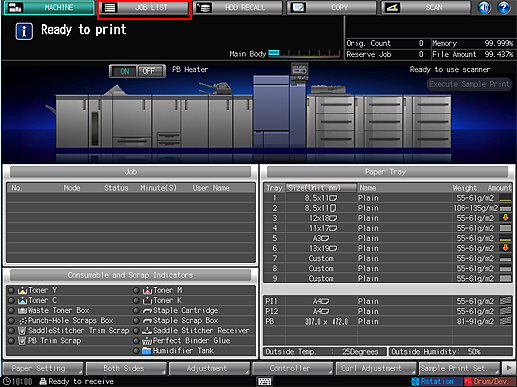
On the touch panel of the main body, press [JOB LIST].
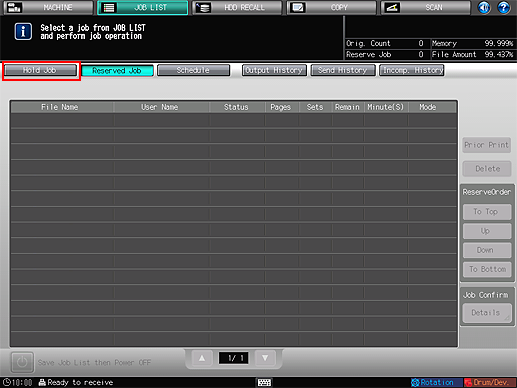
Press [Hold Job].
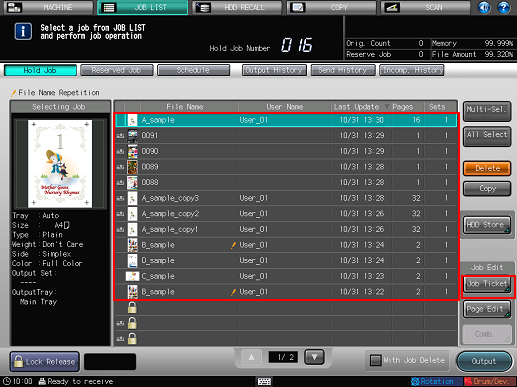
Press to select the job (one job) to edit and press [Job Ticket] in the [Job Edit] field.
For a copy job, a
 icon is displayed at the left end and the user name is not displayed.
If the same [File Name] (job name) is in the list, a
 icon is displayed.
For a job that cannot be output, a
 icon is displayed (for example, when a necessary finisher is not equipped).
The specified job is called and the [Job Ticket Edit] screen is displayed.
On the touch panel of the main body, you can edit both copy and print jobs.
To work on a job that was set with a password at the time of holding (by selecting [COPY] - [Hold Setting] on the touch panel of the main body, or [Workflow] - [Print Mode] - [Secure Print] in the printer driver), press [Lock Release] in the lower left of screen and input the password. All the jobs with the matching password are unlocked and become usable.
Click the button of the item to edit and change the setting.
You can check the status of imposition with the preview image in the middle of the screen.
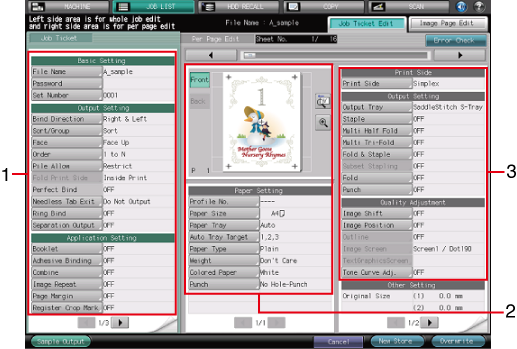
Job Ticket Edit on the touch panel of the main body allows you to make the following settings.
Item
Check Job
1. Left pane of the screen
[Basic Setting]
Set [File Name][Password][Set Number].
[Output Setting]
Set [Bind Direction][Sort/Group][Face][Order][Pile Allow][Fold Print Side][Perfect Bind][Separation Output], etc.
[Application Setting]
Set [Booklet][Adhesive Binding][Combine][Image Repeat][Page Margin][Register Crop Mark][180 Deg. Rotation][Stamp], etc.
[Other Setting]
Check the copy density, color adjustment, hue, saturation, color balance, etc.
2. Center pane of the screen
Preview image display
Displays the preview image of the selected file. You can preview the front and back side image of a 2-sided original, and check the rotate view image or the output direction of the image. On the enlarged preview screen, you can set the crop mark, image position, or image shift function.
[Paper Setting]
Set [Profile No.][Paper Size][Paper Tray][Auto Tray Target][Paper Type][Weight][Colored Paper][Punch].
3. Right pane of the screen
[Print Side]
Set [Print Side] (1-sided/2-sided).
[Output Setting]
Set [Output Tray][Staple][Multi Half Fold][Multi Tri-Fold][Fold & Staple][Punch][Fold], etc.
[Quality Adjustment]
Set [Image Shift][Image Position][Outline][Image Screen][TextGraphicsScreen][Glossy][Tone Curve Adj.], etc.
[Other Setting]
Check the original size, original type, original side, zoom, resolution and color.
Pressing [Error Check] in the upper right of the screen starts checking for inconsistency of the settings. If any of the settings obstructs output, the cause is displayed.
If images different in Job Type (copy/print) or Controller Image Comp. Set (gradation priority / resolution priority) have been imposed in the [Image Page Edit] screen, [Booklet]/[Adhesive Binding]/[Combine] of [Application Setting] cannot be selected in the [Job Ticket Edit] screen.
To check the output image with the current settings, press [Sample Output]. Only one set or the sheet being previewed is output so that you can check the actual result.
To display the Page Edit screen (refer to Using HDD: Editing a Hold Job on a per Page Basis (Page Edit)), press the [Image Page Edit] tab. To return to the [Job Ticket Edit] screen, press the [Edit Job Ticket] tab.
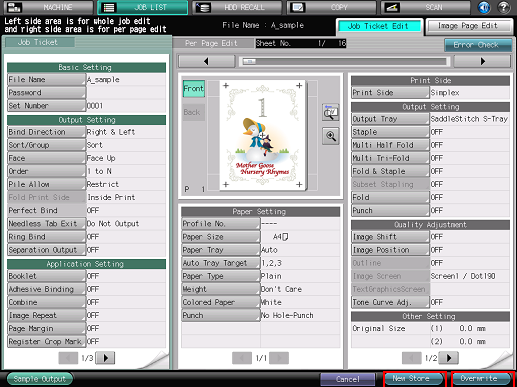
After editing, press [New Store] or [Overwrite].
[New Store]: The data is saved as new data keeping the original data as is.
[Overwrite]: The original data is overwritten by the edited data.
Editing Job Tickets from Job Centro
You can use Job Centro on a computer to edit the print setting of hold jobs.
Start Job Centro and log in to the machine. (Refer to Starting Job Centro.)
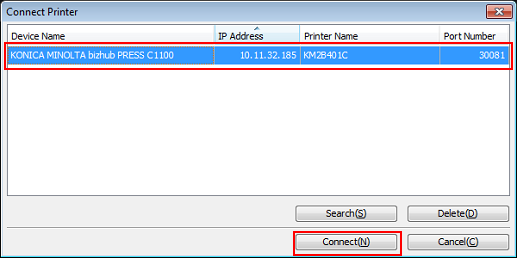
The [Job Centro] screen is displayed.
Click the [Hold Job] tab and select the job (one job) to edit.
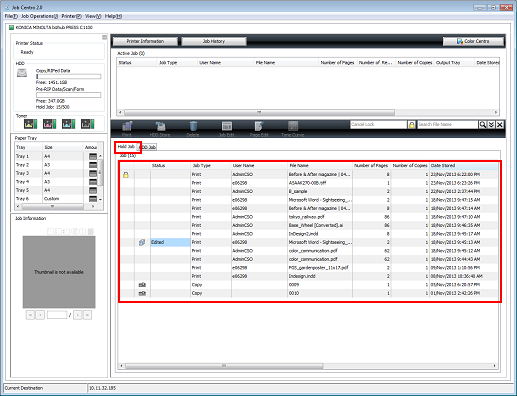
In Job Centro, you can only edit print jobs ([Job Type] is [Print]). To edit copy jobs ([Job Type] is [Copy]), use the touch panel of the main body.
To work on a job that was set with a password at the time of holding (by selecting [COPY] - [Hold Setting] on the touch panel of the main body, or [Workflow] - [Print Mode] - [Secure Print] in the printer driver), enter the password in the [Cancel Lock] field and click
 ([Lock Release]) icon.
Click [Job Edit].
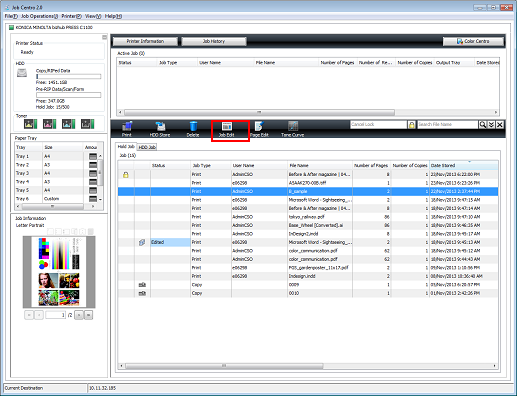
If Color Centro has been installed, you can click [Tone Curve] to adjust tone curve. (Refer to Image Quality and Colors: Changing the Contrast (Tone Curve).)
The specified job is called and the Job Edit (print setting) screen is displayed.
Click the tab of the item to edit and change the setting.
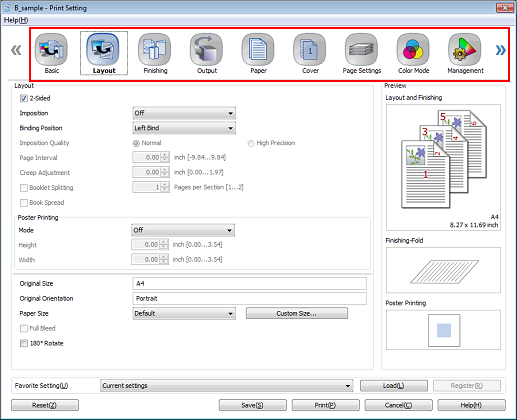
The Job Edit (print setting) screen of Job Centro allows you to make the following settings.
For more details of each item, refer also to the following.
Tabs
Check Job
[Basic]
Paper tray, paper profile / paper data / number of sets / printing range
[Layout]
2-sided, imposition, bind direction, imposition quality, page pitch, outer offset, divided booklet, book spread / poster printing / paper size
[Finishing]
Bind direction, staple, divided finish, punch/fold
[Output]
Output tray, feed direction, sort/group, output mode, set output, sheet output, unnecessary tab paper ejection
[Paper]
Tray and paper data acquisition
[Cover]
Banner tray / front cover / back cover / perfect bind
[Page Settings]
Tab paper settings/chapters
[Color Mode]
Output color / 2-color printing, separation output / color verification
[Management]
Color management data acquisition, color configuration, manual settings
[Imaging]
Resolution/screening/outline process
[Image Position]
Image shift / tab paper image shift / image position / register mark
[Stamp]
Date/time, page number, numbering
[Workflow]
Print Mode
[Authent.]
(Displays authentication information.)
If images with different type of job (copy/print) or the controller image compression setting (priority on gradation/priority on resolution) are attached on the image data in the [Image Page Edit] screen, you cannot select [Booklet], [Adhesive Binding] or [Combine] of [Application Setting] cannot be selected in the [Job Ticket Edit] screen.
After editing, click [Save].
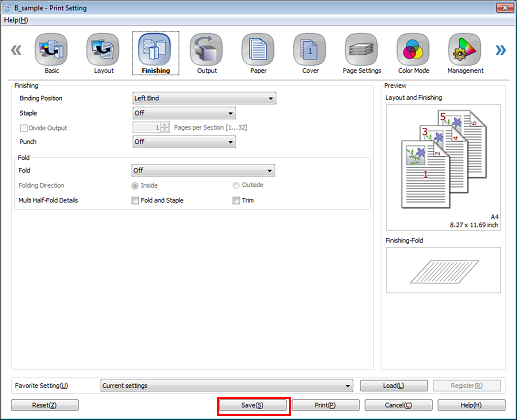
The Job Edit (print setting) screen closes and the edited content is saved. After saving, [Edited] is displayed in the [Hold Job] screen of Job Centro.
The operations in Job Centro differ from the touch panel of the main body and you do not have the option to newly save or overwrite. To newly save as another job, copy an original job in the [Hold Job] screen of Job Centro before editing.
