
Quickly Printing Files on USB Memory or Mobile Terminal
To directly print a file on a USB flash drive
Directly Printing from a USB Memory Device
Printing from a USB memory device
By connecting a USB memory device to this machine and specifying a file stored in the USB memory device, you can print the file.

Conditions of available USB flash drive
For details on the conditions of the available USB flash drive, refer to Here.
How to Print
The available file types are as follows.PDF, Compact PDF, JPEG, TIFF, XPS, Compact XPS, OOXML (.docx/.xlsx/.pptx), PPML (.ppml/.vdx/.zip) You can print out encrypted PDF, searchable PDF, and outline PDF files.
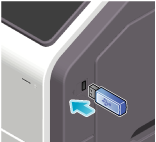
Connect the USB flash drive to the USB port of this machine.

When this machine is starting up, do not connect or disconnect the USB flash drive to/from the USB port.
Tap [USB Mem. Print] on the home screen.
Tap the file to be printed.
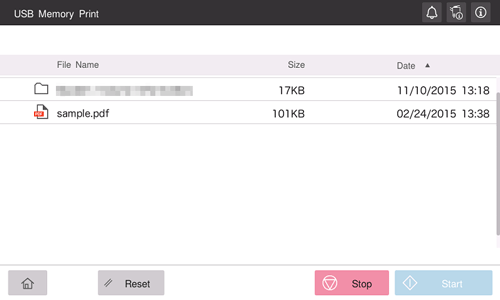
Specify print options as needed.
Setting
Description
[No. of Sets]
Enter the number of copies to be printed (default: [1] copy).
[Color]
Select the printing colors (default: [Full Color]).
[Paper]
Select the paper tray for the printing paper (default: [Auto]).
[Duplex Settings]
Select the print side of paper (default: [1-Sided Print]).
[Staple/Punch]
Select whether to staple or punch printed sheets (default: [OFF]).
[Combination]
Select whether to reduce and print multiple pages on the same side of a single sheet of paper (default: [Do not combine]).
Use the Start key to start printing.
When printing is complete, disconnect the USB flash drive from the port of this machine.

When you print a password protected PDF file, the file is stored in the Password Encrypted PDF User Box. For details on how to print files from Password Encrypted PDF User Box, refer to Here.
A file stored with 1200 dpi is converted to 600 600 dpi when printed.
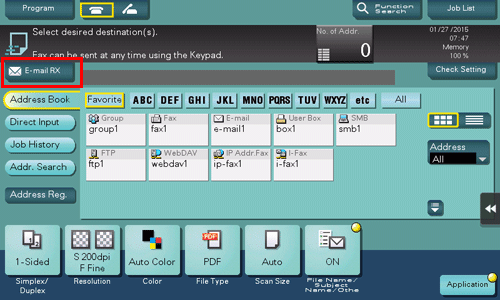
To directly print an E-mail attachment
Printing a Received E-mail Attachment (E-mail RX Print)
E-mail RX Print
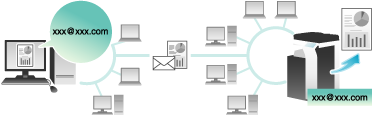
E-mail RX Print is a function that prints a file attached to an E-mail received by the machine.
If you send the E-mail, to which the target file is attached, to the E-mail address of this machine, you can print the file on this machine without using the printer driver. If necessary, you can save an E-mail attachment in a User Box of the machine.
To use this function, an option is required. For details on the required option, refer to Here.
E-mail and attachment conditions
To use the E-mail RX Print function for printing, E-mails and attachments must satisfy the following conditions.
Item | Specifications |
|---|---|
Number of files | Up to 20 files |
File size | Unlimited |
Supporting file type | PDF, Compact PDF, XPS, Compact XPS, TIFF, JPEG, OOXML (.docx/.xlsx/.pptx), PPML (.ppml/.vdx/.zip)
|
E-mail format | The E-mail format has the following restrictions.
|
Specifying an address | Address (To), CC, BCC |
Files that do not satisfy the above conditions are discarded. Detailed information such as whether a file has been discarded can be viewed in the job history.
When you receive a password-protected PDF file as an E-mail attachment, the file is saved in the Password Encrypted PDF User Box.
If an E-mail has no attachment, the E-mail is discarded.
Preparation required to use this function (for the administrator)
Configure a setting to use the E-mail RX Print function.
For details on the setting procedure, refer to Here.
When user authentication or account track is enabled, you must permit [Print without Authentication] (Here) (default: [Restrict]).
Configuring a print setting when sending an E-mail
The E-mail attachment that has been sent is printed on the machine according to the setting values of [Printer Settings] (Here). To change the print setting each time you sent an E-mail, enter a predetermined setting value into the Subject field of an E-mail in your E-mail program, and configure the desired print setting.
Enter the setting value in the "setting value@" format into the Subject field.
Entry example of specifying a single setting value: dup@
Entry example of specifying multiple setting values: dup, box1@
The available setting values are as follows.
Item | Setting value | Description |
|---|---|---|
Color | col | Sets the print color to full color mode. |
mono | Sets the print color to black and white mode. | |
Duplex/Simplex | dup | Sets both sides of paper to be printed on. |
simp | Sets a single side of paper to be printed on. | |
Original Orientation | port | Sets the original orientation to Portrait. |
land | Sets the original orientation to Landscape. | |
Copies | Numeric Value | Specify the number of copies (1 to 9999) to be printed. |
Combine | Column + Numeric value | Specify the number of (1 to 5) to be combined in one page. Entry example: Column2 |
Row + Numeric value | Specify the number of (1 to 5) to be combined in one page. Entry example: Row3 | |
Recalling the copy program | m + Numeric value | Specify the registration number (1 to 30) of the copy program to be applied to printing. Entry example: m1 |
Specifying a User Box | box + Numeric value | Specify the registration number (1 to 999999999) of the User Box to save files in. If the registration number of a User Box that does not exist is specified, a new User Box is created automatically to save files. Entry example: box1 |
A setting value entered after "@" is not considered to be a print setting value. If "@" is omitted, the entire subject text is considered to be a setting value.
The setting value is not case sensitive. Characters other than a setting value are invalid.
To specify multiple setting values, delimit them using ", (comma)".
If multiple setting values are specified in the same item, the setting value entered first is applied.
If the copy program is specified, its settings are prioritized, and other individual settings are disabled.
Receiving an E-mail on the machine and print a file
You can manually inquire the mail server about whether an E-mail arrives.
Tap [E-mail RX] to inquire the mail server. If there is an incoming E-mail, receive it and print its attachment.
The machine automatically inquires the mail server regarding the E-mail reception status at a predetermined interval (default: 15 minutes) depending on the E-mail RX setting. If an E-mail has arrived, the machine receives it and prints its attachment.
A password-protected PDF file is stored in the Password Encrypted PDF User Box. For details on how to operate a file saved in the Password Encrypted PDF User Box, refer to Here.
To print files on a mobile terminal via Wi-Fi Direct
Using Wi-Fi Direct for printing
About Wi-Fi Direct
Wi-Fi Direct is a standard that enables direct connection with a wireless terminal without an access point.
You can specify and print a file stored on a terminal using a mobile terminal such as a smartphone or a tablet PC that supports Wi-Fi Direct.
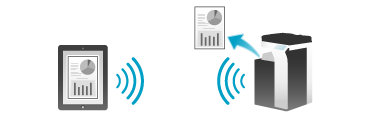
This function is available when this machine is connected to the wireless LAN environment and used as a Wi-Fi Direct group owner.
Preparation required to use this function
Connect the terminal to this machine via Wi-Fi Direct.
For details on how to operate a terminal, refer to the relevant manual.
Some terminals may not be able to be connected to this machine via Wi-Fi Direct. For details, refer to the relevant manual of your terminal.
Select "Wi-Fi Direct" on the setting menu of the terminal.
This displays a list of devices that support Wi-Fi Direct.
Select the SSID of this machine from the list.
This machine is registered on the terminal, and the connection setting is completed.
Using a mobile terminal for printing
Install Konica Minolta Mobile Print on your mobile terminal.
Connect the mobile terminal to this machine.
For details on the connection procedure, refer to Here.
Specify a file to be printed using the application, then execute printing.
For details on how to operate the application, refer to Help of the application.
Printing using a computer
After connecting this machine to the computer via Wi-Fi Direct, install the printer driver on the computer.