
Specifying the size or type of the paper to be copied
To select the size and type of copy paper ([Paper])
To display:
- [Copy]
- [Paper]
Select the paper size and type for copying. You can also change the size and type settings of the paper loaded in paper trays.
For details on the available paper types, refer to Here.

Settings | Description |
|---|---|
[Auto] | Tap this button to automatically select paper fitting the size of the original when making a copy. |
[1] - [4] | Tap this button to specify paper loaded into any of Tray1 to Tray4 to make a copy. |
[] | Tap this button to copy onto the paper loaded into the Bypass Tray. |
[L] | Tap this button to copy onto the paper loaded into the Large Capacity Unit. |
[Change Tray Setting] | If necessary, change the size and type settings of the paper loaded in the selected paper tray. For details, refer to Here. |
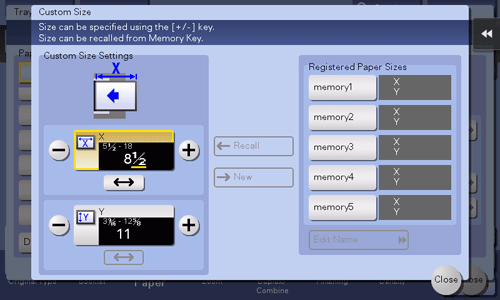
To copy on custom size paper ([Custom Size])
To display:
- [Copy]
- [Paper]
- [Change Tray Setting]
- [Custom Size]
- [Change Tray Setting]
- [Paper]
When loading custom size paper into the paper tray, enter the length (X) and width (Y) of the paper.
You can either enter the size manually, or select from the registered sizes in the memory.
This option is available when Tray1, Tray2, or Bypass Tray is selected as a paper tray.
Settings | Description |
|---|---|
[Custom Size Settings] | For the inch area, tap [+]/[-] or the keypad to enter the length (X) and width (Y) of the paper. After you have entered the size, select a key ([memory1] to [memory5]) in [Registered Paper Sizes], and tap [New]. Then the size you have entered is registered in the memory. You can recall the registered size in the future. |
[Registered Paper Sizes] | The custom sizes registered in the memory are displayed.
|

You can measure the size of custom paper using the machine and register the size in the memory. For details, refer to Here.
To copy on a wide paper ([Wide Paper])
To display:
- [Copy]
- [Paper]
- [Change Tray Setting]
- [Wide Paper]
- [Change Tray Setting]
- [Paper]
Select this option when you load wide paper into the paper tray.

Settings | Description |
|---|---|
[Inches] | When loading wide paper in inch size into paper tray, select the paper size. |
[Metric Sizes] | When loading wide paper in metric sizes into paper tray, select the paper size. |
[Paper Size] | Displays the specified paper size. You can select [Change Size] to change the specified paper size to any required size. |
To change the paper setting of the paper tray ([Change Tray Setting])
To display:
- [Copy]
- [Paper]
- [Change Tray Setting]
- [Paper]
Change the size and type settings of the paper loaded in the selected paper tray.

Settings | Description |
|---|---|
[Paper Type] | Select the type of the paper loaded in the selected paper tray. The available paper type varies depending on the selected paper tray. For details on the available paper types, refer to Here. When you are using plain paper of 15-15/16 lb to 18-5/8 lb (60 g/m2 to 70 g/m2), tap [Alter Thickness]. The paper tray with the [Alter Thickness] check box selected is set to a low priority sequence among the paper trays in which plain paper is loaded. However, if the [Alter Thickness] check box is selected for all paper trays, the priority sequence specified in [Auto Tray Selection Settings] is available. For details on [Auto Tray Selection Settings], refer to Here. |
[Paper Size] | Select the size of the paper loaded in the selected paper tray. The available paper size varies depending on the selected paper tray. For details on the available paper sizes, refer to Here. Selecting [Auto Detect] automatically detects the size of the loaded paper. |