
Printing in the Windows Environment
Saving the Number of Printed Sheets
To print multiple pages on the same side of a single sheet ([Combination])
Printing multiple pages on the same side of a single sheet ([Combination])
You can print multiple reduced size pages on the same side of a single sheet to reduce the number of pages to be printed.
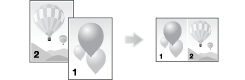
In [Combination] in the [Layout] tab, select "N in 1". For example, when you select [9 in 1], every set of nine pages is reduced and printed on the same side of one sheet.
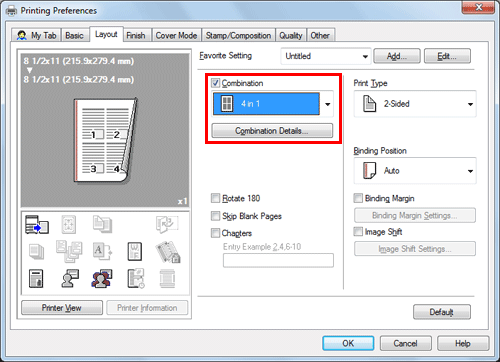
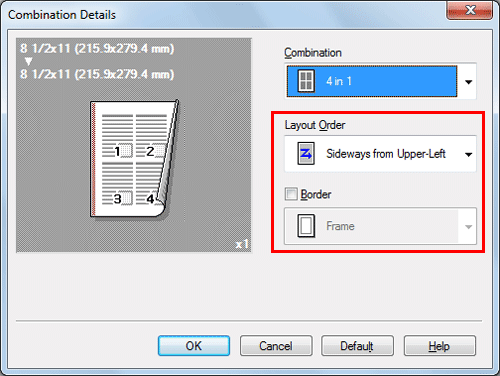
If necessary, click [Combination Details...] to set the page layout order and whether to input border lines between pages.
Settings | Description |
|---|---|
[Layout Order] | Select the page layout order. |
[Border] | Select this check box when you want to draw border lines between pages. In addition, select the type of border lines from [Frame] and [Line]. |

By using this function in combination with the 2-Sided Print function ([Print Type]: [2-Sided]), you can save more amount of paper.
To print on both sides of paper ([2-Sided])
Printing on both sides of paper ([2-Sided])
By using both sides of paper for printing, you can halve paper consumption.
In [Print Type] in the [Layout] tab, select [2-Sided]. [2-Sided] is specified by default.
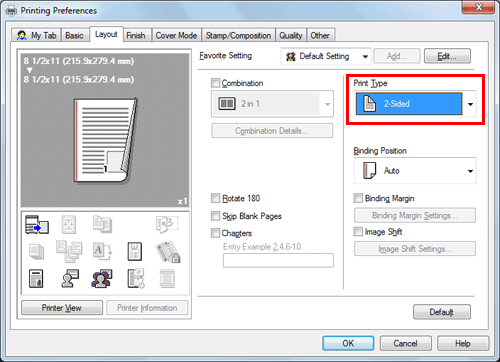
By using this function in combination with the Combine function ([Combination]: "N in 1"), you can save more amount of paper.
To skip blank pages ([Skip Blank Pages])
Skipping blank pages ([Skip Blank Pages])
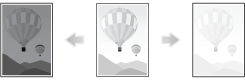
Blank pages contained in the original are skipped when the original is printed. You can reduce the number of printed sheets.
In the [Layout] tab, select the [Skip Blank Pages] check box.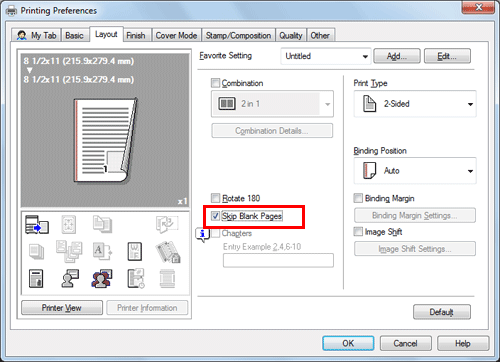
For some originals, blank pages are also printed.
[Skip Blank Pages] is available only when the printer driver for Windows is used.
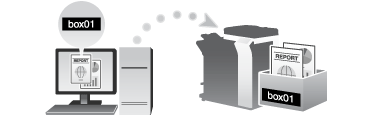
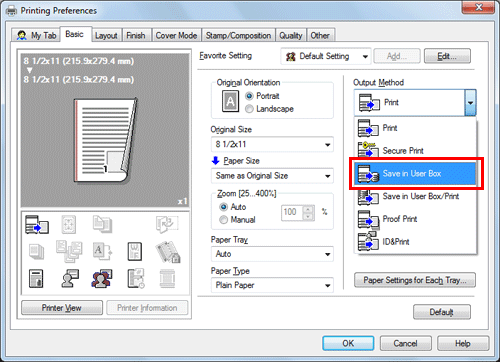
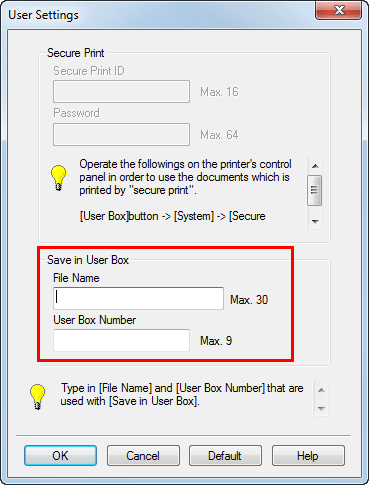
To save originals in a user box on this machine ([Save in User Box])
Saving Originals in the Box on This Machine ([Save in User Box])
Save in User Box
The Save in User Box function saves print data in a box on this machine. You can also print the data at the same time as it is being saved in the box.
You can use multiple User Boxes for different purposes, for example:
By saving data in a box that all users can access (Public Box) or in a box that the members of a specific department can access (Group Box), you can distribute the data.
By saving data in the private box (Personal Box), you can assure security because only you can open the box. The data in the box is not deleted by mistake.
Operations required to use this function
Register the boxes for storing print data on this machine.
For information on the procedure for registering boxes, refer to Here.

You can also register boxes using Web Connection. For details, refer to Here.
How to print from the computer
In [Output Method] in the [Basic] tab, select [Save in User Box].
When you want to print the data at the same time it is saved in the box, select [Save in User Box/Print].
Enter the file name and the box number of the save location, click [OK].
Use a file name that helps you locate the data in the box.
If you always use the same file name and box number, registering them in advance eliminates the need for entering them each time. For details, refer to Here.
Execute printing.
The data is saved in the box on this machine.
Using data saved in a box
You can print or send data saved in a box via E-mail or fax.
For information on how to print data saved in a box, refer to Here.
For information on how to send data saved in a box, refer to Here. However, if data is saved in a box while [Resolution] in the [Quality] tab is set to [1200dpi (Rasterize on PC)] or [1200dpi (Rasterize on Device)], it cannot be sent. To send such data, set it to [600dpi].
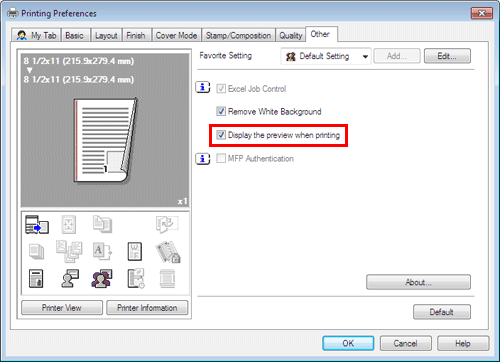
To view the finished preview image in order to prevent misprints (XPS only)
Previewing the Print Image (XPS Only)
The XPS driver has a function to preview the print image for your checking.
In the preview window, you can check the print image and delete unnecessary pages.
In the [Other] tab, select the [Display the preview when printing] check box.
In the application software, execute printing.
The preview window appears.
Check the print image, then execute printing.
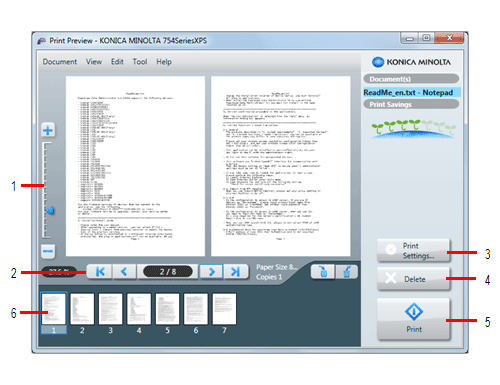
No.
Function
1
Move this slider to enlarge or reduce the preview.
2
Click this button to switch the currently displayed page.
3
Click this button to change the print settings.
4
Click this button to delete the displayed print job.
5
Select this menu to start printing.
6
Select the page to be displayed. You can delete the selected page or pages.
[Display the preview when printing] is available only when the printer driver for Windows (XPS) is used.
Enlarging or Reducing an Original Image
To enlarge or reduce based on the paper size ([Paper Size])
Enlarging or reducing to the paper size ([Paper Size])
The original is printed after it is enlarged or reduced by a ratio that is automatically determined by the original size and paper size.
If you select a paper size larger than the original size, the original is enlarged to the paper size. If you select a paper size smaller than the original size, the original is reduced to the paper size.

In [Paper Size] in the [Basic] tab, select the size of paper for printing. The zoom ratio is automatically determined by the paper sizes selected in [Original Size] and [Paper Size].
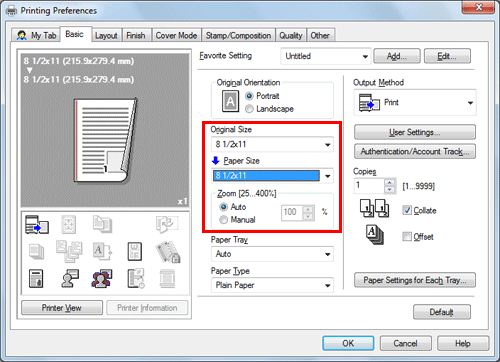
This function is enabled when [Zoom] is set to [Auto].
To enlarge or reduce with any zoom ratio ([Zoom])
Enlarging or reducing by the desired zoom ratio ([Zoom])
You can print the original image after it has been enlarged or reduced by the desired zoom ratio. The zoom ratio can be specified to be between 25% and 400% (in increments of 1%).
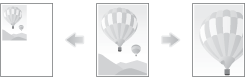
In [Zoom] in the [Basic] tab, specify the zoom ratio.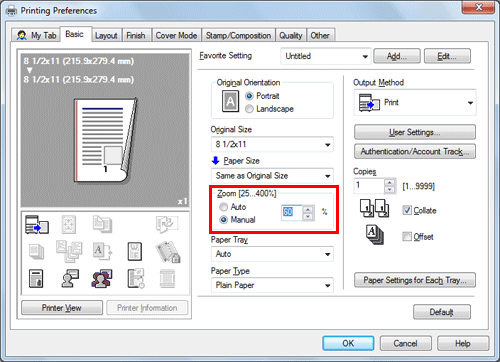
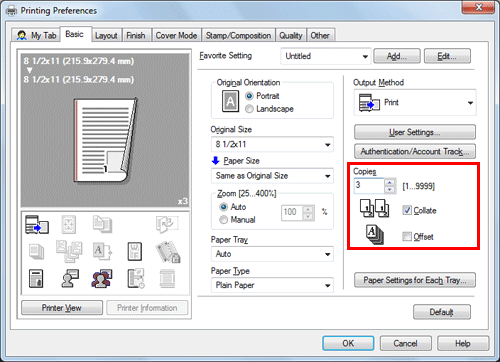
Printing Multiple Sets of Copies
To specify the number of copies ([Copies])
Specifying the number of copies ([Copies])
In [Copies] in the [Basic] tab, specify the number of copies you want to print.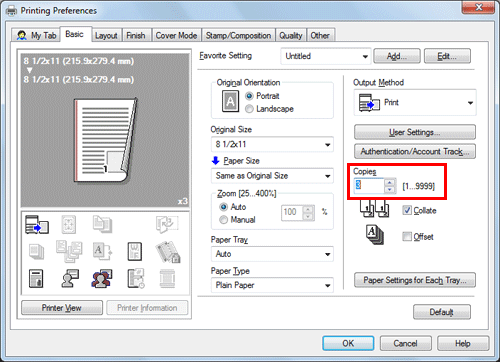
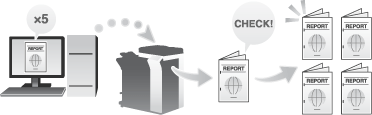
When you print a large number of copies, use of the Proof Print function will prevent a large number of misprints being created, thereby reducing the amount of waste paper generated. For details, refer to Here.
To print by sets ([Collate]/[Offset])
Printing by sets ([Collate]/[Offset])
When multiple sets of copies are printed, the paper output position of each set is staggered to help you locate the first page of each set.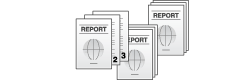
When the [Collate] check box on the [Basic] tab is selected, copies are output separately in a set-by-set manner, for example, "Pages 1, 2, 3, 4, and 5", "Pages 1, 2, 3, 4, and 5", and then "Pages 1, 2, 3, 4, and 5". When the [Offset] check box is selected, the sets are output in staggered layers.
When you select both [Collate] and [Offset] check boxes, the output position is staggered for each set, allowing you to easily prepare handouts.
To make a trial printing in order to prevent misprints ([Proof Print])
Making a Trial Printing ([Proof Print])
Proof Print
The Proof Print function is used when printing multiple copies. It allows the printer to output one copy and pause the printing operation before printing the remaining copies.
Because you can check the print result before starting printing the remaining copies from the Touch Panel, this function is helpful to prevent a lot of misprints.
How to print from the computer
In [Output Method] in the [Basic] tab, select [Proof Print].
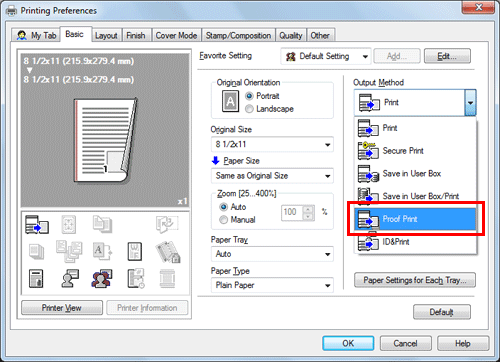
Specify the number of copies, then execute printing.
Only one copy is printed. Continue to "Operations on this machine".
Operations on this machine
Tap [Job List].
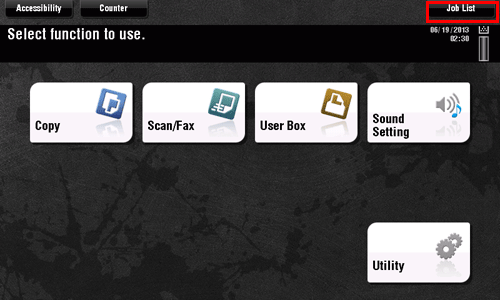
While [Active] is displayed, tap [Release Held Jobs].
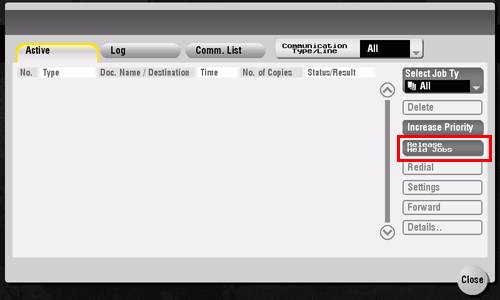
Select the job you want to print.
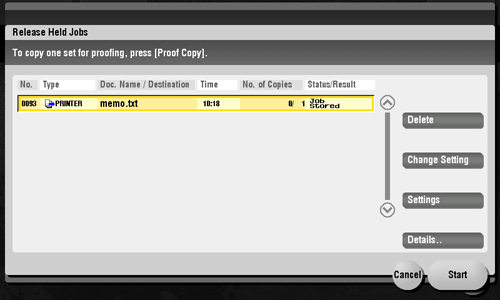
If necessary, tap [Change Setting] to change the print conditions.
To delete a job, tap [Delete].
Tap [Start] or press the Start key.
The remaining copies are printed.
Deleting a job
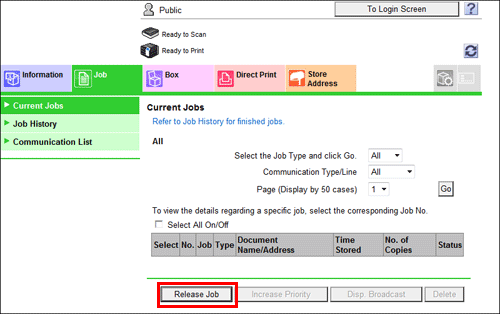
A job, which has been sent to this machine with [Proof Print] enabled, can be deleted remotely using Web Connection via the Web browser of the computer.
Access to the Web Connection, using the Web browser.
For information on how to access Web Connection, refer to Here.
Log in to the user mode.
For details on how to login to the user mode, refer to Here.
Click [Job] - [Current Jobs].
Click [Release Job].
Select the check box of the job to be deleted, and click [Delete].
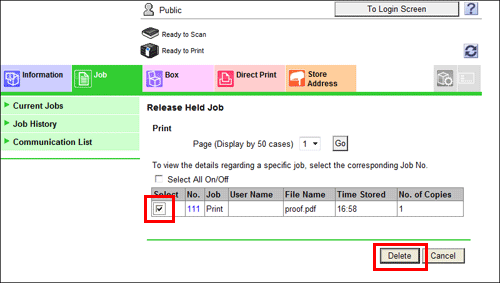
Click [OK].
The selected job is deleted.
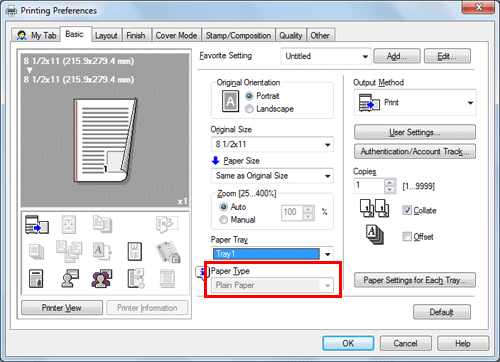
Selecting the Paper Size and Paper Type for Printing
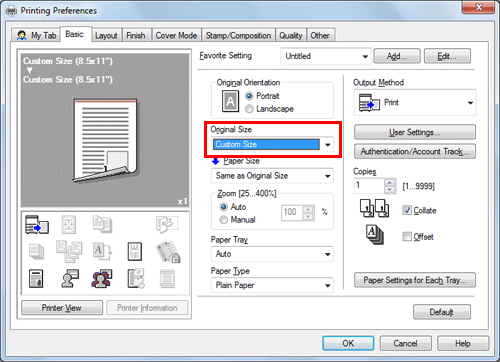
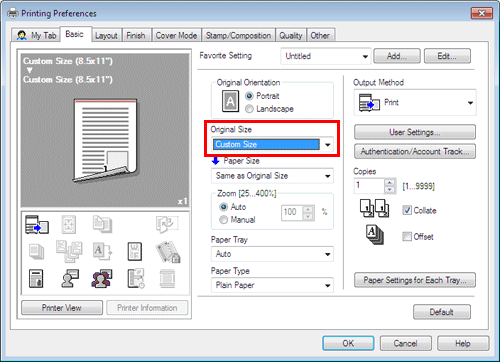
To print on custom size paper ([Original Size])
Printing on custom size paper ([Original Size])
A special sized original is printed on custom sized paper loaded in the Bypass Tray.
In [Original Size] in the [Basic] tab, select [Custom Size].
In [Paper Size], select [Same as Original Size].
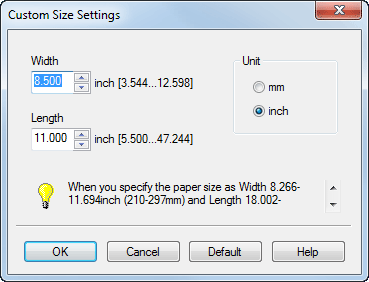
The [Custom Size] setting window appears.
Specify the width and length as desired, and click [OK].
To change the paper type ([Paper Type])
Specifying the paper type ([Paper Type])
In [Paper Type] in the [Basic] tab, select the type of paper for printing. This function is enabled when [Paper Tray] is set to [Auto].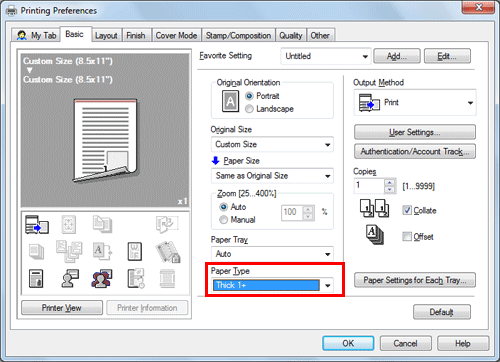
In [Paper Settings for Each Tray...] on the [Basic] tab, you can set a paper type for each tray. When you specify anything other than [Auto] in [Paper Tray], the paper type information specified here is applied.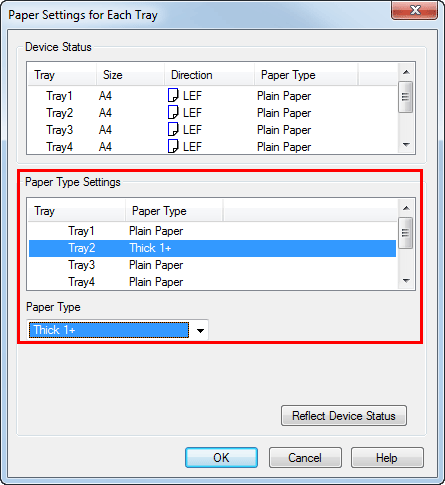
To specify the paper tray ([Paper Tray])
Specifying the paper tray ([Paper Tray])
In [Paper Tray] in the [Basic Settings] tab, select the paper tray for printing.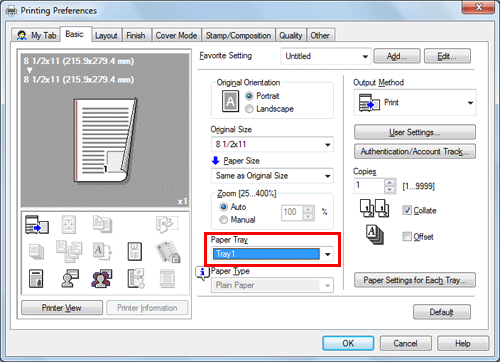
If you select [Auto], the paper tray for the paper you have selected in [Paper Size] is automatically selected.
To collectively print on different-color sheets loaded on multiple trays ([Carbon Copy])
Printing on paper in multiple trays ([Carbon Copy])
You can print the original on different sheets of paper loaded in multiple trays. Because you can obtain printing results that look like carbon-copied slips using the print command once, this function is called Carbon Copy.
For example, by using the print command once, you can print a submission document on high-quality paper loaded in Tray 1 and print your copy on recycled paper loaded in Tray 2.
This function is useful when you want to create a submission document and its copy at one time.

You cannot print multiple copies when using the Carbon Copy function.
In [Paper Tray] in the [Basic] tab, select the paper tray for printing the original.
You cannot select [Auto].
In the [Cover Mode] tab, select the [Carbon Copy] check box.
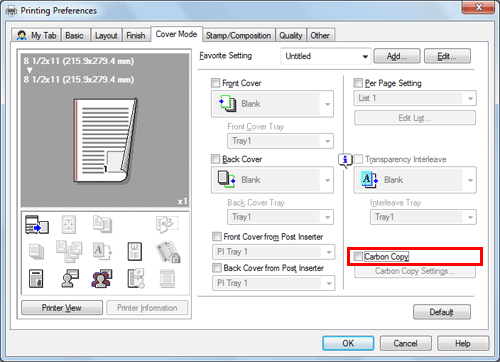
The [Carbon Copy Settings] window appears.
Specify the paper tray for carbon copies and output order, and click [OK].

Settings
Description
[Original Copy]
The paper tray for printing the original is displayed.
[Carbon Copy Tray]
Select the paper tray for carbon copies. Select the check boxes for all paper trays to be used.
[Output Order]
Select the order of outputting carbon copies.
[Tray]: Carbon copies are printed in order of selected trays. When an original of multiple pages is printed, all pages are printed on paper from one tray, then the next tray is used.
[Page]: Carbon copies are printed page by page. When an original of multiple pages is printed, each page is printed on paper from all the selected trays.
To print on postcards
Printing on postcards
You can print the original on a postcard loaded in the Bypass Tray.
Set as follows on the [Basic] tab.
[Original Size]: Select [Postcard].
[Paper Size]: Select [Same as Original Size].
[Paper Tray]: Select [Bypass Tray].
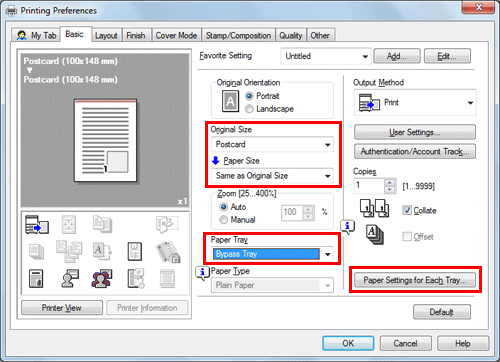
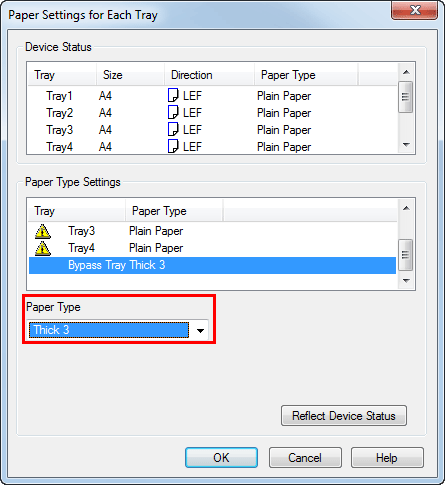
Click [Paper Settings for Each Tray...]
From [Paper Type], select [Thick 3] and click [OK].
Execute printing.
A message appears on the Touch Panel to prompt you to load postcards.
Load postcards into the Bypass Tray.
For details on how to load postcards, refer to Here.
Tap [Complete] on the Touch Panel.
Printing starts.
To print on banner paper
Printing on Banner Paper
Printing on banner paper
This machine accommodates paper with a length of up to 47-1/4 inches (1,200 mm) in the Bypass Tray.
Printable paper
Paper width | Paper length | Paper weight |
|---|---|---|
8-1/4 to 11-11/16 inches (210 to 297 mm) | 18 to 47-1/4 inches (457.3 to 1200 mm) | 33-13/16 to 55-7/8 lb (127 g/m2 to 210 g/m2) |
When printing data on banner paper, select a paper type appropriate to the banner paper using the printer driver. Then, the [Paper Tray] is set to [Bypass Tray] and [Resolution] is fixed to [600dpi].
How to print on banner paper
Specify the banner paper size.
If [ID & Print] is set to [ON] in [ID & Print Settings], printing on banner paper is disabled (default: [OFF]). For details on [ID & Print Settings], refer to Here.
On the Touch Panel of this machine, tap [Utility] - [Banner Printing].
Select [Allow], then tap [OK].
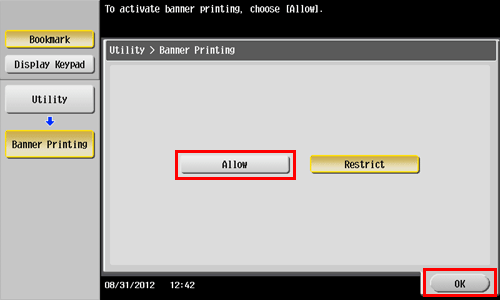
Check that the screen waiting for banner printing job has appeared.
When a banner printing job is queued, the machine can receive the following print jobs, excluding banner printing jobs.
Printing from the computer: Print, Secure Print, Save in User Box, Save in User Box and Print, Proof Print, ID&Print
Direct printing from Web Connection: Print, Secure Print, Save in User Box, Proof Print, ID&Print
When a banner printing job is queued, the machine can receive the following fax jobs.
G3 Fax, Internet Fax, IP Address Fax, PC-Fax
The following jobs remain queued until a banner printing job is released.
Forward TX, Relay Distribution, TSI Routing, Timer TX, PC-Fax TX
When a banner printing job is queued, the following operations cannot be carried out.
Printing, sending, and downloading files in a User Box from Web Connection, WS scan, TWAIN scan
When you have finished the above settings, start to print from the PC.
In [Original Size] in the [Basic] tab, select [Custom Size].
Specify the width and length of the banner paper, and click [OK].
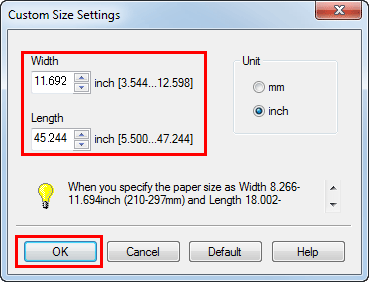
The [Confirm setting changes] dialog box appears.
Click [Yes].
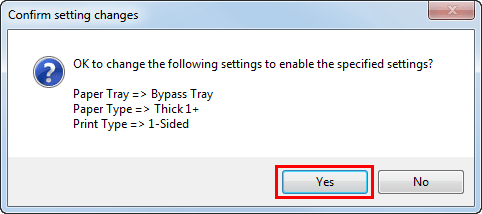
The [Paper Tray], [Paper Type], and [Print Type] settings are switched.
Click the [Paper Settings for Each Tray...], and change the type of papers on the Bypass Tray according to the weight of print papers.
If [Resolution] is set to [1200dpi (Rasterize on PC)] or [1200dpi (Rasterize on Device)], it is changed to [600dpi].
Execute printing.
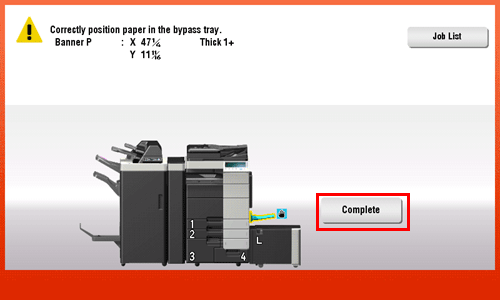
A message appears on the Touch Panel to prompt you to load papers.
Load the banner paper into the Bypass Tray.
For information on how to load banner paper into the Bypass Tray, refer to Here.
When you have loaded a banner paper, tap [Complete].
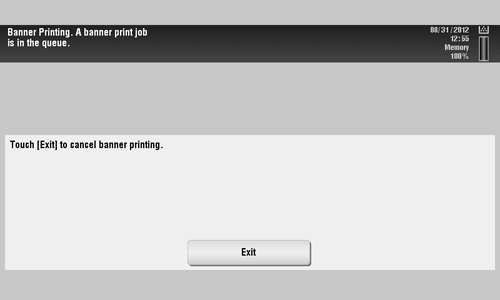
Printing on the banner paper starts. Support the ejected banner paper by hand. To continue printing, execute printing from the computer.
Tap [Exit].
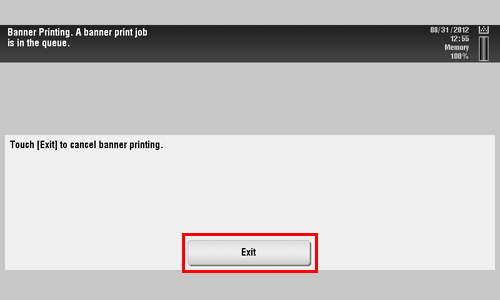
A message confirming the end of banner printing is displayed. To terminate printing, tap [Yes].
If there is a queued job, the job is started.
Adjusting the Image Quality to Obtain a Nice-Looking Print Image
To fine-tune the image quality according to the original ([Quality Adjustment])
Fine-tuning the image quality according to the original ([Quality Adjustment])
You can fine tune the image quality according to the original.
You can adjust the overall image quality of the original, and you can also adjust in detail the image quality of each element of the original, such as text and photos. When you are using the PCL driver, you can adjust the brightness and contrast.
In the [Quality] tab, click [Quality Adjustment].
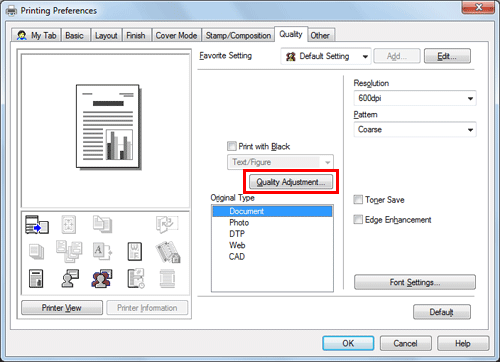
Fine tune the image quality according to the original.
[Simple]: The image quality of the entire original is adjusted.
[Detail]: The image quality of the original is adjusted in detail for each element such as text, photos, figures, tables, and graphs.
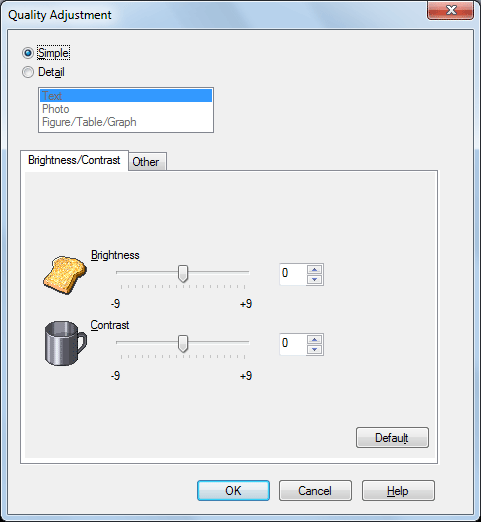
Click [OK].
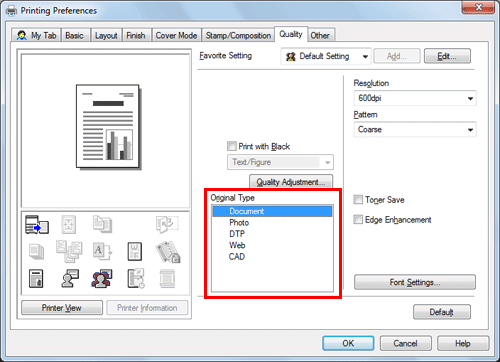
To automatically select the optimum image quality for the original ([Original Type])
Selecting the optimum image quality for the original ([Original Type])
Select the optimum settings for the original to print it at the optimum image quality level.
Select one of the following processes according to the original to be printed; the process suitable for originals consisting primarily of text, the process suitable for photos, the process suitable for originals created with DTP, the process suitable for printing Web pages, or the process suitable for printing CAD data.
In [Original Type] in the [Quality] tab, select the optimum original type mode for the original.
To specify the graphic pattern density ([Pattern]) (PCL/XPS only)
Specifying the graphic pattern density ([Pattern]) (PCL/XPS only)
In [Pattern] in the [Quality] tab, select the graphic pattern density.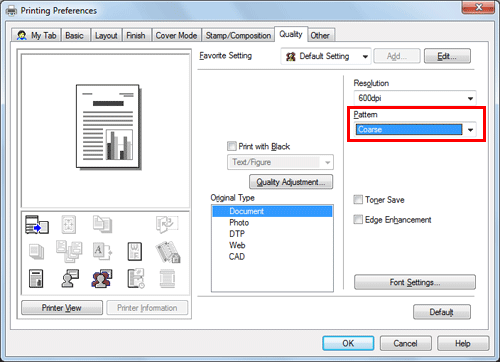
[Pattern] is available only when the printer driver for Windows (PCL/XPS) is used.
To adjust the printing density in order to reduce toner consumption ([Toner Save])
Saving toner ([Toner Save])
Selecting the [Toner Save] check box in the [Quality] tab adjusts the printing density in order to save the amount of toner consumed.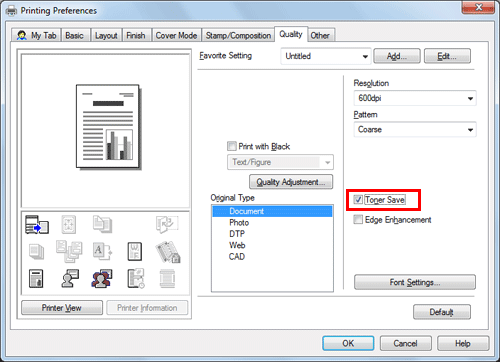
To sharpen the border between text ([Edge Enhancement])
Sharpening the border between text etc. ([Edge Enhancement])
Sharpen the edges of images such as text in the table and graphics to improve legibility.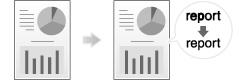
In the [Quality] tab, select the [Edge Enhancement] check box.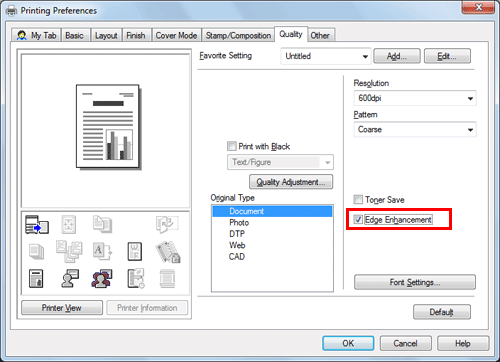
To specify the font processing method ([Font Settings]) (PCL/PS only)
Specifying font processing ([Font Settings]) (PCL/PS only)
Specify how the fonts are processed for printing.
In the [Quality] tab, click [Font Settings].
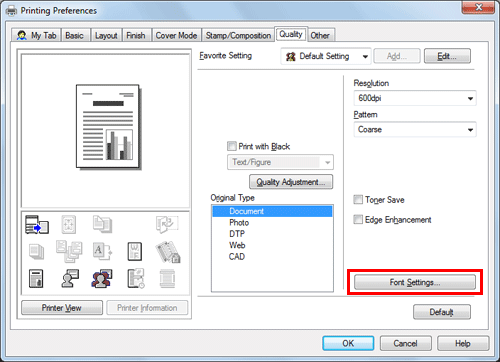
Change how the fonts are processed for printing.
PCL driver
PS driver
Settings
Description
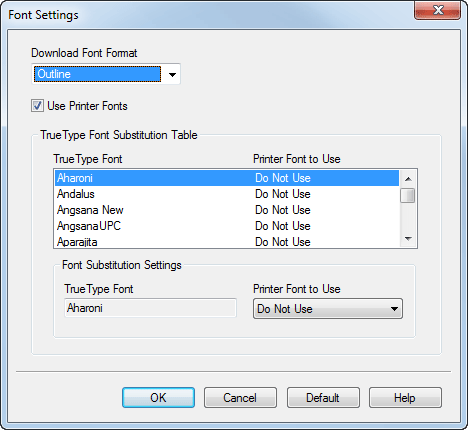
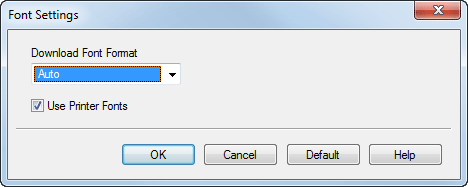
[Download Font Format]
Select a type of fonts to be downloaded from the PC to this machine.
[Use Printer Fonts]
Select this check box to replace TrueType fonts with printer fonts during printing. Use of printer fonts increases the printing speed.
In normal printing operations, we recommend that you select this check box.
[TrueType Font Substitution Table] (PCL only)
Set this table when you want to specify the printer fonts that replace TrueType fonts.
From the list, select the TrueType font, then in [Printer Font to Use], select the printer font with which you want to replace the TrueType font.
Click [OK].
To prevent a failure in printing thin lines ([Thin Line Support]) (PCL only)
Preventing failure in printing thin lines ([Thin Line Support]) (PCL only)
You can prevent thin lines from disappearing in reduced-size printing.
On the [Other] tab, select the [Thin Line Support] check box.
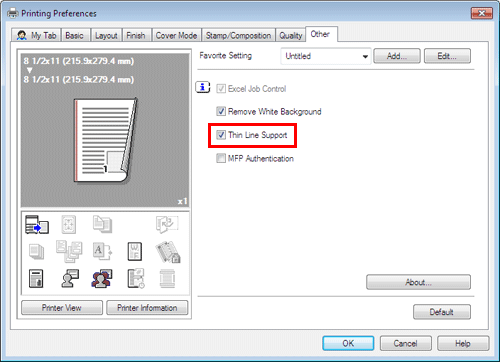
This is effective for thin lines such as table borders created in Excel, but not for thin lines used in illustrations.
[Thin Line Support] is available only when the printer driver for Windows (PCL) is used.
Finishing in Handouts or Booklet Format
To staple paper ([Staple])
Staple papers ([Staple])
Each set of papers can be stapled (at a corner or at two positions) and output automatically. This function is useful for preparing a project proposal or other booklet materials.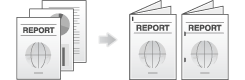
In the [Finish] tab, select the [Staple] check box. In addition, specify the number and positions of staples.
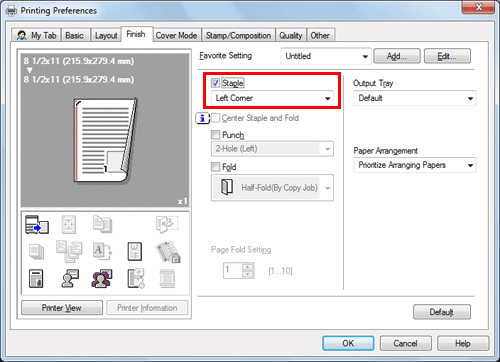
To use [Staple], the optional Finisher is required.
In [Binding Position] in the [Layout] tab, specify the staple position.
To add a page margin on paper ([Binding Margin])
Adding margin on pages ([Binding Margin])
A margin for binding is added on pages.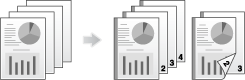
In the [Layout] tab, select the [Binding Margin] check box.
In [Binding Position] in the [Layout] tab, specify the margin position.
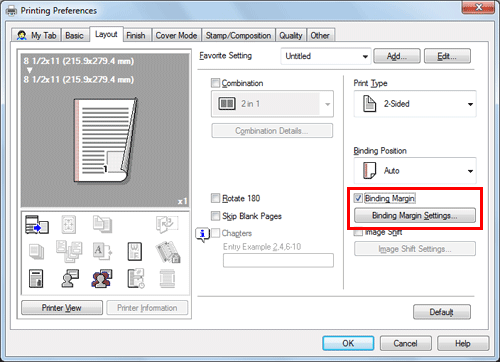
Click [Binding Margin Settings... ].
Adjust the size of margin and click [OK].

Settings
Description
[Shift Mode]
Select how the images are shifted for creating the margin.
[Front Side]/[Back Side]
Specify the size of the margin on the front side.
When you print on both sides, specify the size of the margin on the back side. When the [Same value for front and Back sides] check box is selected, a margin of the same size is created on both front and back sides.
To punch paper ([Punch])
Punching the printed sheets ([Punch])
Printed sheets are punched for filing before they are output. This function is useful when you want to bind printed materials in files.
In the [Finish] tab, select the [Punch] check box. In addition, specify the number and positions of punch holes.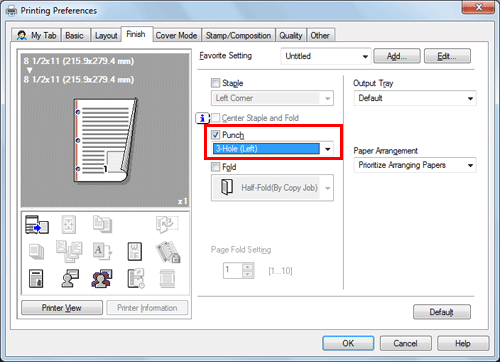
To use [Punch], the optional Finisher and Punch Kit are required.
In [Binding Position] in the [Layout] tab, specify the punch position.
The number of punched holes varies depending on the country you are in.
To fold paper ([Fold])
Folding papers ([Fold])
The printed sheets are creased before they are output.
Half-Fold

Tri-Fold
Z-Fold
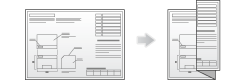
In the [Finish] tab, select the [Fold] check box, and select the folding mode.
When you want to fold page by page, specify the number of pages to be folded at one time in [Page Fold Setting].
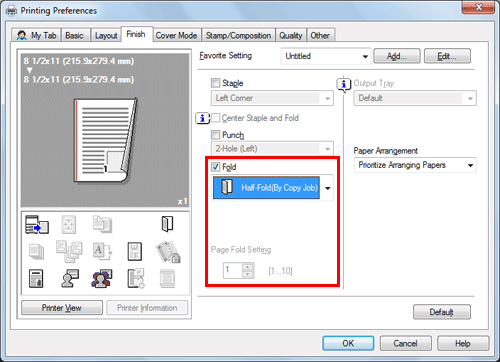
To use Half-Fold or Tri-Fold of [Fold], the optional Finisher and Saddle Stitcher are required.
To use Z-Fold of [Fold], the optional Finisher and Z-Fold Unit are required.
To use Z-Fold of [Fold], specify the paper size described in the setting you selected from the drop-down list ([Z-Fold (A3, B4, 11
 17, 8K)], [Z-Fold (8 1/2 14)]) at "Paper Size" of the application software or printer driver.
This function cannot be used on originals that contain more pages than the number of pages that can be folded by this machine.
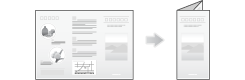
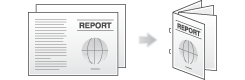
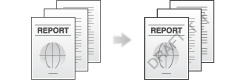
To print in a booklet format ([Booklet])
Printing in a booklet format ([Booklet])
The pages in the original data are arranged and spread out in booklet format and printed on both sides of sheets. When the printed sheets are stacked and folded in two, the pages are arranged in the correct order.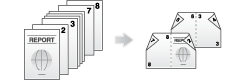
In [Print Type] in the [Layout] tab, select [Booklet].
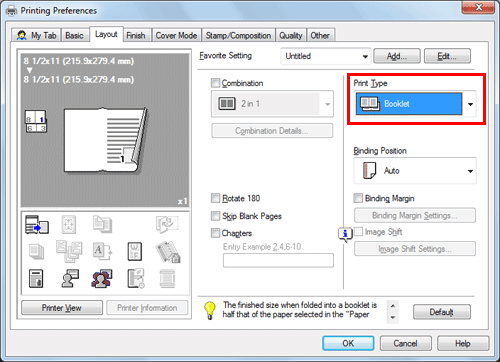
By selecting [Fold] or [Center Staple and Fold] in the [Finish] tab in combination with this function, you can create booklet-form documents by folding the printed sheets in the center or by binding them using two staples in the center.
By selecting [Chapters] in the [Layout] tab in combination with this function, you can place the specified page on the front side.
To bind in the center of paper ([Center Staple & Fold])
Binding in the center of the paper ([Center Staple and Fold])
The printed sheets are bound in the center and folded before they are output.
In the [Finish] tab, select the [Center Staple and Fold] check box.
As the sheets are bound in the center, use the combined document data or set the [Print Type] to [Booklet] on the [Layout] tab.
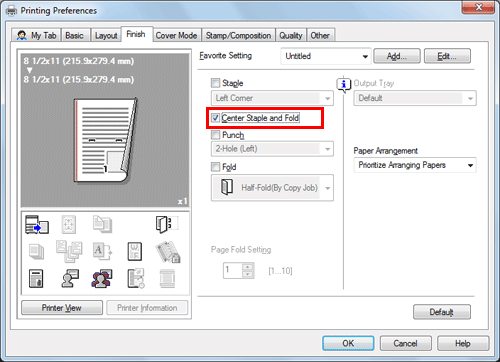
To use [Center Staple and Fold], the optional Finisher and Saddle Stitcher are required.
To specify the output tray ([Output Tray])
Specifying the output tray ([Output Tray])
In [Output Tray] in the [Finish] tab, select the tray to which printed sheets are output.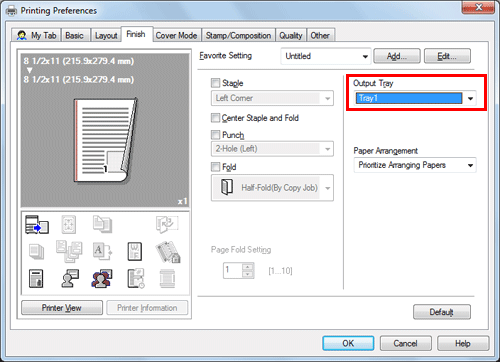
Adding Date/Time, Page Number, or Stamp to Handouts
To add a watermark ([Watermark])
Adding a watermark ([Watermark])
Text such as "NO REPRODUCTION" and "INTERNAL USE" are printed on the center of all pages in a tint color.
By printing a watermark, you can specify the handling policy of copied documents.
In the [Stamp/Composition] tab, select the [Watermark] check box. In addition, select the watermark you want to print.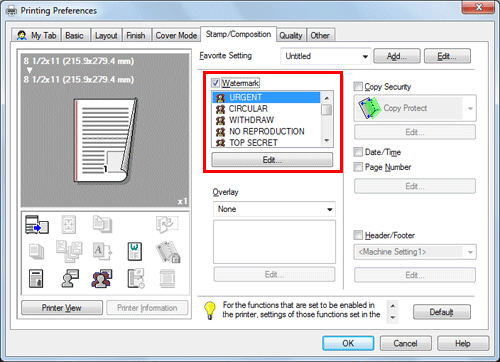
[Watermark] is available only when the printer driver for Windows is used.
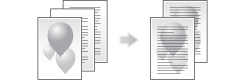
To compose an overlay image ([Overlay])
Composing an overlay image ([Overlay])
An overlay image registered in the computer or this machine is recalled and printed on the original as a composite image.
In [Overlay] in the [Stamp/Composition] tab, select [Print Host Image] or [Print Device Image] (PCL only), and then from the list, select the overlay image to be printed on the original as a composite image.
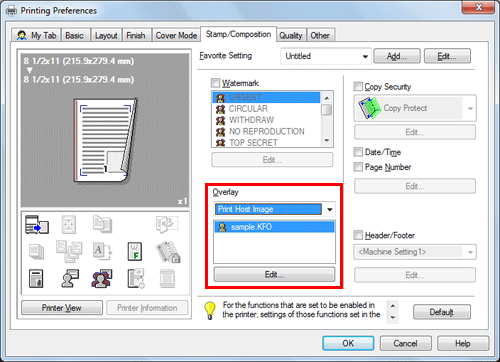
As necessary, click [Edit...] to add or delete overlay images. Alternatively, change the method of composing an overlay image.
When you have selected [Print Host Image]: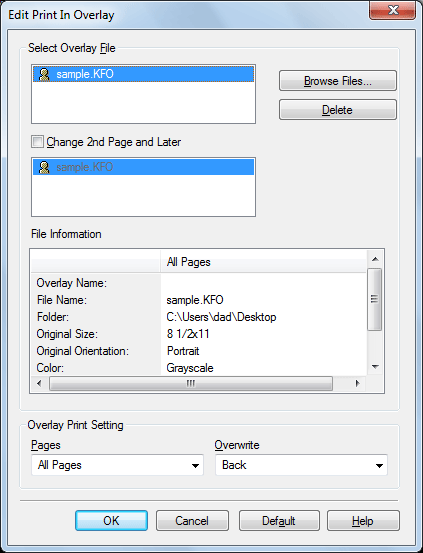
Settings | Description | |
|---|---|---|
[Select Overlay File] | Add or delete overlay images. | |
[Browse Files...] | Add an overlay image to the list. | |
[Delete] | The selected overlay images are deleted from the list. | |
[Change 2nd Page and Later] | Select this check box to change the overlay image to be printed on the second and subsequent pages of the original. In addition, from the list, select the overlay image you want to use. | |
[File Information] | Information on the selected overlay image is displayed. | |
[Overlay Print Setting] | If necessary, change the method of composing an overlay image. | |
[Pages] | Select the range of pages on which an overlay image is composed. | |
[Overwrite] | Select whether to compose the overlay image by overwriting the image on the front side of the original, or to composite it on the back side of the original. | |
When you have selected [Print Device Image]: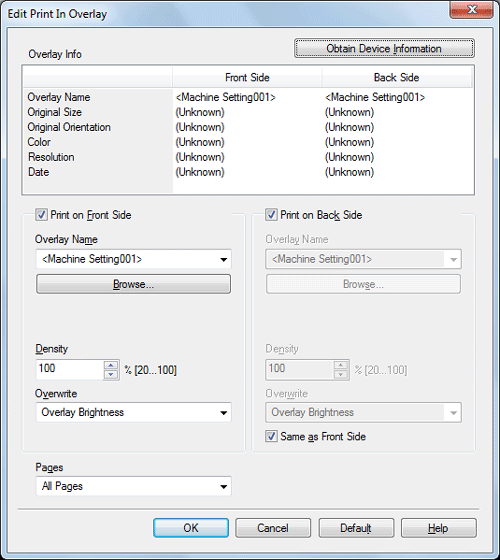
Settings | Description | |
|---|---|---|
[Obtain Device Information] | If your computer can communicate with this machine, your computer obtains and displays the latest information on the overlay images registered in this machine. | |
[Overlay Info] | Information on the overlay image selected from the list is displayed. | |
[Print on Front Side]/[Print on Back Side] | Select this check box to compose an overlay image on the front and back sides. In addition, specify how to compose an overlay image. | |
[Overlay Name] | Select the overlay image to be composed. Click [Browse...] to confirm the detailed overlay information. | |
[Density] | Specify the density of the overlay image to be composed. | |
[Overwrite] | Select whether to compose the overlay image by overwriting the image on the front side of the original, or to compose it on the back side of the original by watermarking the image. | |
[Same as Front Side] | Select this check box to apply the settings for the front side to the back side. | |
[Pages] | Select the range of pages on which an overlay image is composed. | |
[Overlay] is available only when the printer driver for Windows is used.
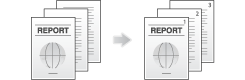
To add the print date/time or page number ([Date/Time] / [Page Number])
Adding the print date/time or page number ([Date/Time]/[Page Number])
You can add the print date/time or page number to your printouts. If necessary, you can select the print position and format of the text.
Date/Time
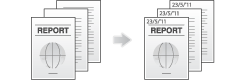
Page Number
In the [Stamp/Composition] tab, select the [Date/Time] or [Page Number] check box.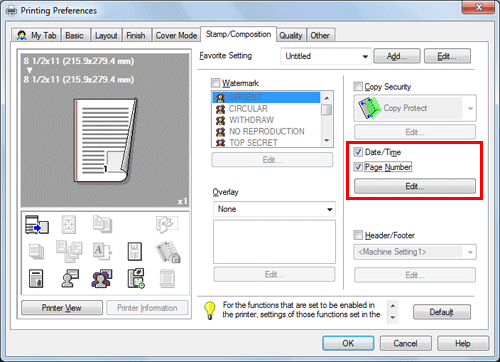
As necessary, click [Edit...] to change the print position and format of the text.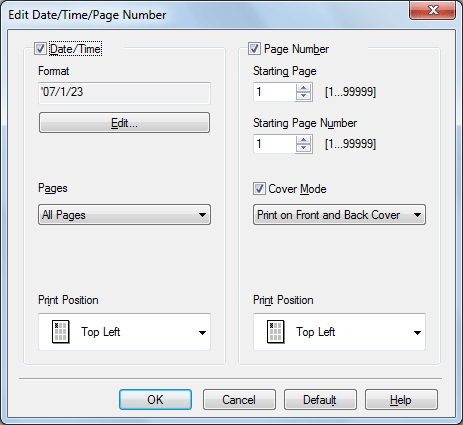
Settings | Description | |
|---|---|---|
[Date/Time] | Change the print position or format of the date/time. | |
[Format] | As necessary, click [Edit...] to specify the date/time format or whether to print the time. | |
[Pages] | Specify the range of pages on which the date/time is printed. | |
[Print Position] | Specify the print position for the date/time. | |
[Page Number] | Change the print position of page numbers and the page from which the page number printing starts. | |
[Starting Page] | Specify the page from which the page number printing starts. | |
[Starting Page Number] | Specify the page number to be printed on the page specified in [Starting Page]. | |
[Cover Mode] | Select this check box to print page numbers on the front and back covers when they are inserted. In addition, select the format. | |
[Print Position] | Specify the print position for the page numbers. | |
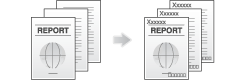
To add information to the header or footer ([Header/Footer])
Adding information to the header/footer ([Header/Footer])
You can add and print the date and time and arbitrary text in the top or bottom margin (header/footer) of the original. You must register the information to be added for the header and footer in advance on this machine.
For details on how to register the information to be added to the header and footer, refer to Here.
In the [Stamp/Composition] tab, select the [Header/Footer] check box. In addition, select the information you want to add to the header/footer.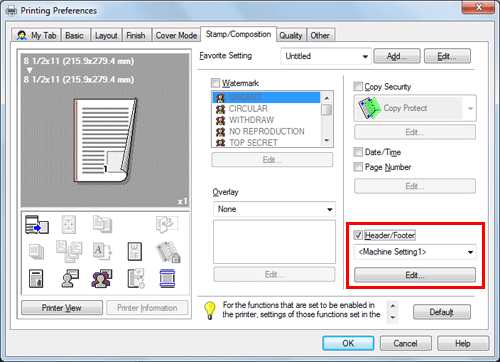
As necessary, click [Edit...] to change the range of pages on which the header/footer is printed and other settings .

Settings | Description |
|---|---|
[Recall Header/Footer] | Select the header/footer to be recalled. If your computer can communicate with this machine, clicking [Obtain Device Information] obtains and displays the latest header/footer information registered in this machine. |
[Distribution Control Number] | Select whether to print copy numbers when printing multiple sets of copies.
As necessary, click [Edit...] to specify the copy number format and the page from which the copy number printing starts. |
[Pages] | Select the range of pages on which the text is printed in the header/footer. |
Inserting a Front Cover or Different Original Page into the Original
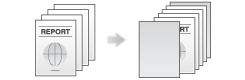
To insert front and back covers ([Front Cover] / [Back Cover])
Inserting front and back covers ([Front Cover]/[Back Cover])
You can insert cover sheets, which may be different from those used for the body, before the first page and after the end page of the original.
The front and rear cover sheets can be a paper different from body pages (in paper color and thickness). You can print them at a time.

In [Paper Tray] in the [Basic] tab, select the paper tray for printing the body pages.
You cannot select [Auto].
In the [Cover Mode] tab, select the [Front Cover] or [Back Cover] check box.
If necessary, you can select whether to print the original on the inserted sheets or to leave them blank. When the inserted sheets are printed, the first page of the original is printed on the front cover and the last page of the original is printed on the back cover.
In [Front Cover Tray] or [Back Cover Tray], select the paper tray for the paper to be used as the front cover or the back cover.

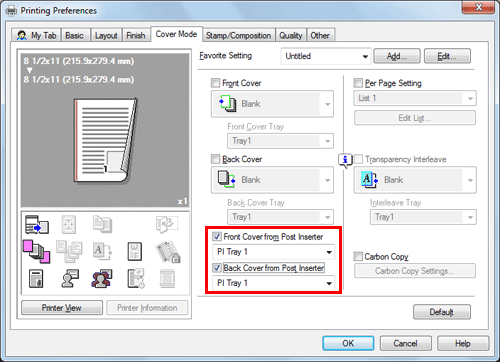
To insert front and back covers using the post inserter ([Front Cover from Post Inserter] / [Back Cover from Post Inserter])
Inserting front and back covers ([Front Cover from Post Inserter]/[Back Cover from Post Inserter])
You can insert the optional Post Inserter paper before the first page or after the last page of the original as the outer front cover.
In [Paper Tray] in the [Basic] tab, select the paper tray for printing the body pages.
You cannot select [Auto].
In the [Cover Mode] tab, select the [Front Cover from Post Inserter] or [Back Cover from Post Inserter] check box.
Select the PI trays for paper to be inserted as the front and back covers.
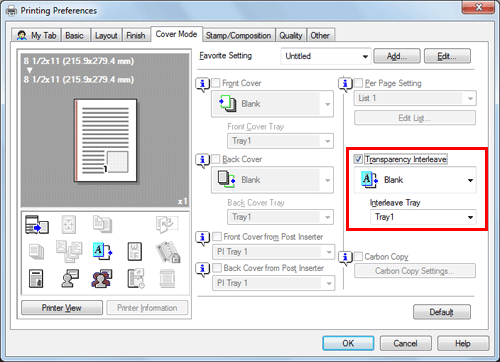
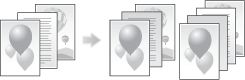
To print by inserting paper between transparencies ([Transparency Interleave])
Inserting paper between transparencies ([Transparency Interleave])
When printing on multiple OHP transparencies, you can insert the specified paper between the OHP transparencies. These sheets of paper prevent the transparencies from sticking together due to heat generated after printing or static electricity.
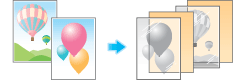
In [Paper Type] in the [Basic] tab, select [Transparency].
If you select [Transparency], the [Print Type] is set to [1-Sided].
In the [Cover Mode] tab, select the [Transparency Interleave] check box.
In [Interleave Tray], select the paper tray for the paper to be inserted between OHP transparencies.
OHP interleaves are inserted as blank sheets.
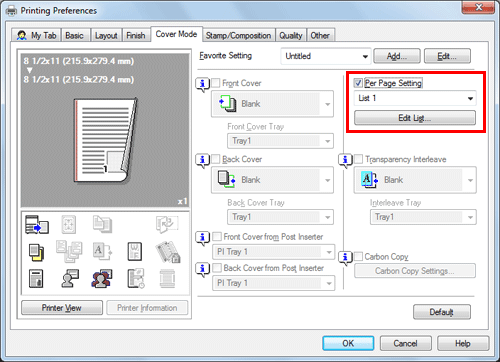
To insert paper into the specified page ([Per Page Setting])
Inserting Paper into the Specified Pages ([Per Page Setting])
Paper different from other pages is inserted into the specified pages.
You can select color paper and thick paper as paper to be inserted. You can also select whether to print the original on the inserted paper.
Create in advance a list that specifies the paper and print settings for each page. When printing on inserted paper, select the list you want to apply to printing.
In the [Cover Mode] tab, select the [Per Page Setting] check box, then click [Edit List...].
When you have already prepared a list, select the list you want to apply to printing.
Create a list by specifying the paper and print settings for each page.
Settings
Description
[Settings List]
The settings for each page are displayed in a list.
[List Name]
Select the list to be created.
[Edit List Name]
If necessary, change the list name.
[Up]/[Down]
These buttons move the order of settings in the list. They do not change the settings.
[Add]
This button adds the setting to the list.
[Delete]
This button deletes the setting selected in the list.
[Tab Paper Settings]
When using index paper, set the number and positions of index tabs.
[Add/Edit]
You can add settings to the [Settings List] or edit settings.
[Page Number]
Enter the page numbers you want to add.
To specify multiple page numbers, separate each number with a comma (for example, "2,4,6") or connect the numbers using a hyphen (for example, "6-10").
[Change Settings]
Change the setting for the item selected in the [Add/Edit] list.
[Print Type]: Select the print type applied when printing the specified pages.
[Tab Paper]: Select whether to use index paper.
[Paper Tray]: Select the paper tray for printing the specified pages.
[Staple]: Select the staple position applied when the specified pages are stapled.
[Tab Position]
Specify what number tab of index paper is to be used to print text.
[Text on Tab]
Enter text to be printed as a tab of index paper using up to three lines.
[Tab Text Details]
Specify the details such as the direction, position, or size for text to be printed as a tab of index paper.
Click [OK].
Adjusting the Layout
To print a poster-sized image ([Combination]) (PCL only)
Printing a poster-sized image ([Combination]) (PCL only)
The original image is enlarged, divided, and printed on multiple sheets. When you join the printed sheets together, a large poster is created.
In [Combination] in the [Layout] tab, select "N N". For example, when you select [2 2], one page of the original image is enlarged, divided, and printed on four sheets.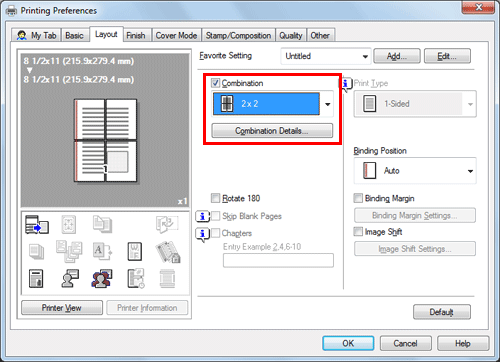
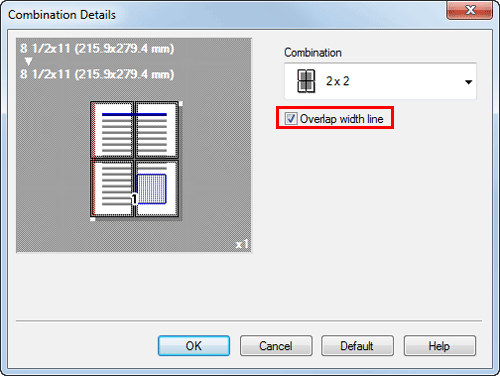
As necessary, click [Combination Details...] to select whether to create overlap margins.
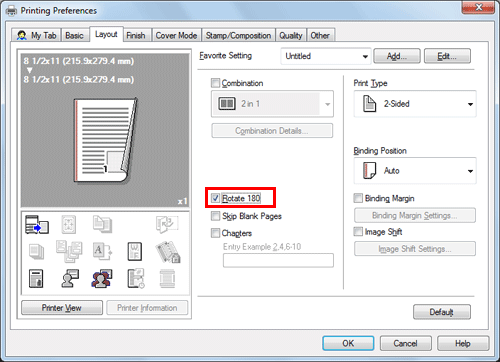
To rotate an image 180 degrees ([Rotate 180])
Rotating the image 180 degrees ([Rotate 180])
The image is printed upside down. Use this function when printing on envelopes whose loading direction cannot be changed.
In the [Layout] tab, select the [Rotate 180] check box.
To fine-tune the print position ([Image Shift])
Fine-tuning the print position ([Image Shift])
You can fine tune the print position of the image upward, downward, rightward, and leftward with respect to the paper. When an image is printed on both side, you can also fine tune its position.
Use this function when you want to make a fine adjustment, such as changing the print position a little or printing images in different positions between the front and back sides.

In the [Layout] tab, select the [Image Shift] check box.
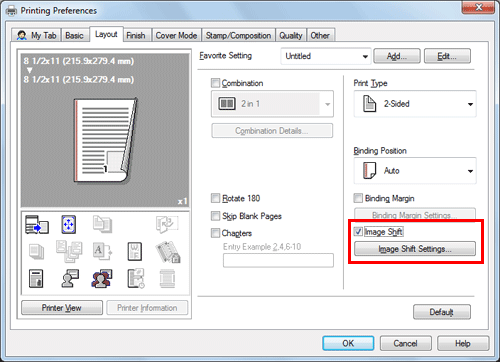
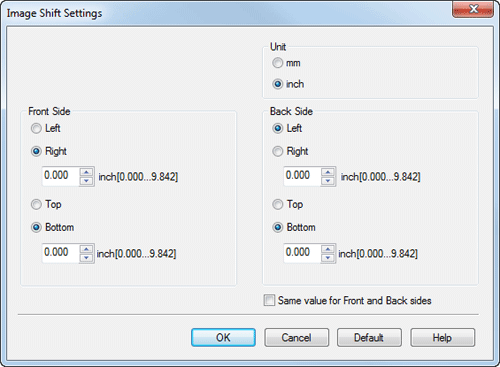
Click [Image Shift Settings...].
Adjust the upward/downward and rightward/leftward shift distances, and click [OK].
When printing images on both sides, selecting the [Same value for Front and Back sides] check box applies the same settings to both sides.
Restricting a Handout Copy or Printing a Highly Confidential Document
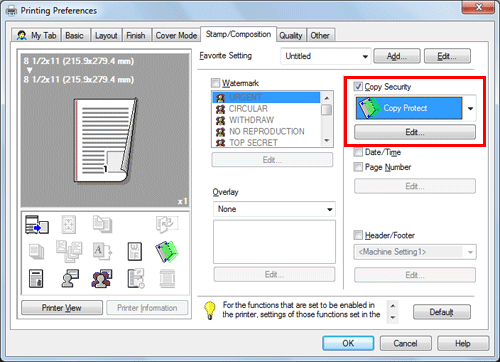
To print a concealed security watermark that appears when copied ([Copy Protect])
Printing a concealed security watermark ([Copy Protect])
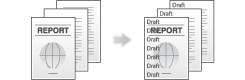
Text such as "Copy" and "Private" are printed in the background pattern as concealed text. This function is called the Copy Protect function.
When a copy-protected document is copied, the concealed security watermark appears on the entire page, thereby indicating that it is an unauthorized copy.
On the [Stamp/Composition] tab, select the [Copy Security] check box, and then select [Copy Protect].
As necessary, click [Edit...] to specify the text to be printed and the format of the text. For details, refer to Here.
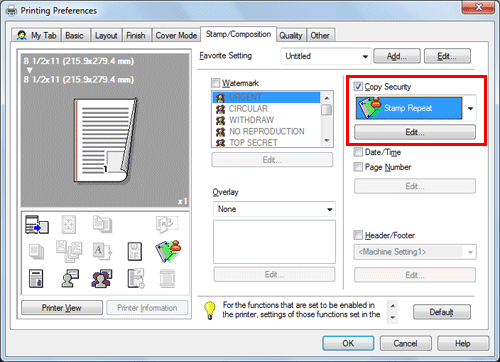
To print stamps such as "Copy" and "Private" on the entire page ([Stamp Repeat])
Printing a stamp on the entire page ([Stamp Repeat])
Stamp such as "Copy" and "Private" are printed on the entire page.
By printing text such as "Copy" or "Private" as a visible stamp, you can deter unauthorized copying.
On the [Stamp/Composition] tab, select the [Copy Security] check box, and then select [Stamp Repeat].
As necessary, click [Edit...] to specify the text to be printed and the format of the text. For details, refer to Here.
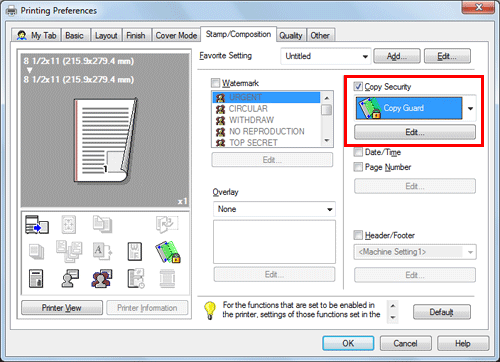
To embed copy restriction information in the copy protection function that prints concealed security watermarks in the background ([Copy Guard])
Adding copy restriction information ([Copy Guard])
Copy Guard is a copy protection function that prints concealed security watermarks such as "Private" or a date in the background to prevent unauthorized copying, and embeds a copy restriction pattern on all printed sheets.
If an attempt is made using a device that supports the copy guard function to copy a sheet that has been copy protected, a copy guard pattern is scanned, the copying process is canceled, and the job is deleted.
To use [Copy Guard], you need to install the optional Security Kit and enable the Copy Guard function of this machine. For details on how to enable the Copy Guard function, refer to Here.
On the [Stamp/Composition] tab, select the [Copy Security] check box, and then select [Copy Guard].
As necessary, click [Edit...] to specify the text to be printed and the format of the text. For details, refer to Here.
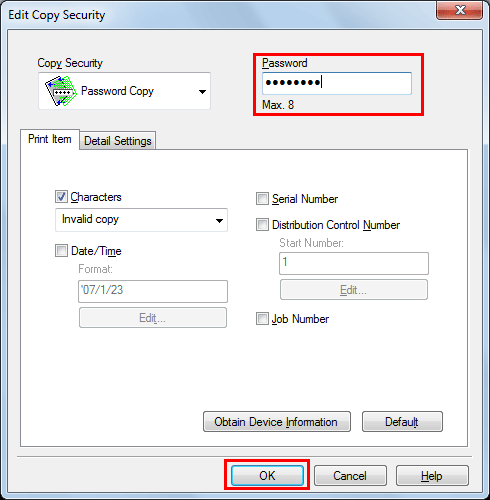
To embed a password in the copy protection function that prints concealed security watermarks in the background ([Password Copy])
Adding a password ([Password Copy])
Password Copy is a copy protection function that prints concealed security watermarks such as "Private" or a date in the background to prevent unauthorized copying, and embeds a password for the password copy function on all printed sheets.
If an attempt is made using a device that supports the password copy function to copy a sheet that has been prepared for password copy, a password copy pattern is scanned and entry of a password is requested. Copying starts if the correct password is entered.
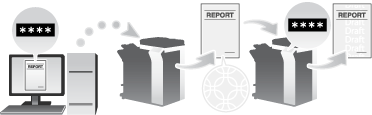
To use [Password Copy], you need to install the optional Security Kit and enable the Password Copy function of this machine. For details on how to enable the Password Copy function, refer to Here.
On the [Stamp/Composition] tab, select the [Copy Security] check box, and then select [Password Copy].
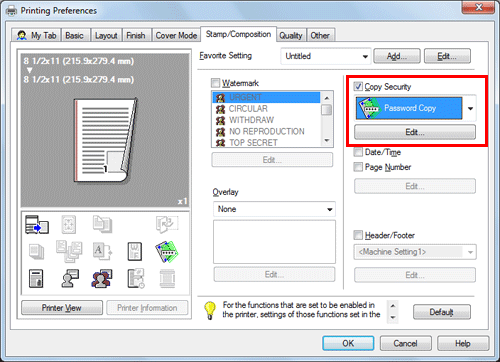
Enter the password to be embedded (using up to eight characters), and then click [OK].
As necessary, specify the text to be printed and the format of the text. For details, refer to Here.
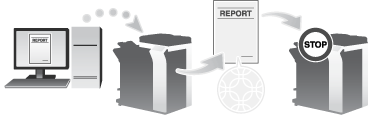
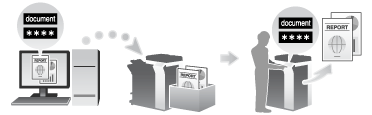
To print a highly confidential document ([Secure Print])
Printing Highly Confidential Documents ([Secure Print])
Secure Print
The Secure Print function allows you to set an ID and a password for print data and to save the data in a box (Secure Print User Box) on this machine. Because the data is not printed within a short time period, this function prevents printed materials from being missing or left unattended.
Since you need to enter the ID and password from the Touch Panel to print the data saved in the box, this function is particularly suitable for safely printing highly confidential documents.

How to print from the computer
A single job allows you to print out a document of up to 2999 pages in length.
In [Output Method] on the [Basic] tab, select [Secure Print].
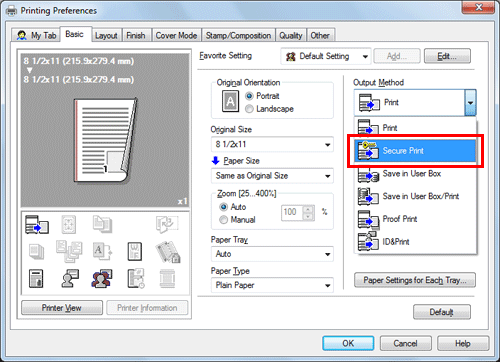
Enter the ID and password, then click [OK].
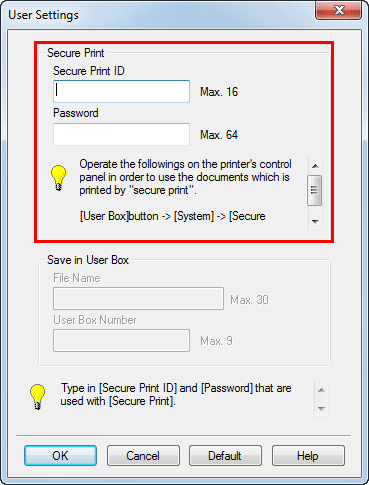
If you always use the same ID and password, registering them in advance eliminates the need for entering them each time. For details, refer to Here.
Execute printing.
The data is saved in the Secure Print User Box. Continue to "Operations on this machine".
You can issue a print instruction from the Control Panel before print data scanning on this machine is completed. However, printing is executed after print data scanning on this machine has been completed.
Operations on this machine
Data printed using the Secure Print function is saved in the Secure Print User Box. To print the saved data, you need to enter the ID and password specified in the printer driver.
For details on how to print, refer to Here.
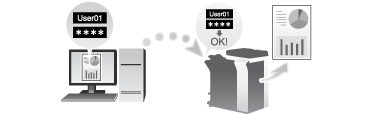
Printing in the Environment with User Authentication Installed
To add authentication information
Attaching Authentication Information
Printing when authentication is set
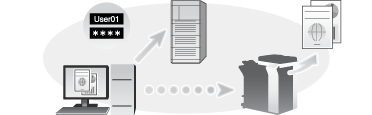
When printing a document in an environment where user authentication or account track is employed, you need to send the authentication information (user name and password) to this machine to execute printing. This requirement limits the users who can use this machine, preventing unauthorized use by a third party.
When this machine receives a print job from a user who is not allowed to print or a print job without authentication information, this machine automatically discards the job.
A print job without authentication information is a print job that is sent without correctly configuring the User Authentication/Account Track setting using the printer driver even though the User Authentication/Account Track setting is configured on this machine.
The status in which the User Authentication/Account Track setting is not configured correctly means that the [Auto] check box of [Obtain Settings...] is cleared and [User Authentication]/[Account Track] of [Device Option] is set to [None] in the [Configure] tab of the [Properties] windows of the printer driver. If a print job is executed in this status by selecting [Print] in [Output Method] of the [Basic] tab at the time of printing, it is considered as a print job without authentication information.
When printing a highly confidential document in an environment where user authentication or account track is employed, using the ID & Print function enables high security printing. For details, refer to Here.
If the quick authentication for printing server is installed, you can start printing by authentication with only the user name but without password entry. How to configure the setting is explained using Web Connection. For details, refer to Here.
Operations required to use this function
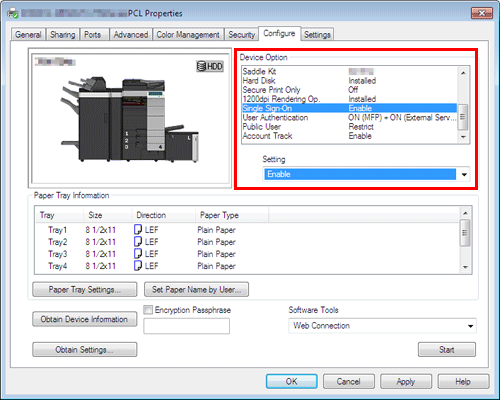
In the [Configure] tab of the printer driver, check that the User Authentication/Account Track setting is correctly configured.
Display the [Properties] window of the printer driver.
For information on how to display the [Properties] window, refer to Here.
In [Device Option] in the [Configure] tab, check that the User Authentication/Account Track setting is correctly configured for your operating environment.
If it is not configured correctly, select [User Authentication] or [Account Track] from the list, then change the relevant setting in [Setting].

Click [OK].
How to print from the computer
If [ID & Print] is set to [ON] in [ID & Print Settings], a print job is considered as an ID & Print job even if [Output Method] is set to [Print] for the printer driver (default: [OFF]). For details on [ID & Print Settings], refer to Here.
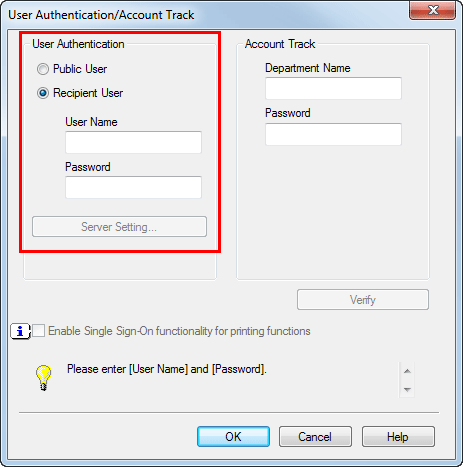
In the [Basic] tab, click [Authentication/Account Track...].
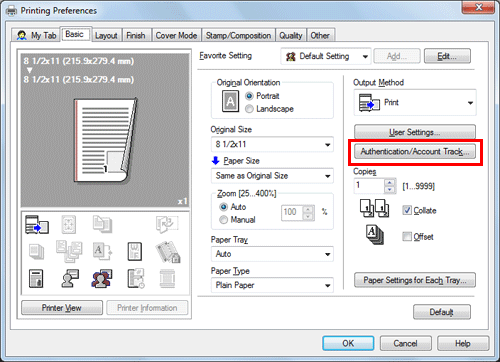
When user authentication is enabled, select [Recipient User], then enter the user name and password.
When this machine is accessible to public users (unregistered users), selecting [Public User] enables you to execute printing without entering the user name and password.
When an external authentication server is used, click [Server Setting...] and select the authentication server.
If you always use the same user name and password, registering them in advance eliminates the need for entering them each time. For details, refer to Here.
If account track is enabled, enter the account name and password.
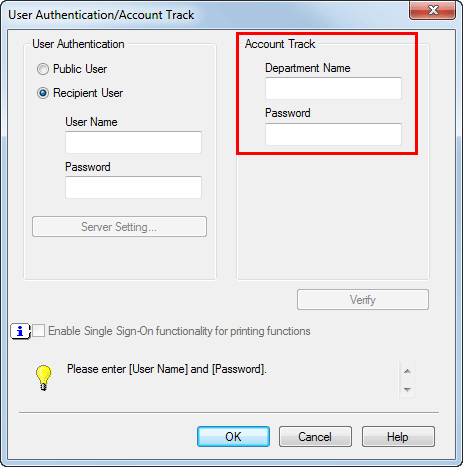
If you always use the same account name and password, registering them in advance eliminates the need for entering them each time. For details, refer to Here.
Click [OK].
If the PC can communicate with this machine, you can click [Verify] to check the entered authentication information. Also, you can check the authentication information for errors before printing it.
To perform MFP authentication when external server authentication is used together, select the [MFP Authentication] check box in the [Other] tab.

Execute printing.
Printing starts successfully when the authentication information is judged correct.
To print a highly confidential document ([ID&Print])
Printing at the Same Time as Authentication (ID & Print)
ID & Print
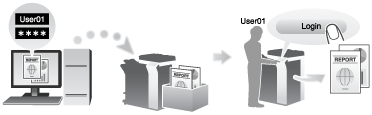
The ID & Print function saves print data in a box on this machine in an environment where user authentication is employed. Because the data is not printed within a short time period, this function prevents printed materials from being missing or left unattended.
Since you need to be authenticated in this machine to print the data saved in the box, this function is suitable for safely printing highly confidential documents. When you are successfully authenticated, the print data of the login user is automatically printed. This enhances security as well as ensures smooth operation.
How to print from the computer
A single job allows you to print out a document of up to 2999 pages in length.
In the [Basic] tab, click [Authentication/Account Track...].
Enter the authentication information, and click [OK].
For details, refer to Here.
In [Output Method], select [ID&Print].
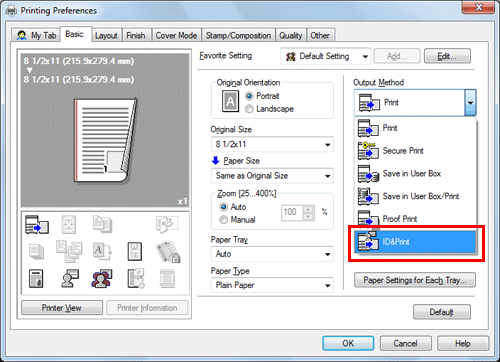
Execute printing.
The data is saved in the ID & Print User Box. Continue to "Operations on this machine".
You can issue a print instruction from the Control Panel before print data scanning on this machine is completed. However, printing is executed after print data scanning on this machine has been completed.
Operations on this machine
Tap the [User Name] field or keyboard icon, and enter the user name and password.

Check that [ID & Print/MFP Access] is selected in [ID & Print], and tap [Login].
When you are successfully authenticated, all data items saved in the ID & Print User Box are printed.
After data has been printed, do not log in to the machine.
When you select [Access Basic Screen] in [ID & Print], you can log in without starting printing.
You can change the default value for [ID & Print] (Default: [ID & Print/MFP Access]) if necessary. For details, refer to Here.
To print a particular data item in the ID & Print User Box, open the ID & Print User Box and select the data item. For details on how to print, refer to Here.
Operations on this machine (when an Authentication Unit is used)
When an optional Authentication Unit (biometric type) or Authentication Unit (IC card type) is used, you can execute printing just by touching the authentication unit with your finger or IC card.
You may be required to enter the user name and password before touching the unit with your finger or IC card due to the authentication settings. Tap the [User Name] or [Password] field or keyboard icon, and enter the user name or password.
Check that [Authentication Device] is selected in [Authentication Method].
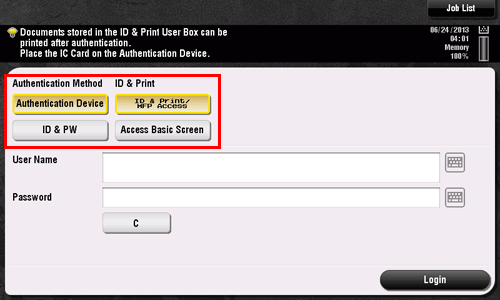
Check that [ID & Print/MFP Access] is selected in [ID & Print], and touch the Authentication Unit with your finger or IC card.
When you are successfully authenticated, all data items saved in the ID & Print User Box are printed.
After data has been printed, do not log in to the machine.
When you select [Access Basic Screen] in [ID & Print], you can log in without starting printing.
You can change the default value for [ID & Print] (Default: [Print & Access Basic Screen]) if necessary. For details, refer to Here.
To print in the single sign-on environment of Active Directory
Printing in the Single Sign-on Environment of Active Directory
Single sign-on
When the print service of this machine joins a domain of Active Directory, users can execute printing from computers in the same domain without entering the authentication information (user name and password). The authentication information entered in the login page on the computer is used for this authentication.
Operations required to use this function
In the [Configure] tab of the printer driver, check that the User Authentication and Single sign-on settings are correctly configured.
Before using this function, configure a setting to join this machine in the Active Directory domain. For details, refer to Here.
Display the [Properties] window of the printer driver.
For information on how to display the [Properties] window, refer to Here.
In [Device Option] in the [Configure] tab, check that the [User Authentication] and [Single Sign-On] settings are correctly configured for your operating environment.
If they are not configured correctly, select [User Authentication] and [Single Sign-On] from the list, and then change the relevant settings in [Setting].
You can set the [Single Sign-On] option to [Enable] if you have set the [User Authentication] to [ON (External Server)] or [ON (MFP) + ON (External Server)].
Printing procedure
In the [Basic] tab, click [Authentication/Account Track...].
Check [Enable Single Sign-On functionality for printing functions] box, and click [OK].
The login name in the PC is displayed in the [User Name] field.
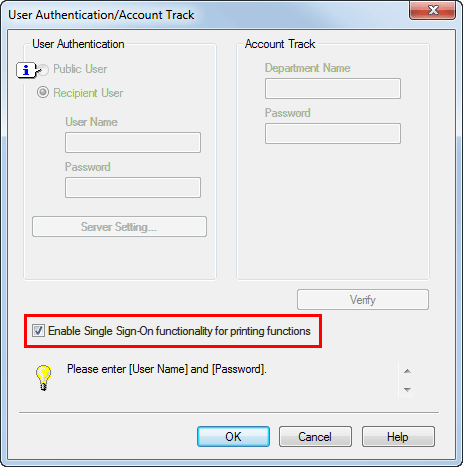
Click [OK].
Execute printing.
Printing starts.