
Description of Setup Buttons (Administrator Settings)
Cellular Phone/PDA Setting[Utility]
To display:
- [Utility]
- [Administrator Settings]
- [System Connection]
- [Cellular Phone/PDA Setting]
- [System Connection]
- [Administrator Settings]
Select whether to allow users to print files from a Bluetooth-compatible mobile phone, smartphone, or tablet PC, or to save files in a box.
This can be set if the Bluetooth interface is enabled.
[Restrict] is specified by default.
Tips
- The Local Interface Kit EK-607 is required to use the Bluetooth function.
- The settings by the service representative are required to use the Bluetooth function. For details, contact your service representative.
Center Staple Position[Utility]
To display:
- [Utility]
- [Administrator Settings]
- [System Settings]
- [Expert Adjustment]
- [Finisher Adjustment]
- [Center Staple Position]
- [Finisher Adjustment]
- [Expert Adjustment]
- [System Settings]
- [Administrator Settings]
If the staple position is not on the fold line on saddle-stitched paper, use this option to align the staple position on the fold.
Copy after configuration, then repeat adjustments as required.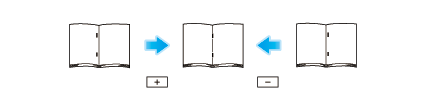
| Settings | Description |
|---|---|
[Paper Size] | Select the size of paper that is used to adjust the staple position. |
[Adjust Value] | Enter an adjustment value between -10.0 mm and 10.0 mm by tapping [-] and [+].
[0.0 mm] is specified by default. |
Tips
- This item is available when the Finisher FS-534 and Saddle Stitcher SD-511 are installed.
- This item is available when the Finisher FS-535 and Saddle Stitcher SD-512 are installed (bizhub C554 only).
- Adjust the half-fold position before adjusting the center staple position.
- Make adjustment while checking paper stapled at a displaced position.
- The value you set by selecting [All] in [Paper Size] will be added to the setting for each paper size.
- For adjustments to put staples parallel with the left edge of paper, contact your service representative for instructions.
Centering[Utility]
To display:
- [Utility]
- [Administrator Settings]
- [System Settings]
- [Expert Adjustment]
- [Printer Adjustment]
- [Centering]
- [Printer Adjustment]
- [Expert Adjustment]
- [System Settings]
- [Administrator Settings]
Adjust the print start position on the left edge of the paper relative to the paper discharge direction.
Press Start to print a test pattern. Check that the margin between the left edge and the print starting position is 3/16 inches (4.2 mm) (+/- 1/32 inch (+/- 0.5 mm)). Repeat adjustments, as required.
| Settings | Description |
|---|---|
[Select Tray] | Select a paper tray that is used to adjust the start position for printing. |
[Adjust Value] | Enter an adjustment value between -3.0 and +3.0 mm by tapping [-] and [+]. [0.0 mm] is specified by default. |
Tips
- Only 8-1/2
 11
11  (A4 ) paper can be used for adjusting the Bypass Tray.
Centering (Duplex 2nd Side)[Utility]
To display:
- [Utility]
- [Administrator Settings]
- [System Settings]
- [Expert Adjustment]
- [Printer Adjustment]
- [Centering (Duplex 2nd Side)]
- [Printer Adjustment]
- [Expert Adjustment]
- [System Settings]
- [Administrator Settings]
Adjust the print start position at the left edge of the paper relative to the paper discharge direction for printing the back side in 2-sided printing.
Press Start to print a test pattern. Check the test pattern and adjust so that the margin between the left edge of the paper and the print start position is 3/16 inches (4.2 mm) (+/-1/32 inch (+/-0.5 mm)). Repeat adjustments, as required.
| Settings | Description |
|---|---|
[Select Tray] | Select a paper tray that is used to adjust the start position for printing. |
[Adjust Value] | Enter an adjustment value between -3.0 and +3.0 mm by tapping [-] and [+]. [0.0 mm] is specified by default. |
Tips
- Only 8-1/2 11 (A4 ) paper can be used for adjusting the Bypass Tray.
Change Registered Overlay[Utility]
To display:
- [Utility]
- [Administrator Settings]
- [System Settings]
- [Restrict User Access]
- [Restrict Access to Job Settings]
- [Change Registered Overlay]
- [Restrict Access to Job Settings]
- [Restrict User Access]
- [System Settings]
- [Administrator Settings]
Select whether to allow the user to overwrite or delete a registered overlay image.
[Allow] is specified by default.
Change the "From" Address[Utility]
To display:
- [Utility]
- [Administrator Settings]
- [System Settings]
- [Restrict User Access]
- [Restrict Access to Job Settings]
- [Change the "From" Address]
- [Restrict Access to Job Settings]
- [Restrict User Access]
- [System Settings]
- [Administrator Settings]
Select whether to allow the user to change sender E-mail address ("From" address).
| Settings | Description |
|---|---|
[Allow] | Allow the user to change the "From" address. [Allow] is specified by default (without user authentication). |
[Administrator E-Mail Address] | Prohibit the "From" address from being changed and use the administrator's E-mail address. |
[Login User Address] | Prohibit the "From" address from being changed and use the user's E-mail address. Administrator's E-mail address is used if user's E-mail address has not been registered. [Login User Address] is specified by default (with user authentication). |
Changing Job Priority[Utility]
To display:
- [Utility]
- [Administrator Settings]
- [System Settings]
- [Restrict User Access]
- [Restrict Access to Job Settings]
- [Changing Job Priority]
- [Restrict Access to Job Settings]
- [Restrict User Access]
- [System Settings]
- [Administrator Settings]
Select whether to allow the user to change the priority of print jobs.
If [Restrict] is selected, [Increase Priority] does not appear in [Job List] screen.
[Allow] is specified by default.
Changing Zoom Ratio[Utility]
To display:
- [Utility]
- [Administrator Settings]
- [System Settings]
- [Restrict User Access]
- [Restrict Access to Job Settings]
- [Changing Zoom Ratio]
- [Restrict Access to Job Settings]
- [Restrict User Access]
- [System Settings]
- [Administrator Settings]
Select whether to allow the user to change the user preset zoom.
[Allow] is specified by default.
Check HDD Capacity[Utility]
To display:
- [Utility]
- [Administrator Settings]
- [Security Settings]
- [HDD Settings]
- [Check HDD Capacity]
- [HDD Settings]
- [Security Settings]
- [Administrator Settings]
Enables you to check the used space, total space and available space on the hard disk.
Client Settings[Utility]
To display:
- [Utility]
- [Administrator Settings]
- [Network Settings]
- [SMB Settings]
- [Client Settings]
- [SMB Settings]
- [Network Settings]
- [Administrator Settings]
Configure settings to enable use of the SMB client function of this machine.
| Settings | Description |
|---|---|
[ON]/[OFF] | Select whether to use the SMB client function of this machine. Using this function allows you to send the scanned original data to a shared folder of a computer. [ON] is specified by default. |
[SMB Authentication Setting] | Select an authentication method for SMB transmission according to your environment.
[NTLM v1] is specified by default. |
[Authentication Setting if Kerberos Fails] | If [Kerberos] is selected in [SMB Authentication Setting], select whether to perform NTLM authentication when Kerberos authentication has failed.
[Disable NTLM] is specified by default. |
[User Authentication (NTLM)] | Select whether to use user authentication via the NTLM server. [ON] is specified by default. |
[DFS Setting] | Select whether to use DFS when the distributed file system (DFS) is installed. [OFF] is specified by default. |
[Single Sign-On Setting] | Configure the single sign-on function for SMB transmission. By using the user authentication information (login name and password) of this machine as SMB destination authentication information (host name and password), you can avoid the problem of having to specify SMB destination authentication information, allowing construction of a single sign-on environment for SMB transmission.
|
Client Settings (Remote Panel Settings)[Utility]
To display:
- [Utility]
- [Administrator Settings]
- [Network Settings]
- [Remote Panel Settings]
- [Client Settings]
- [Remote Panel Settings]
- [Network Settings]
- [Administrator Settings]
Configure settings to operate the Control Panel of this machine using dedicated software on a different computer.
| Settings | Description |
|---|---|
[ON]/[OFF] | Select whether to operate the Control Panel of this machine using dedicated software on a different computer. [OFF] is specified by default. |
[Port No.] | If necessary, change the port number of the server where the dedicated software was installed. [443] is specified by default. |
[Connection Timeout] | If necessary, change the timeout time of communication with the server where the dedicated software was installed. [60 sec.] is specified by default. |
[Server Address] | Enter the address of the server where the dedicated software was installed. Use one of the following entry formats.
|
[Certificate Verification Level Settings] | To validate the certificate during SSL communication, select items to be verified.
|
[Synchronize WebDAV Client Setting] | To access a server with the dedicated software installed via a proxy server, enter your proxy server.
|
Closed Network RX[Utility]
To display:
- [Utility]
- [Administrator Settings]
- [Fax Settings]
- [Function Settings]
- [Closed Network RX]
- [Function Settings]
- [Fax Settings]
- [Administrator Settings]
Configure the settings for using the Closed Network RX function.
Closed Network RX is a function that restricts fax senders by passwords. You can use this function only when the remote machine is one of our models that has the Password TX function.
| Settings | Description |
|---|---|
[Closed Network RX Password] | To use the Closed Network RX function, tap [No] to deselect it. Also, enter the password for limiting communications peers (a number containing up to four digits). Inform the receiver of the password you entered here. [No] is specified by default. |
Color Registration Adjust[Utility]
To display:
- [Utility]
- [Administrator Settings]
- [System Settings]
- [Expert Adjustment]
- [Color Registration Adjust]
- [Expert Adjustment]
- [System Settings]
- [Administrator Settings]
Adjust the print position for each paper type with respect to each color if color shifts are detected in the print result.
Load paper into the Bypass Tray and press Start to start printing the test pattern. Make adjustments while checking the test pattern. Repeat adjustments as necessary.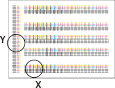
The example shows the color registration adjustment for cyan.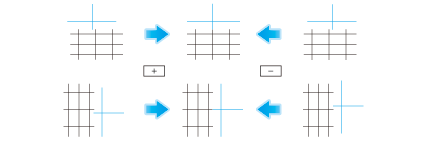
| Settings | Description |
|---|---|
[X] | If the print position of the desired color is out of line to the left or right with respect to the printing position of black, tap [-] and [+] to enter an adjustment value in the range between -6 dots and +6 dots.
[0 dot] is specified by default. |
[Y] | If the print position of the desired color is shifted up or down with respect to the printing position of black, tap [-] and [+] to enter an adjustment value in the range between -6 dots and +6 dots.
[0 dot] is specified by default. |
Color/Grayscale Multi-Value Compression Method[Utility]
To display:
- [Utility]
- [Administrator Settings]
- [Fax Settings]
- [Network Fax Settings]
- [Color/Grayscale Multi-Value Compression Method]
- [Network Fax Settings]
- [Fax Settings]
- [Administrator Settings]
Change default settings on the compression type for sending data in full color or gray scale if you are using the Internet Fax or IP Address Fax function.
| Settings | Description |
|---|---|
[JPEG (Color)] | Compress image data in color JPEG format. [JPEG (Color)] is specified by default. |
[JPEG (Gray Scale)] | Compress image data in black-and-white JPEG format. |
[Not Set] | Compress data according to the compression type specified in [Black Compression Level]. You cannot send data in color or gray scale. Whichever file format you specify, data is converted to the TIFF format. |
Tips
- Data is converted to the compact PDF format using the technique unique to this machine.
Communication Check[Utility]
To display:
- [Utility]
- [Administrator Settings]
- [Network Settings]
- [TCP/IP Settings]
- [IPsec Settings]
- [Communication Check]
- [IPsec Settings]
- [TCP/IP Settings]
- [Network Settings]
- [Administrator Settings]
Select this option to confirm IPsec communication error logs.
Pressing [Communication Error Log] displays a list of IP addresses at which a communication error occurred, error details, and occurrence times. To confirm the details, select a target communication error, then press [Details].
Confidential Document Access Method[Utility]
To display:
- [Utility]
- [Administrator Settings]
- [Security Settings]
- [Security Details]
- [Confidential Document Access Method]
- [Security Details]
- [Security Settings]
- [Administrator Settings]
Specify how to enter an ID and a password when accessing to a file in the Secure Print User Box. This function is forcibly determined in conjunction with [Prohibited Functions When Authentication Error].
| Settings | Description |
|---|---|
[Mode 1] | Displays all files when the ID and password specified in the printer driver are entered. Select a desired file and print it. [Mode 1] is specified by default. |
[Mode 2] | Displays all files when the ID specified in the printer driver are entered. To print, select your desired file, then enter the appropriate password for each file. |
Confidential Rx Report[Utility]
To display:
- [Utility]
- [Administrator Settings]
- [Fax Settings]
- [Report Settings]
- [Confidential Rx Report]
- [Report Settings]
- [Fax Settings]
- [Administrator Settings]
Select whether to print a report containing the results of confidential faxes received.
[ON] is selected by default.
Confirm Address (Register)[Utility]
To display:
- [Utility]
- [Administrator Settings]
- [Fax Settings]
- [Function Settings]
- [Function ON/OFF Setting]
- [Confirm Address (Register)]
- [Function ON/OFF Setting]
- [Function Settings]
- [Fax Settings]
- [Administrator Settings]
Select whether to require the user enter a fax number twice to register it when, for example, registering a destination or forwarding destination.
This is helpful to prevent the fax number from being incorrectly registered.
[OFF] is specified by default.
Confirm Address (TX)[Utility]
To display:
- [Utility]
- [Administrator Settings]
- [Fax Settings]
- [Function Settings]
- [Function ON/OFF Setting]
- [Confirm Address (TX)]
- [Function ON/OFF Setting]
- [Function Settings]
- [Fax Settings]
- [Administrator Settings]
Select whether to require the user to enter a fax number twice to send a fax by directly entering the fax number.
This is helpful to prevent a fax from being sent to the wrong destination.
[OFF] is specified by default.
Copier Settings[Utility]
To display:
- [Utility]
- [Administrator Settings]
- [Copier Settings]
- [Administrator Settings]
Configure each function used in the copy mode.
| Settings | Description |
|---|---|
[Auto Zoom (Platen)] | Specify whether to switch [Zoom] to [Auto] when selecting paper for copying after loading an original on the Original Glass. For details, refer to Here. |
[Auto Zoom (ADF)] | Specify whether to switch [Zoom] to [Auto] when selecting paper for copying after loading an original on the ADF. For details, refer to Here. |
[Specify Default Tray when APS Off] | Select a paper tray to switch to after releasing the selection of [Auto] for [Paper]. For details, refer to Here. |
[Print Jobs During Copy Operation] | Specify whether to print immediately or to print after copying is completed when a print job or fax job is received during copy operations on the Control Panel. For details, refer to Here. |
[Tri-Fold Print Side] | Specify whether to have tri-folded copies ejected with the print side folded inward or outward. For details, refer to Here. |
[Automatic Image Rotation] | Select the setting in which the image is to be automatically rotated if the original orientation is different from the paper orientation. For details, refer to Here. |
Copy Guard[Utility]
To display:
- [Utility]
- [Administrator Settings]
- [Security Settings]
- [Security Details]
- [Copy Guard]
- [Security Details]
- [Security Settings]
- [Administrator Settings]
Select whether to use Copy Guard.
Copy Guard is a copy protection function that prints concealed security watermarks such as "Private" or a date in the background to prevent unauthorized copying, and embeds a copy restriction pattern on all printed sheets.
[No] is specified by default.
Tips
- To use Copy Guard, the Security Kit is required.
Copy Program Lock Settings[Utility]
To display:
- [Utility]
- [Administrator Settings]
- [System Settings]
- [Restrict User Access]
- [Copy Program Lock Settings]
- [Restrict User Access]
- [System Settings]
- [Administrator Settings]
Restrict the administrator to change or delete the names of the registered copy and image adjustment programs. You can configure this option for each program.
Counter Remote Control[Utility]
To display:
- [Utility]
- [Administrator Settings]
- [User Authentication/Account Track]
- [User/Account Common Setting]
- [Counter Remote Control]
- [User/Account Common Setting]
- [User Authentication/Account Track]
- [Administrator Settings]
Specify whether to allow acquisition of counter information managed on this machine when a remote diagnosis system is used.
[Restrict] is specified by default.
Create One-Touch Destination[Utility]
To display:
- [Utility]
- [Administrator Settings]
- [One-Touch/User Box Registration]
- [Create One-Touch Destination]
- [One-Touch/User Box Registration]
- [Administrator Settings]
Register frequently used destinations and fixed subject and message text phrase of the E-mail. You can select registered information before sending.
| Settings | Description |
|---|---|
[Address Book (Public)] | Register destinations for each transmission mode, such as Scan to E-mail and Fax TX. |
[Group] | Register multiple destinations as a group. You can register different types of destinations for a group, such as E-mail, SMB and fax. |
[E-Mail Settings] | Register fixed subject and message text phrase of the E-mail. You can select a registered subject and message text before sending. |
Create User Box[Utility]
To display:
- [Utility]
- [Administrator Settings]
- [One-Touch/User Box Registration]
- [Create User Box]
- [One-Touch/User Box Registration]
- [Administrator Settings]
Register various user boxes such as shared user box and exclusive user box.
| Settings | Description |
|---|---|
[Public/Personal User Box] | Register a Public User Box. If user authentication or account track is installed on this machine, you can register Personal and Group User Boxes. For details on settings, refer to Here. |
[Bulletin Board User Box] | Register a Bulletin Board User Box to be used for polling in each application. For details on settings, refer to Here. |
[Relay User Box] | Register a User Box to relay fax. For details on settings, refer to Here. |
[Annotation User Box] | Creates a User Box to automatically add the Date/Time and Annotation to files during printing or sending. For details on settings, refer to Here. |
Custom Display Settings[Utility]
To display:
- [Utility]
- [Administrator Settings]
- [System Settings]
- [Custom Display Settings]
- [System Settings]
- [Administrator Settings]
Change the view of the main screen for the main menu and each mode in a user-friendly manner.
| Settings | Description |
|---|---|
[Main Menu Default Settings] | Configure shortcut keys that are displayed in the main menu. For details, refer to Here. |
[Main Menu Display Settings] | Change the background color, etc. for the main menu as desired. For details, refer to Here. |
[Custom Function Pattern Selection] | Change the display pattern of function keys in the Copy, Scan/Fax and User Box modes, respectively. For details, refer to Here. |
[User/Admin Function Permissions] | Specify whether to allow changes of the function key display pattern by user/account when user authentication/account track is enabled. For details, refer to Here. |
[Function Display Key Permission Setting] | Specify whether to allow users to change the function keys to be displayed in the Copy, Scan/Fax and User Box modes, respectively. For details, refer to Here. |
[Temporary Change Language Setting] | Specify whether to display the [Language] key for temporarily changing the display language on the Touch Panel. For details, refer to Here. |
Custom Function Pattern Selection[Utility]
To display:
- [Utility]
- [Administrator Settings]
- [System Settings]
- [Custom Display Settings]
- [Custom Function Pattern Selection]
- [Custom Display Settings]
- [System Settings]
- [Administrator Settings]
Change the display pattern of function keys in the Copy, Scan/Fax and User Box modes, respectively.
| Settings | Description |
|---|---|
[Copy/Print] | Select a display pattern of function keys to be displayed on the print settings screen in Copy and User Box modes.
Tap [Details] to check the functions that can be used in the respective display patterns. [Full Functions] is specified by default. |
[Send/Save] | Select a display pattern of function keys to be displayed on the send and save settings screens in Fax/Scan and User Box modes.
Tap [Details] to check the functions that can be used in the respective display patterns. [Full Functions] is specified by default. |