
[Barcode Area] / [Serial No. Area]
Overview
Set the area to inspect bar codes or serial numbers.
This function reads bar codes, numbers, and alphabetic characters in the specified area and saves them in a CSV file.
You can also check whether the numeric value changes sequentially.
- Setting by a customer engineer is required to use this function. For details, contact your service representative.
One of the following settings is required to write a CSV file.
- Set [Common Setting] - [Create Auto Inspection Report] of [User Setting] or [Administrator Setting] to [ON].
- Set [Create Auto Inspection Report] in [IQ Function Set.] to [ON].
- The saved CSV file can be download from Web Utilities of Auto Inspection Unit UK-301. For details about how to access Web Utilities, refer to Web Utilities (Auto Inspection Unit UK-301).
- For details about [Create Auto Inspection Report] in [Common Setting], refer to the corresponding items in [Common Setting].
- For details about how to create [Create Auto Inspection Report] of [IQ Function Set.], refer to the corresponding items in [Common Setting].
Setting Conditions
-[Barcode Area] setting conditions
Compatible bar code types | Reading conditions |
|---|---|
| The following conditions must be satisfied to read bar codes. Narrow bar width: 0.3 mm or more, GS1-128: 0.191 mm or more Cell size: 0.35 mm or more Background color: White At least 5 mm of margin must be left around the text.* *: If a space between numbers in the target area is narrow, a recognition error may occur. |
-[Serial No. Area] setting conditions
The following conditions must be satisfied to read numeric values.
Font type
For numbers only: Gothic, Arial, OCRB
For numbers, alphabetical characters, and symbols: Arial, OCRBFont size: 6 points or more
Background color: White
Number of characters: 20
At least 5 mm of margin must be left around the text.*
*: If a space between numbers in the target area is narrow, a recognition error may occur.
- Characters covered by OCR (Optical Character Recognition)
Numbers: 0 1 2 3 4 5 6 7 8 9
Alphabetical characters (uppercase): A B C D E F G H J K L M N P Q R S T U V W X Y Z
Symbols: # $ &
- Characters not covered by OCR (Optical Character Recognition)
Alphabetical characters (uppercase): I O
Alphabetical characters (lowercase): All
Symbols: @ ! " % ' ( ) - ^ [ ; : ] , . / = ~ | ` { + * } < > ? _ \ etc.
Setting Items
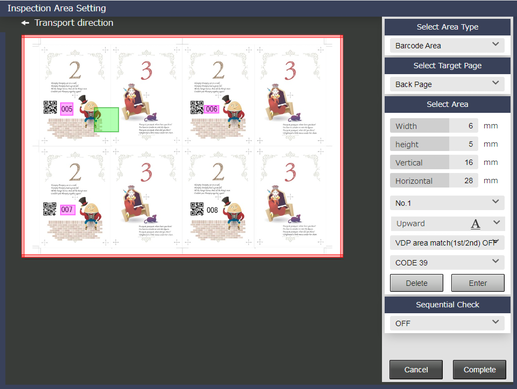
[Barcode Area]
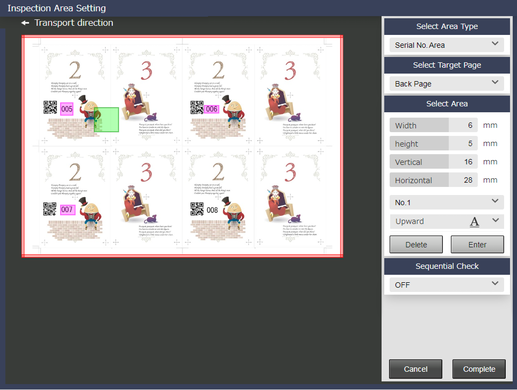
[Serial No. Area]
Setting item | Description | ||
|---|---|---|---|
[Select Area Type] | [Barcode Area] | Sets an area targeted for bar code inspection. This function reads and decodes the bar code in the target area. You can also check whether the numeric value changes sequentially. | |
[Serial No. Area] | Sets an area targeted for serial number inspection. This function reads numbers in the target area and converts them to text data. You can also check whether the numeric value changes sequentially. | ||
[Select Target Page] | [Front Page] | Sets an area on the front page. | |
[Back Page] | Sets an area on the back page. | ||
[Select Page] | Sets an automatic inspection area in the selected page. Only 1 page is selectable. | ||
[Front and Back] | Sets the area on both the front and back sides at once. | ||
[Select Area] | [Width] | Enter a numeric value for the horizontal width of the automatic inspection area. | |
[Height] | Enter a numeric value for the vertical width of the automatic inspection area. | ||
[Horizontal] | Enter a numeric value for the horizontal position of the automatic inspection area. | ||
[Vertical] | Enter a numeric value for the vertical position of the automatic inspection area. | ||
Area No. | Assigns an area No. to each target area. No.1 to No.30 can be set to the selected target side. The numbers you set are displayed in red. | ||
Orientation of bar code or serial number | Sets the orientation of the bar code or serial number drawn in the area on the preview screen. | ||
Front/back match of specified area | [VDP area match(1st/2nd) OFF] | When the same area number is set to [Back Page] and [Front Page], set whether to confirm that the numbers and alphabetic characters match between the front and back sides. | |
[VDP area match(1st/2nd) ON] | |||
Bar code type | Sets the bar code type when [Barcode Area] is selected. | ||
[Sequential Check ON], [Sequential Check OFF] | You can set whether to perform the sequential check for each area number of [Select Area] when [Check the data inside a page] or [Check the data between pages] is selected in [Sequential Check]. | ||
[Delete] | Deletes the selected [Select Area]. Select and delete the area number of the area to be deleted. | ||
[Enter] | The set [Select Area] is applied. If [Enter] is pressed, the next area number is automatically selected. Up to 30 [Select Area] can be specified for each target side. | ||
[Sequential Check] | [OFF] | Make a setting to confirm whether the consecutive numbers or bar codes in the specified area are sorted in serial numbers (ascending or descending order). | |
[Check the data inside a page] | |||
[Check the data between pages] | |||
- When an area is set to [Front Page] or [Back Page] in [Select Target Page], the area cannot be set to [Select Page].
- If an area is set to [Select Page] of [Select Target Page], the area cannot be set to [Front Page] or [Back Page].
Setting Procedure (Setting Front/Back Match Check for Specified Area)
If you set the specified areas with the same area number on the front and back sides of the image, you can read and confirm whether the numbers and alphabetic characters match between the same area numbers.
If the numbers and alphabetic characters do not match, paper feeding will be stopped regardless of the preset processing, and a pop-up for canceling printing will be displayed on the Touch panel of this system.
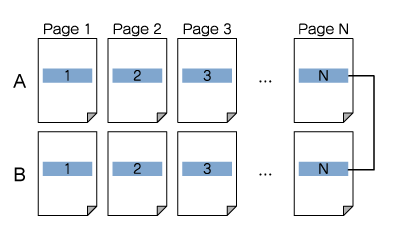
A: [Front Page] B: [Back Page] : Specified area


[Select Page] is not able to be selected.
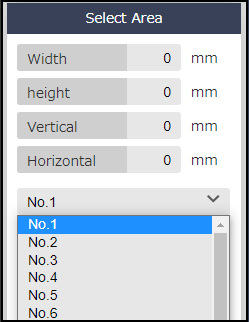
[No.1] is selected by default. It is recommended that the area numbers are used in order from No.1.

[Width] / [Height]: Enter the area from the starting point to the lower right direction using a positive value, and the area to the upper left direction using a negative value, using the horizontal and vertical positions as the starting points (0 mm).
[Horizontal] / [Vertical]: Enter the position of the area to the lower right direction using a positive value, using the upper left edge of the displayed reference image as the starting point (0 mm).
- If a mouse is connected to this system, you can drag the mouse to set the area.
Orientation of bar code or serial number drawn in the area
Type of bar code in the area (with [Barcode Area] selected)
The next area number is automatically selected.
Repeat steps 3 to 6 to make area settings for [Front Page].
Area numbers 1 to 30 can be set to the selected target side.
[Select Page] is not able to be selected.
- When confirming the front/back matching in the specified area, set the same area number in [Front Page] and [Back Page].
[VDP area match(1st/2nd) ON] is able to be selected when [Front Page] and [Back Page] are set to the same area number.
ON/OFF can be set individually for each area.
If ON/OFF is switched, press [Enter] again.
- If [Enter] is pressed, the next area number is automatically selected. After pressing [Enter], be sure to check the currently selected area number.
Setting Procedure (Setting a Sequential Check)
You can scan and confirm whether the consecutive numbers or bar codes in the specified area are sorted in serial numbers (ascending or descending order).
If it is judged that the serial number of the scanned value is not correct, paper feeding will be stopped regardless of the preset processing, and a pop-up for canceling printing will be displayed on the Touch panel of this system.
There are 2 methods of carrying out a sequential check.
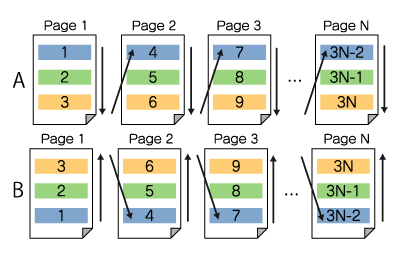
[Check the data inside a page]: Confirm whether the serial numbers are sorted (in ascending or descending order) in the order in which the area numbers are specified in the same page. For the second and subsequent pages, confirm from the continuation of the last number on the previous sheet.
[Check the data between pages]: Confirm whether the same area numbers are sorted with serial numbers (in ascending or descending order) between pages.
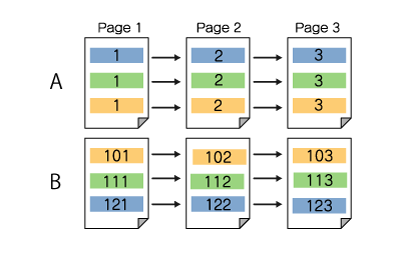
A: [Front Page] B: [Back Page]
 : Area No. 1
  : Area No. 2
  : Area No. 3
- For the area set in [Front Page] of [Select Target Page], only confirm the serial numbers only on the front side. For the area set in [Back Page], only confirm the serial numbers only on the back side. Therefore, it is not possible to perform the sequential check of consecutive numbers from the front side to the back side.
- The sequential check is not available for the area with [Select Page] set in [Select Target Page].
- Even if a value is skipped between the set area numbers, it is ignored and inspected (example: Area No. 1, Area No. 2, Area No. 4... In this case, inspection is performed even if area No. 3 does not exist).
- The numeric value does not necessarily need to be increased or decreased. Even if the same value is set, it is not judged to be erroneous (example: 1, 2, 2, 3).
- When the numeric value is omitted and left blank, it is judged to be erroneous (example: 1, , 2, 3).
- When values are read, if the distance between values in the target area is too narrow, a misrecognition may occur. Confirm whether a margin of at least 5 mm remains around text.


To use this function, [Front Page] / [Back Page] / [Front and Back] and [Select Page] cannot be set at the same time.
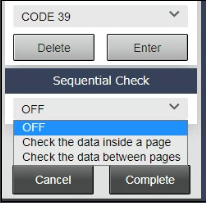
If [OFF] is selected, no inspection is performed, but the bar code and serial number are read. The result can be checked in [AutoInspect.Report]. For details, refer to [Print Workflow].
The items for sequential check are determined when settings are selected. You do not need to press [Enter] of [Select Area].
If [Check the data between pages] is selected, be sure to note the following points.
- This function is not available when area No.1 is in ascending order and area No.2 is in descending order. Only one of the ascending and descending orders can be set in each area.


[No.1] is selected by default. It is recommended that the area numbers are used in order from No.1.

[Width] / [Height]: Enter the area from the starting point to the lower right direction using a positive value, and the area to the upper left direction using a negative value, using the horizontal and vertical positions as the starting points (0 mm).
[Horizontal] / [Vertical]: Enter the position of the area to the lower right direction using a positive value, using the upper left edge of the displayed reference image as the starting point (0 mm).
- If a mouse is connected to this system, you can drag the mouse to set the area.
Orientation of bar code or serial number drawn in the area
Type of bar code in the area (with [Barcode Area] selected)
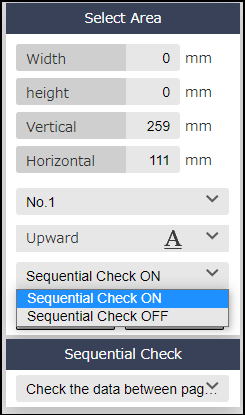
Select [Sequential Check OFF] for the area excluded from the sequential check.

The next area number is automatically selected.
Repeat steps 4 to 8 to make area settings.
Area numbers 1 to 30 can be set to the selected target side.
- If [Enter] is pressed, the next area number is automatically selected. After pressing [Enter], be sure to check the currently selected area number.


 in the upper-right of a page, it turns into
  and is registered as a bookmark.