
Sending a Fax
Checking the Fax Transmission Method
To send a fax (Basic operation flow)
Sending (Basic Operation Flow)
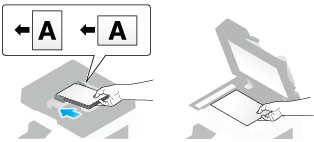
Load the original.
Tap [Scan/Fax].

It is convenient to use the fax mode when sending a fax. For details on the fax mode, refer to Here.
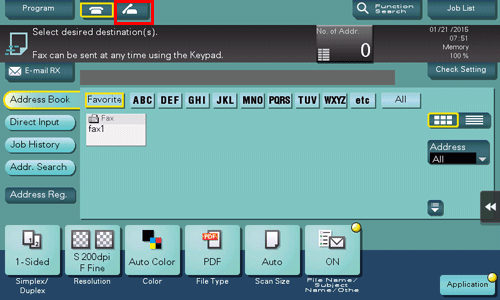
Enter a fax number.
For details on how to specify a destination, refer to Here.
Specifying multiple destinations carries out computer sending and fax transmission simultaneously.

If necessary, you can change the display of the main screen in fax/scan mode (default: [Address Book]). For details, refer to Here.
Configure the option settings for fax transmission as necessary.
For details on configuring option settings, refer to the respective columns of the following table.
Purpose
Reference
To configure basic options such as original size and resolution
To configure options to scan various types of originals such as various sizes and books
To adjust the image quality level of the original such as colored background (newspaper, etc.) or light printing original
To print date/time and page number
Other option settings
Press the Start key.
Tap [Check Setting] before sending, and check the destination and settings as necessary.
To redo operations for specifying destinations or option settings, press the Reset key.

If the screen to confirm the specified destination or settings appears, check the contents, then tap [Send].
If the keyboard screen appears, enter the specified password, then tap [Send]. For the password, contact the administrator of this machine.
Transmission begins.
If you press the Stop key while scanning an original, the scanning process stops, and a list of stopped jobs appears. To redo scanning of the original, delete the job from the list of inactive jobs.

The sender information is automatically added to a fax to be sent.


You can register multiple sender names and use different sender names depending on the destination. For details, refer to Here.
To use sender names by destination ([Fax Header Settings])
Sending by Renaming the Sender ([Fax Header Settings])
Sender information
The sender information includes the machine name, your company name (sender name), and the fax number of the machine. It is automatically added to each fax to be sent.
For the sender name, the default sender name is automatically added. If multiple sender names are registered, you can change the default sender name.


When the sender information is specified to appear inside the body text, it may overlap with part of the fax image, causing it to be lost from the transmitted fax.
Operations required to use this function (for the administrator)
By registering multiple sender names, you can use different sender names depending on the destination.
For details on how to register, refer to Here.
Operation flow
Load the original.
Tap [Scan/Fax].
Specify the destination.
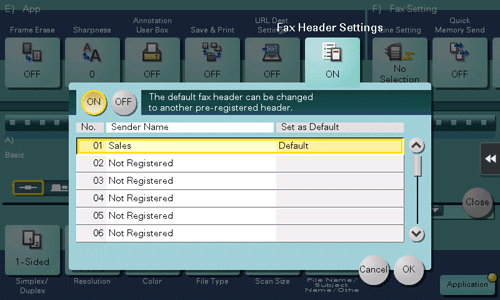
Tap [Application] - [App] - [Fax Header Settings].
Select the sender name you want to change from the list of sender names, and tap [OK].
Press the Start key.
Transmission begins. The changed sender name is added to a fax.
Changes on [Fax Header Settings] are only temporary. It is useful to specify frequently used sender names as defaults when registering sender names.
Resending a Failed Fax
To automatically redial
Resending a Fax
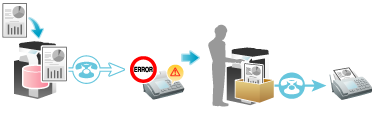
Auto resending (Auto redial)
If a fax transmission fails due to a line or recipient machine problem, the machine automatically resends (redials) the fax after certain time has elapsed. By default, the machine redials up to three times at three-minute intervals.
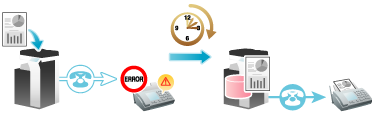
If for some reason a fax is not successfully sent after redials were attempted up to the set number of times, the job can be temporarily stored in the box of the machine and resent later. For details, refer to Here.
Manual resending
A failed fax transmission is handled as a reserved job pending for resending (redial).
Pending jobs for resending are resent automatically after a certain period of time has elapsed using the auto redial function. However, you can manually resend the fax.
Tap [Job List].
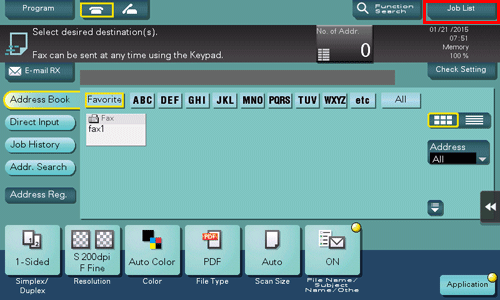
Select a job you wish to resend and tap [Redial].
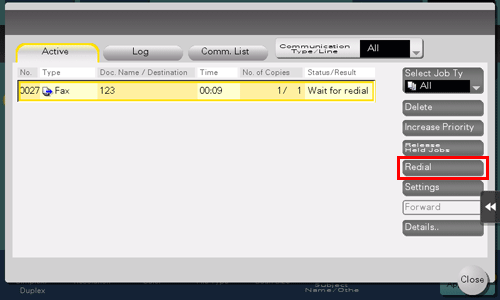
Tap [Start].
Transmission begins.
To resend a fax that failed in automatic redialing
Resending a Fax for Which the Fax Number Could Not Be Redialed
Fax Retransmit
Fax Retransmit is a function that stores a fax that could not be sent by Redial in the machine's user box for a given period of time.
A stored fax job can be resent later by recalling it from the box.
Operations required to use this function (for the administrator)
Enable Fax Retransmit. Set how long a fax should be stored in the User Box.
For details on how to set the period, refer to Here.
Operation flow
Open the Fax Retransmit User Box in the User Box mode and specify the fax you want to resend.
For details on the procedure, refer to Here.
Sending at Low Cost
To send a fax at the preset time (Timer TX)
Sending a Fax at Preset Time ([Timer TX])
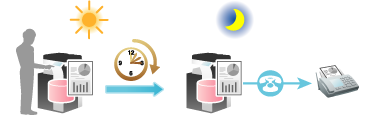
Timer TX
Timer TX is a feature that automatically starts sending at a specified time.
Using the Timer TX function to reserve fax transmission during off-peak rate hours early in the morning and late at night can help to reduce transmission costs. You can reserve up to 20 Fax TX jobs using the Timer TX function.
This function cannot be used together with the following functions.
Quick Memory TX, Polling TX, Polling TX (Bulletin Board), broadcast transmission including destinations other than those for faxes
Operation flow
Load the original.
Tap [Scan/Fax].
Specify the destination.
You can specify multiple destinations at the same time.
Tap [Application] - [Fax Setting] - [Timer TX], then tap [ON].
Using the Keypad, enter the transmission start time, then tap [OK].
To display the Keypad, tap the input area for the numeral.
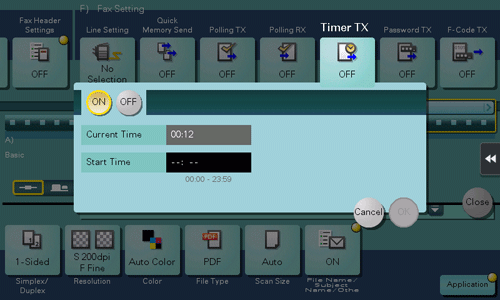
Press the Start key.
Scanning of the original starts. The fax is automatically sent at the specified time.
If the machine power is not activated at the start time, fax transmission will not start. The fax transmission starts just after the machine power is turned on.
When this machine is in power save mode at the start of communication, it returns from power save mode to start fax transmission.
To broadcast via a relay station such as a branch office (Relay Distribution)
Sending a Fax after Specifying a Relay Station ([F-Code TX])
Relay distribution
The Relay Distribution function sends a fax to a relay machine, which distributes the received fax to a pre-registered group of destinations.
Overall communications costs can be reduced by grouping relay stations and destinations by area, compared to the case in which faxes are broadcast to all destinations. This function is useful when broadcasting faxes to distant locations.

The destination machine (the relay machine) needs to have the F-code function.
You need to check both the Relay User Box number specified on the relay machine and the password for relay distribution.
This function cannot be used together with the following functions:
Password TX, Polling TX, Polling TX (Bulletin Board), Polling RX, Polling RX (Bulletin Board).
This machine can also be used as a relay station. For details, refer to Here.
Operation flow
Load the original.
Tap [Scan/Fax].
Specify the fax number of the relay station.
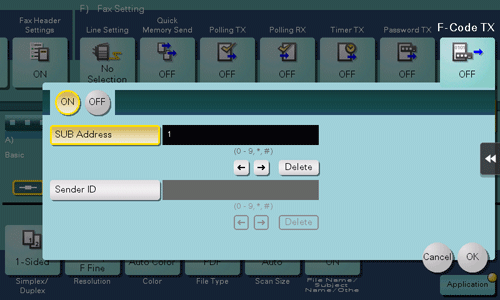
Tap [Application] - [Fax Setting] - [F-Code TX], then tap [ON].
Enter the [SUB Address] and [Sender ID], then tap [OK].
[SUB Address]: Enter the relay user box number.
[Sender ID]: Enter the relay TX password for the relay distribution.
To display the Keypad, tap the input area for the numeral.
Press the Start key.
Fax transmission to the relay station begins. Faxes received by a relay station are delivered to destinations registered with the relay station.
Sending According to the Conditions of the Recipient, This Machine, and Line Status
To check the state on the recipient side before transmission (Manual transmission)
Sending after Checking the State on the Recipient Side (Manual Transmission)
Manual transmission
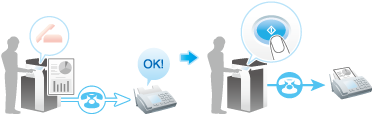
Manual transmission lets the sender to check the state of the recipient by communicating with the recipient or checking signal sounds to ensure that the recipient is ready to receive a fax.
Use this function to ensure faxes are sent to the receiving machines when they are ready to receive them.
Manual transmission is not available if the Confirm Address (TX) function is enabled.
Faxing manually
Load the original.
Tap [Scan/Fax].
It is convenient to use the fax mode when sending a fax. For details on the fax mode, refer to Here.
Configure the option settings for fax transmission as necessary.
For details on configuring option settings, refer to the respective columns of the following table.
Purpose
Reference
To configure basic options such as original size and resolution
To configure options to scan various types of originals such as various sizes and books
To adjust the image quality level of the original such as colored background (newspaper, etc.) or light printing original
To print date/time and page number
Other option settings
Tap the Off-Hook button.
If you are using a phone, pick up the handset.
Check that [Send] is selected and specify a fax number.
Fax numbers can be specified from [Address Book], [Direct Input], [Job History] or [Program]. For details on how to specify a destination, refer to Here. For details on how to specify a fax/scan program, refer to Here.
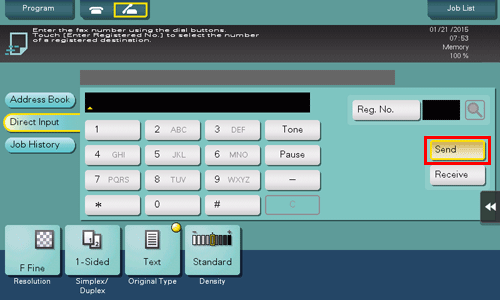
As signal sounds are heard, press the Start key.
To redo operations for specifying destinations or option settings, press the Reset key.
This displays a screen that asks whether you want to start sending faxes.
Tap [Yes].
Transmission begins. If you are using a phone, replace the handset.
If you press the Stop key while scanning an original, the scanning process stops, and a confirmation message is displayed to check whether to delete the stopped job. When scanning the original again, select [Yes].
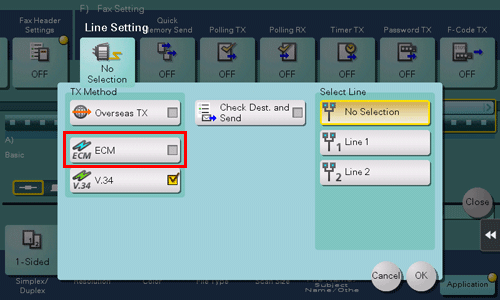
To cancel the ECM mode before transmission ([ECM])
Sending a Fax after Canceling ECM Mode ([ECM])
ECM
ECM is an error correction mode defined by ITU-T (International Telecommunication Union - Telecommunication Standardization Sector).
If fax machines support the ECM, they check for fax data errors while communicating with each other. Image disturbances due to telephone line noise can be suppressed.
By default, this machine uses ECM for transmission. If the noise level is high, the communication may take a little longer than the communication without using ECM checking. To reduce the transmission time, you can transmit faxes with ECM turned off. However, an image error or communication error may occur depending on the specified communication time value, so change the value to suit conditions.

When registering destinations with an address book, you can specify whether to send faxes in the ECM mode in addition to registering fax numbers.
If the ECM function is canceled, the following functions cannot be used together.
V.34 OFF, Polling TX, Polling TX (Bulletin Board), Polling RX, Polling RX (Bulletin Board).
Operation flow
Load the original.
Tap [Scan/Fax].
Specify the destination.
Tap [Application] - [Fax Setting] - [Line Setting].
Cancel the setting of [ECM], then tap [OK].
Press the Start key.
Transmission begins.
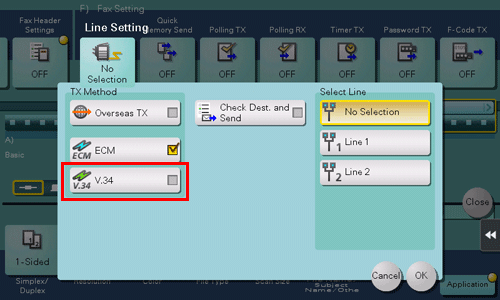
To cancel the Super G3 mode before transmission ([V.34])
Sending a fax after canceling the Super G3 mode (Cancel [V.34])
V.34
V.34 is a communication mode used for the Super G3 fax communication.
This can shorten the communication time and reduce communication costs because a single page of letter/A4 size paper can be sent in as little as approximately three seconds.
By default, this machine transmits faxes with V.34. You can send faxes with V.34 canceled if it is not possible to establish a communication in the Super G3 mode depending on telephone line conditions (for example, when the remote or this machine is connected to a PBX line).

When registering destinations with an address book, you can specify whether to send faxes in the V.34 mode in addition to registering fax numbers.
If the V.34 function is canceled, the following functions cannot be used together.
ECM OFF, Polling TX, Polling TX (Bulletin Board)
Operation flow
Load the original.
Tap [Scan/Fax].
Specify the destination.
Tap [Application] - [Fax Setting] - [Line Setting].
Cancel the setting of [V.34], then tap [OK].
Press the Start key.
Transmission begins.
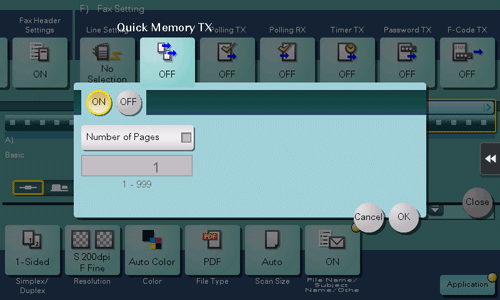
To send data each time one page is scanned in order to prevent the memory from becoming full ([Quick Memory Send])
Sending One Scanned Page at a Time ([Quick Memory Send])
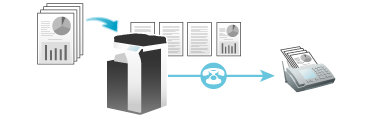
Quick Memory TX
Quick Memory TX is a method to start sending a fax as soon as one page of the original has been scanned. The total number of pages transmitted can be entered in the sender record.
Normally, this machine begins transmission after all pages have been scanned and saved in memory (Memory TX). With Quick Memory TX , the overall processing time can be reduced. With this method, many pages can be faxed without causing memory overflow.
This function cannot be used together with the following functions:
Timer TX, Polling TX, Polling TX (Bulletin Board), Polling RX, Polling RX (Bulletin Board), broadcast transmission including destinations other than those for faxes
Operation flow
Load the original.
Tap [Scan/Fax].
Specify the destination.
Tap [Application] - [Fax Setting] - [Quick Memory TX], then tap [ON].
To add the total number of pages to the sender record, select [Number of Pages], enter the number of original pages using the Keypad, then tap [OK].
To display the Keypad, tap the input area for the numeral.
Press the Start key.
As one page is scanned, transmission starts.
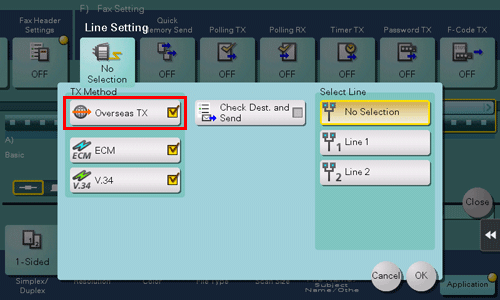
To send a fax to areas where communication conditions are poor ([Overseas TX])
Faxing Overseas ([Overseas TX])
Overseas TX
The Overseas TX Mode function reduces the transmission speed (the information transfer speed) for sending a fax.
It is useful when sending a fax to areas where communication conditions are poor.

When registering destinations with an address book, you can specify whether to send faxes in the Overseas TX mode in addition to registering fax numbers.
This function cannot be used together with the following functions:
Polling TX, Polling TX (Bulletin Board), Polling RX, Polling RX (Bulletin Board).
Operation flow
Load the original.
Tap [Scan/Fax].
Specify the destination.
Tap [Application] - [Fax Setting] - [Line Setting].
Select [Overseas TX], then tap [OK].
Press the Start key.
Transmission begins.
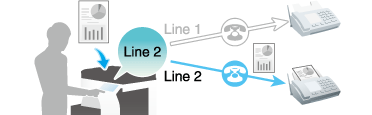
To use different sending lines using additional lines ([Select Line])
Sending a Fax Using an Additional Line ([Select Line])
Using an additional line
When multiple lines are used, you can select a line for sending a fax.
Using additional lines enables you to send a fax using an idle line or assign lines to send a fax.
If the line specified to send a fax is not available, the job is discarded.
When registering destinations with an address book, you can configure the lines used to transmit faxes in addition to registering fax numbers.
This function cannot be used together with the following functions.
Polling TX, Polling TX (Bulletin Board).
Operations required to use this function (for the administrator)
Configure a specific function for additional line. If you set a specific function for each line, you can use each line for a different purpose.
For details on how to configure the settings, refer to Here.
You cannot specify a line if [Multi Line Settings] is set to [RX Only].
Operation flow
Load the original.
Tap [Scan/Fax].
Specify the destination.
Tap [Application] - [Fax Setting] - [Line Setting].
Select a line used for transmission in [Select Line], then tap [OK].

Press the Start key.
Transmission begins.
Sending an Important Fax
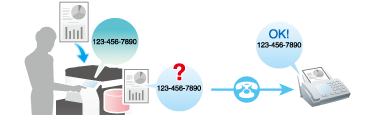
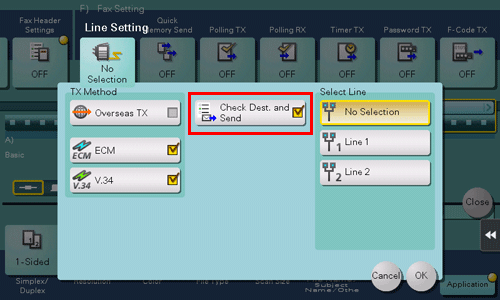
To check the destination fax number ([Check Dest. and Send])
Checking the Destination Fax Number before Sending a Fax ([Check Dest. and Send])
Check Dest. & Send
The Check Dest. & Send function checks the fax number specified for the fax transmission against the destination fax number (CSI) and sends the fax only when they match.
This prevents misdirected transmissions since transmission fails if the specified and destination fax number information (CSI) does not match.
The fax number of the originating machine must have been in the destination machine.
When registering destinations with an address book, you can enable Check Dest. & Send in addition to registering fax numbers.
Operation flow
Load the original.
Tap [Scan/Fax].
Specify the destination.
Tap [Application] - [Fax Setting] - [Line Setting].
Select [Check Dest. and Send], then tap [OK].
Press the Start key.
Transmission begins.
To send a confidential fax ([F-Code TX])
Sending a Confidential Fax ([F-Code TX])
Confidential communication
The confidential communication function is designed for communications with specific persons using a Confidential User Box that requires a registered number and a password.
This ensures fax communications with improved security.

This function is available only when the recipient's machine is equipped with the F-code function.
You need to check the recipient's Confidential User Box number and the password for confidential fax reception.
This function cannot be used together with the following functions:
Password TX, Polling TX, Polling TX (Bulletin Board), Polling RX, Polling RX (Bulletin Board).
You can register a confidential user box on this machine to receive confidential faxes. For details on how to register a Confidential User Box, refer to Here.
Operation flow
Load the original.
Tap [Scan/Fax].
Specify the destination.
Tap [Application] - [Fax Setting] - [F-Code TX], then tap [ON].
Enter the [SUB Address] and [Sender ID], then tap [OK].
[SUB Address]: Enter the confidential user box number.
[Sender ID]: Enter the communication password for confidential RX.
To display the Keypad, tap the input area for the numeral.
Press the Start key.
Transmission begins.
To send to a device for which peers are restricted by the Closed Network RX function ([Password TX])
Sending a Fax with a Password ([Password TX])
Password TX
The Password TX is a function that sends a fax with a password. It is used to send faxes to a device on which fax peers are restricted by passwords (a device with Closed Network RX enabled).
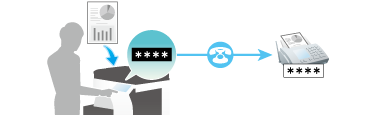
You can only use this function to communicate with our models supporting the closed network reception (password) function.
You need to check the recipient's closed network reception password beforehand.
This function cannot be used together with the following functions:
Relay Distribution, Confidential Communication, Polling TX, Polling TX (Bulletin Board), Polling RX, Polling RX (Bulletin Board).
This machine can restrict fax destinations using the Closed Network RX function. For details on the Closed Network RX function, refer to Here.
Operation flow
Load the original.
Tap [Scan/Fax].
Specify the destination.
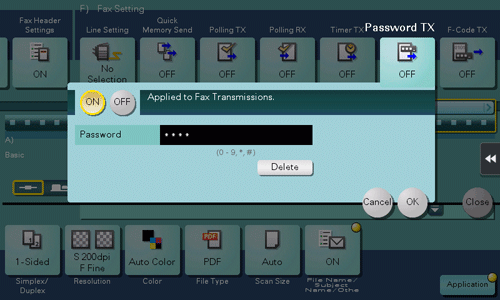
Tap [Application] - [Fax Setting] - [Password TX], then tap [ON].
Using the Keypad, enter the Closed Network RX password of the destination, then tap [OK].
To display the Keypad, tap the input area for the numeral.
Press the Start key.
Transmission begins.
Registering a Polling File
To register a polling file ([Polling TX])
Registering a File for Polling ([Polling TX])
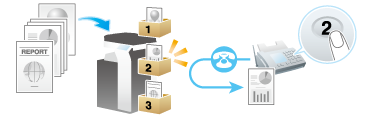
Polling TX
The Polling TX function stores a file beforehand on the internal hard disk and sends it out upon a request for reception (polling request) from the recipient.
The file for polling is stored in the Polling Transmission User Box in the System User Box, and then transmitted upon reception of a polling request.
Only one file can be stored in the Polling TX User Box.

This function cannot be used together with the following functions.
Timer TX, Relay Distribution, Confidential Communication, ECM OFF, V.34 OFF, Quick Memory TX, Overseas TX, Password TX, Polling TX (Bulletin Board), Polling RX, Polling RX (Bulletin Board).
Polling RX can be used to receive a file saved for polling in a receiving machine by sending a request from this machine. For details on the Polling RX function, refer to Here.
Operation flow
Load the original.
Tap [Scan/Fax].
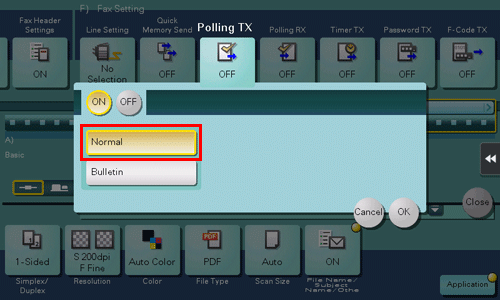
Tap [Application] - [Fax Setting] - [Polling TX], then tap [ON].
Check that [Normal] is highlighted, then tap [OK] .
Press the Start key.
The file is registered with the Polling TX User Box.
To register polling files in the Bulletin Board User Box according to application ([Polling TX])
Registering a File for Polling on the Bulletin Board ([Polling TX])
Polling TX (Bulletin Board)
The Polling TX function stores a file beforehand on the Bulletin Board User Box on this machine and sends it out upon a request for reception (polling request) from the recipient.
The file registered on the Bulletin Board User Box is sent out upon reception of a polling request.
Only one file can be stored in each Bulletin Board User Box. You can create up to 10 Bulletin Board User Boxes, allowing you to use them for different purposes.
The file for polling that is registered with the bulletin board will not be deleted from the box after they have been transmitted upon reception of a polling request from a receiving machine. They are stored according to the file storage period specified for the appropriate Bulletin User Box.
This function cannot be used together with the following functions:
Timer TX, Relay Distribution, Confidential Communication, ECM OFF, V.34 OFF, Quick Memory TX, Overseas TX, Password TX, Polling TX, Polling RX, Polling RX (Bulletin Board).
Polling RX can be used to receive a file saved in a Bulletin User Box in a receiving machine by sending a request from this machine. For details, refer to Here.
Operations required to use Polling TX (Bulletin)
Register the Bulletin Board User Box for the registering file for polling.
For details on the registration procedure, refer to Here.
Operation flow
Load the original.
Tap [Scan/Fax].
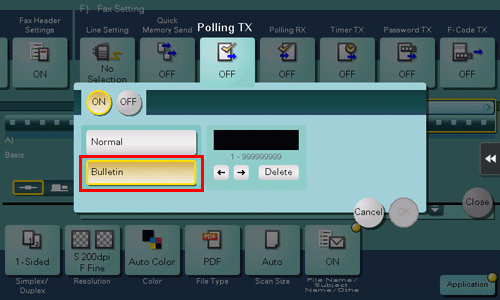
Tap [Application] - [Fax Setting] - [Polling TX], then tap [ON].
Tap [Bulletin], enter the number of the Bulletin User Box in which to register a file using the Keypad, then tap [OK].
To display the Keypad, tap the input area for the numeral.
Press the Start key.
The file is registered with the Polling TX User Box.