
For Network Connection (LPR/Port 9100/SMB)
You can install the printer driver either by searching for the printer on the network, or by creating a new printer port.
Settings of this machine
To use Port 9100, LPR, or SMB printing, you must configure the network settings for the machine in advance.
Items to be configured | Description |
|---|---|
IP Address | In [TCP/IP Settings], specify the IP address. |
RAW port number | To use Port 9100 printing: |
LPD Setting | To use LPR printing: |
SMB Setting | To use SMB printing: |

For details on the network settings for this machine, refer to NIC Setting: Setting the Machine Network Information.
To use SMB printing in the IPv6 environment, [Direct Hosting Setting] for the machine should be enabled. For details, refer to Direct Hosting Setting.
Installing the printer driver by creating a printer port
Installing the driver requires the administrator privilege.
Since the printer is searched for during the installation, be sure to connect this machine to the network before turning it on.
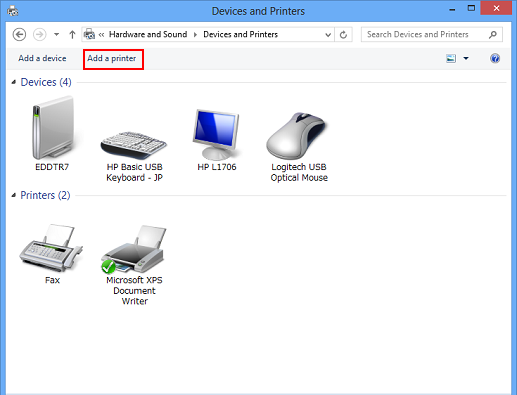
Right-click the Start window, and then click [Devices and Printers] under [All Applications] - [Control Panel] - [Hardware and Sound].
In Windows 8.1/Server 2012 R2, click
 on the Start window - [Control Panel] - [Hardware and Sound] - [Devices and Printers].
In Windows 10, right-click the Start button
 , and then click [Control Panel] - [Hardware and Sound] - [Devices and Printers].
On the toolbar, select [Add a printer].
The [Add Printer] wizard (or [Add a device] wizard) appears.
In the window showing the search result, click [The printer that I want isn't listed].
Click [Add a local or network printer with manual settings].
Click [Create a new port:], and then select the port type.
To use the LPR/Port9100 protocol, select [Standard TCP/IP Port].
To use the SMB connection, select [Local Port].
Click [Next].
Specify the IP address and port.
To use the LPR/Port9100 protocol, select [TCP/IP Device], and then enter the IP address.
To use the SMB connection, enter "\\NetBIOS name\print service name" in the [Port Name] box.
Enter the same NetBIOS name and print service name specified in [SMB Setting] - [Print Setting].
Click [Next].
If [Additional Port Information Required] or More Port Information Required dialog box is displayed, go to Step 10.
If the [Install the printer driver] dialog box appears, go to Step 14.
Select [Custom], and then click [Settings].
Change the settings according to the port, and then click [OK].
For LPR connection, select [LPR], and then enter [Print] in the [Queue Name:] box.
You must discriminate between upper and lower case letters when entering it.
For Port 9100, select [Raw], and then enter a RAW port number (default setting: [9100]) in the [Port Number] box.
If both LPR and Port 9100 are enabled on this machine, the printer driver is connected to this machine using LPR.
Click [Next].
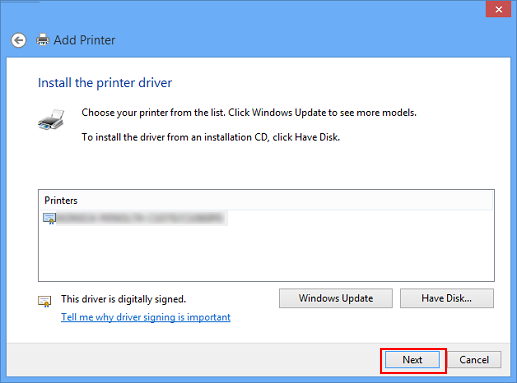
The [Install the printer driver] page appears.
Click [Have Disk].
Click [Browse].
Select the printer driver folder, and then click [Open].
Click [OK].
Click [Next].
Follow the instructions on the windows that follow.
If the [User Account Control] window appears, click [Continue] or [Yes].
Click [Finish].
After finishing the installation, make sure that the icon for the installed printer is displayed in the [Devices and Printers] or [Printers] window.
This completes the printer driver installation.