
Hold Setting: Temporarily Saving Scanned Job
The machine can temporarily save job data scanned from the ADF or from the original glass into memory, and then allows you to check them on the [JOB LIST] screen for output or saving them on an HDD.
The jobs saved on the HDD can be output from the [HDD RECALL] screen, displayed on the [Hold Job] screen, and also printed from the HDD.
This section describes how to save job data scanned from the ADF or from the original glass into memory.

For details about outputting, duplicating, and deleting the hold jobs from the [Hold Job] screen of the [JOB LIST] screen, storing the jobs on the HDD, and also editing the jobs, refer to Hold Job and Save on HDD.
Up to 500 hold jobs can be saved. When hold jobs are saved to the upper limit, the next hold job cannot be saved and [Hold job number exceed limit Job cannot be held any more] is displayed. Delete unnecessary hold jobs, and then try again.
Hold jobs cannot be deleted automatically by default. To set so that hold jobs are deleted automatically after a certain period of time, refer to Hold Job Auto Delete Period: Setting the Time for Automatic Deletion of Hold Jobs.
The number of hold jobs is displayed in the message area of the [Hold Job] screen. The display turns red when the Hold Job number exceeds 450.
Up to 100,000 pages of data can be saved as the sum of hold jobs, jobs saved on HDD, and jobs in operation. When the upper limit is exceeded, [System memory is short of capacity Please delete unnecessary jobs] is displayed. Delete unnecessary hold jobs, and then try again.
Position the original.
Press the [COPY] tab to display the [COPY] screen.
Make copy selections, as desired.
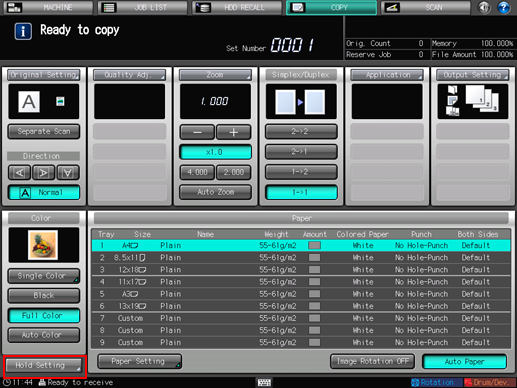
Press [Hold Setting].
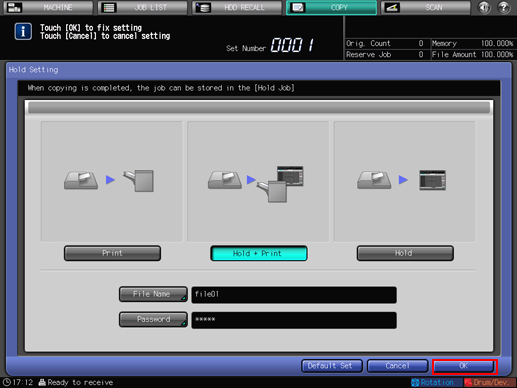
The [Hold Setting] screen is displayed.
Select [Hold + Print] or [Hold].
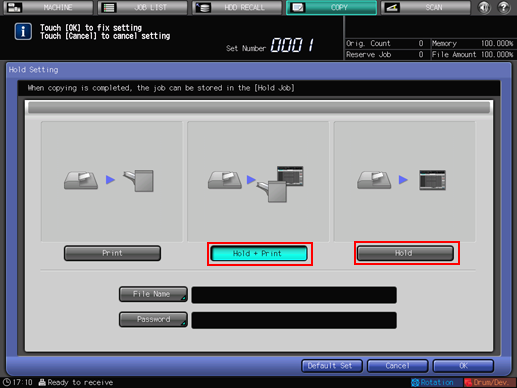
With [Hold + Print] or [Hold] selected, [File Name] and [Password] become available and values can be entered.
The entry of [File Name] can be omitted. In this case, the machine assigns the last 4 digits of the job ID to be created automatically.
The entry of [Password] can be omitted. You will be free from password entry in operating the job without a password assigned.
To enter [File Name], proceed to step 5.
To enter [Password], proceed to step 7.
If both entries are to be omitted, proceed to step 9.
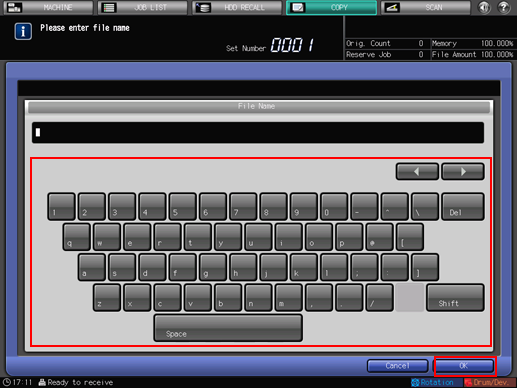
Press [File Name].
The [File Name] screen is displayed.
Enter the desired file name, then press [OK].
Up to 32 two-byte characters or 64 one-byte characters can be entered for the file name. A name can be shared by multiple files.
For details about how to input characters, refer to Inputting Characters.
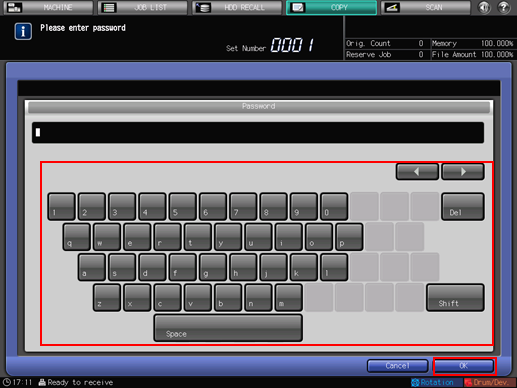
Press [Password].
The [Password] screen is displayed.
Enter the desired password, then press [OK].
Up to 8 one-byte characters can be entered for the password.
Press [OK] on the [Hold Setting] screen.
The screen returns to the [COPY] screen.
With [Print] and [Hold + Print] selected, the message [Ready to copy] is displayed in the message area of the [COPY] screen.
With [Hold] selected, the message [Press [Start] to scan originals] is displayed in the message area of the [COPY] screen.
Press Start on the control panel.
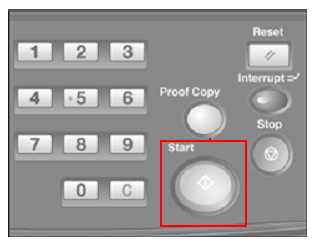
With [Print] selected, normal copies are printed.
With [Hold + Print] selected, the machine will start printing while temporarily storing the job data in memory.
With [Hold] selected, the job data will temporarily be stored in memory without being output.
Press the [JOB LIST] tab to display the [JOB LIST] screen.
Press [Hold Job].
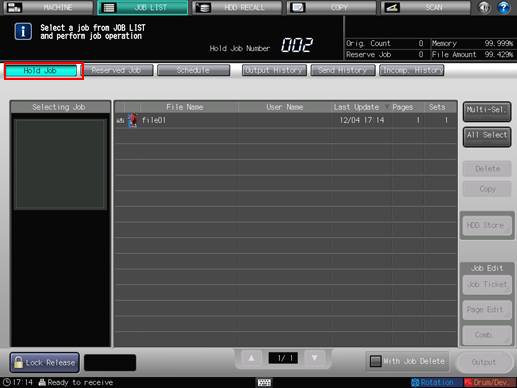
The [Hold Job] screen will be displayed.
For details about subsequent operations, refer to Hold Job and Save on HDD and Hold Job screen.