Q1. Can I move destinations registered in this machine to another MFP?
Operation procedure: Exporting a destination file
The destination file to be exported can be selected from your computer or the SMB sharing folder. This section describes how to export a destination file to your computer.
Start a Web browser, enter the IP address of the machine in the URL field, then press the [Enter] key.
Select [Administrator], then click [Login].
Enter the password, then click [OK].
On the [Maintenance] tab, click [Import/Export], select [Address], then click [Export].
Select the type of destinations to export.
 After export is executed with password entry, importing of the destinations to another MFP requires password entry.
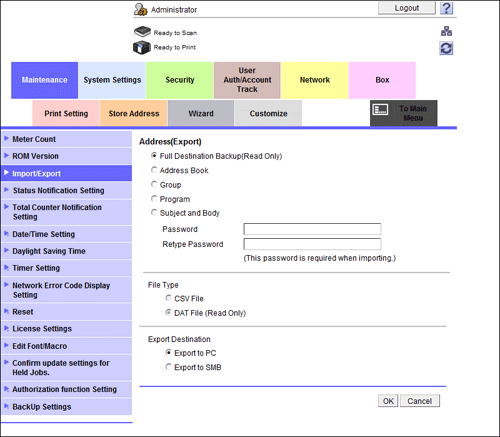
In [File Type], select the file type of the destination file to be exported.
To edit information using the spreadsheet software, select [CSV File].In [Export Destination], select [Export to PC], then click [OK].
To export the destination file to the SMB sharing folder, select [Export to SMB]. In the dialog box displayed after clicking [OK], enter the information to connect to the SMB server, then specify the folder to export the destination file to.When you are ready to download the destination file, click [Download].
Click [Save], select a location to save the data to, then click [Save].
When downloading is completed, click [Close].
Click [Back].
Operation procedure: Importing a destination file
The destination file to be imported can be selected from your computer or the SMB sharing folder. This section describes how to import a destination file saved on your computer.
Start a Web browser, enter the IP address of the machine in the URL field, then press the [Enter] key.
Select [Administrator], then click [Login].
Enter the password, then click [OK].
On the [Maintenance] tab, click [Import/Export], select [Address], then click [Import].
Select whether to import the backup file for all destination data or import the individually exported destination file.
When importing the backup file for all destination data, note that all of the currently registered destinations will be overwritten.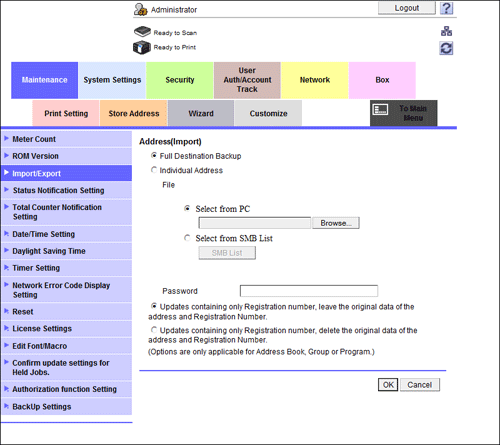
Select [Select from PC], then click [Browse...].
To import the destination file saved in the SMB sharing folder, select [Select from SMB List]. On the dialog box displayed after clicking [SMB List], enter the information to connect to the SMB server, then select the destination file to be imported from the SMB sharing folder.Select the destination file to be imported, and click [OK].
When importing [Address], if you select [Updates containing only Registration number, leave the original data of the address and Registration Number.], address information, in a file to be imported, containing only a registration number, is not registered in the machine. If you select [Updates containing only Registration number, delete the original data of the address and Registration Number.], address information containing only a registration number is deleted from the machine.If the destination file to be imported has a password set, enter the password.The import confirmation dialog box is displayed.
Click [Import].
If the information currently registered on this machine is different from [Authentication Information] and [Address] to be imported, [Difference] is displayed. Clicking [Difference] allows you to select whether to apply the information registered on this machine or the information to be imported.When the import completes, click [OK].