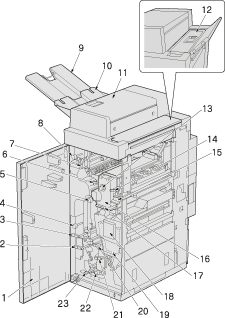
Relay Unit RU-518 (Humidifier HM-103)


|
No. |
Name |
Description |
|---|---|---|
|
1 |
Relay unit front door |
Opens to allow removal of paper jam. |
|
2 |
Lever [RU12] |
Opens rightward for removal of paper jam. |
|
3 |
Lever [RU13] |
Opens rightward for removal of paper jam. |
|
4 |
Knob [RU14] |
Turned to allow removal of paper jam. |
|
5 |
Knob [RU7] |
Turned to allow removal of paper jam. |
|
6 |
Lever [RU4] |
Opens upward for removal of paper jam. |
|
7 |
Lever [RU5] |
Opens rightward for removal of paper jam. |
|
8 |
Knob [RU6] |
Turned to allow removal of paper jam. |
|
9 |
Secondary (sub) tray extension |
Pulled out to hold large paper sizes delivered to the secondary (sub) tray. |
|
10 |
Secondary (sub) tray |
Holds sets output in non offset mode. |
|
11 |
Top cover |
Opens upward for removal of paper jam. |
|
12 |
Supply tank |
Remove this tank, and replenish water to it. |
|
13 |
Knob [HM1] |
Turned to allow removal of paper jam. |
|
14 |
Lever [RU1] |
Opens upward for removal of paper jam. |
|
15 |
Lever [RU2] |
Catch and open downward for removal of paper jam. |
|
16 |
Humidifier HM-103 (option) |
Humidifies both front and back sides of print paper in order to flatten it out. |
|
17 |
Handle [HM2] |
Held to pull out the unit when paper jam occurs. |
|
18 |
Jam position display |
Indicates the position of paper jam by LED lamps. |
|
19 |
Water storage tank |
Used to store water from the supply tank. |
|
20 |
Lever [RU8] |
Opens leftward for removal of paper jam. |
|
21 |
Lever [RU9] |
Remove upward and open rightward for removal of paper jam. |
|
22 |
Knob [RU10] |
Turned to allow removal of paper jam. |
|
23 |
Lever [RU11] |
Opens upward for removal of paper jam. |
|
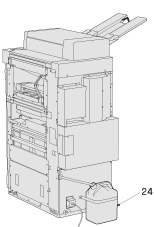
24 |
Protection container |
Used to collect drained water when a problem occurs. |
