
[Paper Setting]: Setting Paper for Tray
Each paper tray has been preset with paper specifications. If you want to use another paper type than any loaded in the trays, follow the procedure below to change the [Paper Setting].
Load copy paper into the tray with the setting to be changed.
Press the [COPY] tab to display the [COPY] screen.
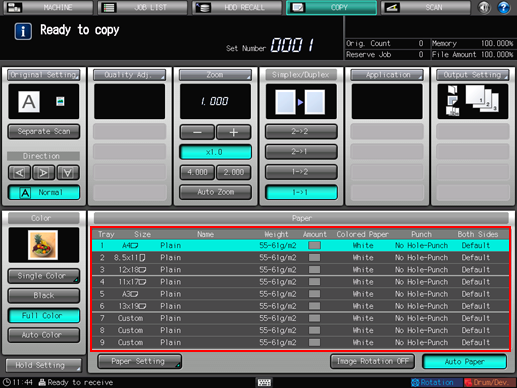
Check the Paper Setting of each tray displayed under [Paper].
The screen provides [Size], [Name], [Weight], [Amount], [Colored], [Punch], and [Both Sides] in a line for each tray. The [Name] normally shows a paper type, or a profile name if registered specifications are recalled.
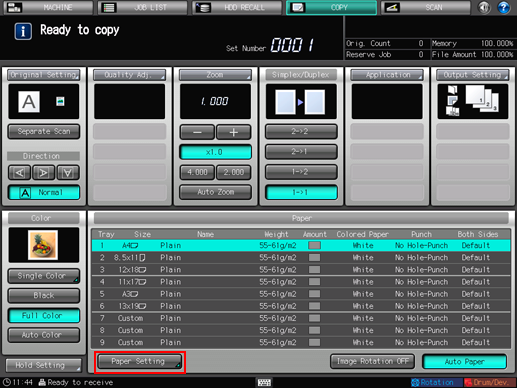
Press [Paper Setting].
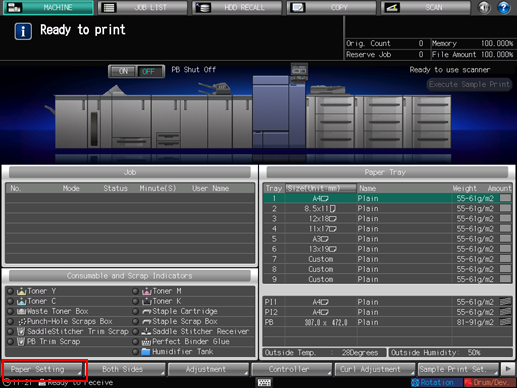
You can make the same setting from both [Paper Setting] in the [COPY] screen and [Paper Setting] in the [MACHINE] screen.
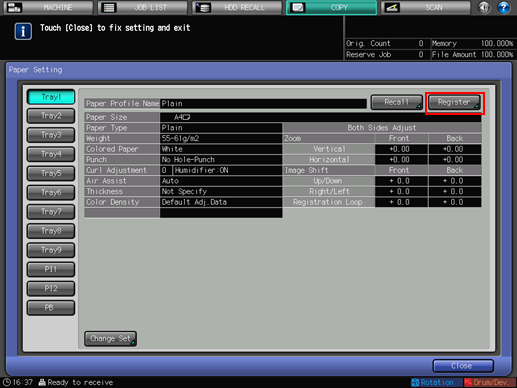
The [Paper Setting] screen is displayed.
Press the tray key to change the Paper Setting.
Tray keys are provided in the left side area of the [Paper Setting] screen. Pressing a tray key shows the conditions specified for that tray in the right side.
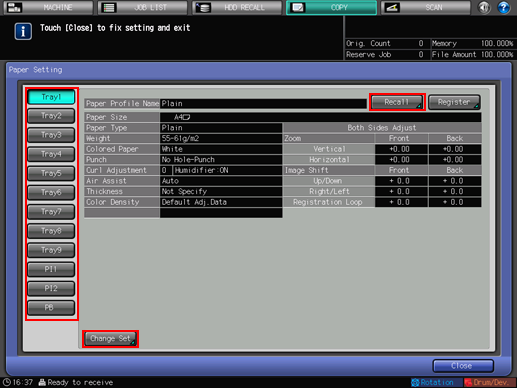
Press [Recall] or [Change Set].
Pressing [Recall] displays the [Recall] screen, on which registered paper specifications can be selected. Proceed to step 7.
Pressing [Change Set] displays the [Change Individual Set] screen to change the specifications individually. Proceed to step 11.
Press [
 ] or [
 ] on the [Recall] screen to scroll to the entry of the desired specifications in the list, then press the entry.
The selected entry will be highlighted.
If registered specifications do not match with those of the selected tray, that entry will be grayed out to show unavailability. In this case, change the tray to be used.
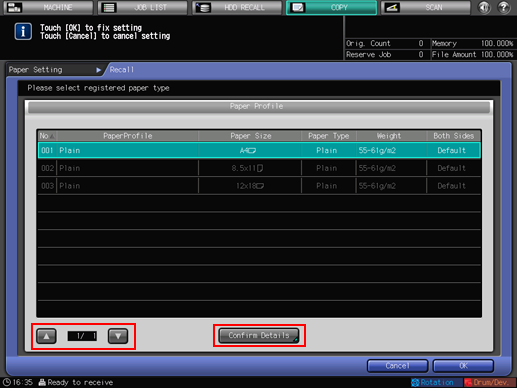
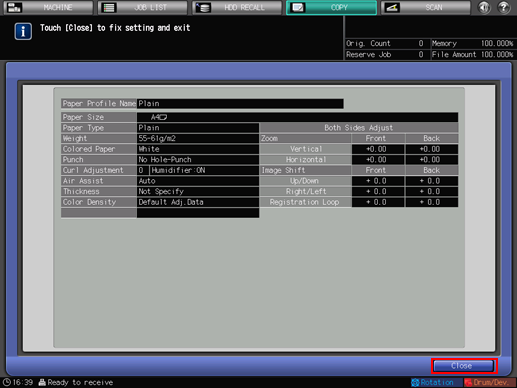
Press [Confirm Details].
Details of the selected entry is displayed. When finished with checking, press [Close].
Press [OK] on the [Recall] screen.
The screen returns to the [Paper Setting] screen.
The [Paper Profile Name] changes to that of recalled specifications.
Proceed to step 32, if no setting change is desired for recalled specifications.
Press [Change Set].
Select the desired one from the keys under [Paper Type].
You can select [Coated-GL], [Coated-ML], [Coated-GO], and [Coated-MO] when you set the value of [Weight] to 81 g/m2 / 22 lb Bond or more.
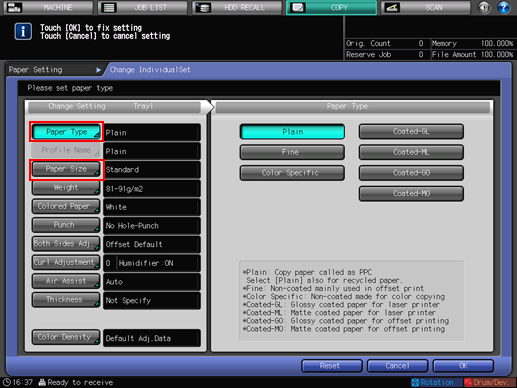
Press [Paper Size].
The [Size Setting] screen is displayed.
Select the desired one from [Standard], [Custom], and [Tab Paper].
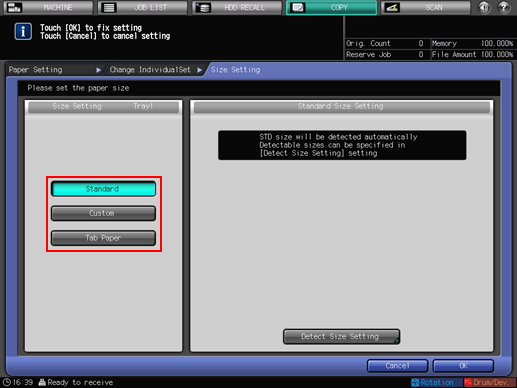
Proceed to step 14 for setting [Standard].
Proceed to step 15 for setting [Custom].
Proceed to step 16 for setting [Tab Paper].
[Standard] and [Tab Paper] will not be displayed with [PB] selected in step 5.
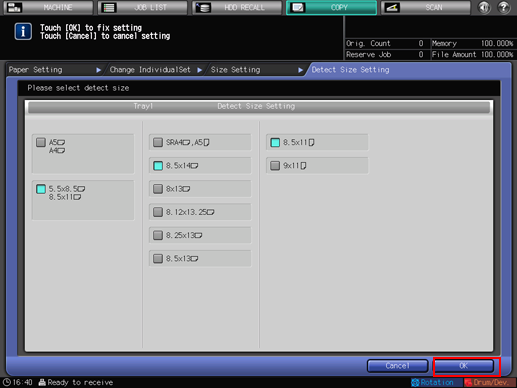
With [Standard] selected, the machine automatically detects the standard size when loaded with standard size paper in that tray.
There is, however, a group of sizes having subtle distinctions, so that the machine cannot distinguish in the operation of size detection. Let the machine detect a specific size by identifying these sizes as any one of them.
Press [Detect Size Setting]. The [Detect Size Setting] screen is displayed.
Groups of indistinguishable sizes are arranged in columns. Press the desired size in each column to select it. Press [OK].
Detectable sizes may vary depending on whether [ON] or [OFF] is selected for the use of [K Size] in the Administrator Setting provided on the Utility Menu screen. For details, refer to K Size: Selecting Whether or Not to Use K Size Paper.
Detectable standard sizes vary depending on the paper tray.
Proceed to step 17.
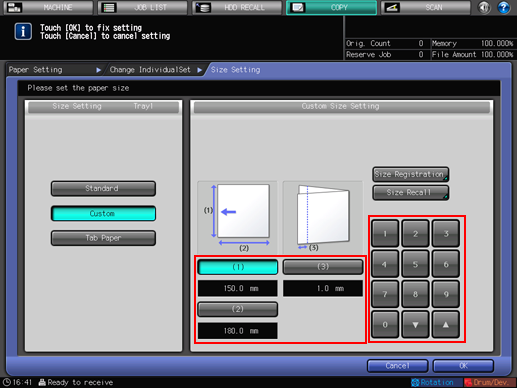
If you select [Custom], the [Custom Size Setting] screen is displayed.
To specify a custom size:
Press [(1)], then use the touch panel keypad, [
][], or the keypad on the control panel to enter the desired widthwise dimension.
Press [(2)], then use the touch panel keypad, [
][], or the keypad on the control panel to enter the desired lengthwise dimension.
Press [(3)], then use the touch panel keypad, [
][], or the keypad on the control panel to enter the desired trimming amount for covers used in Fold & Staple/Multi Half Fold mode. The key to enter the trimming amount is displayed on a machine with Saddle Stitcher SD-506 mounted.
To register a specified custom size:
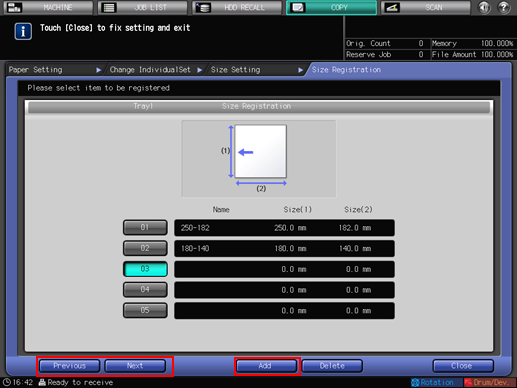
After entering the value, press [Size Registration]. The [Size Registration] screen is displayed.
Display the desired entry, using [Previous] and [Next] as needed to scroll. Entries from [01] to [20] are provided on the screen.
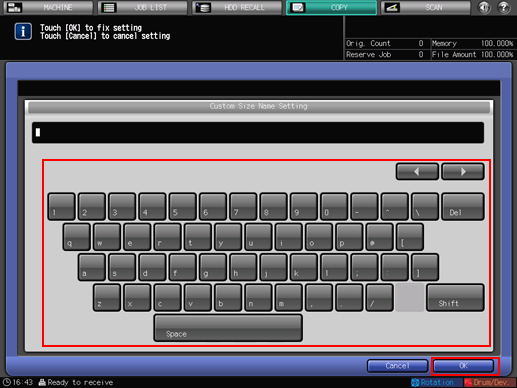
Press the number key on the left side of the desired entry, then press [Add]. The [Custom Size Name Setting] screen is displayed.
Enter the desired name. Up to 20 one-byte characters can be entered.
Press [OK].
To recall a registered custom size:
Press [Size Recall]. The [Size Recall] screen is displayed.
Display the desired custom size, using [Previous] and [Next] as needed to scroll. Entries from [01] to [20] are provided on the screen.
Press the number key of the custom size to be used, then press [OK].

Proceed to step 17.
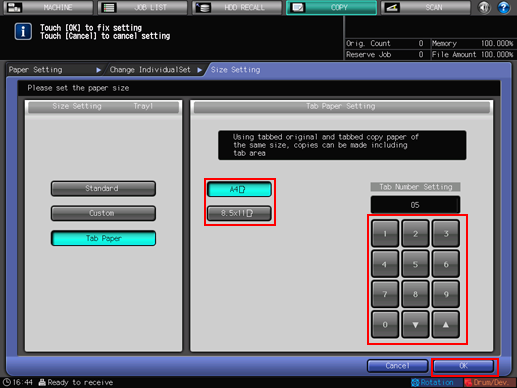
Selecting [Tab Paper] displays the [Tab Paper Setting] screen.
Select either [A4T
 ] or [8.5
 11T].
11T].Use the touch panel keypad, [
], [], or the keypad on the control panel to enter the number of tabs. Setting range for the number of tabs is from 1 to 15.Press [OK].
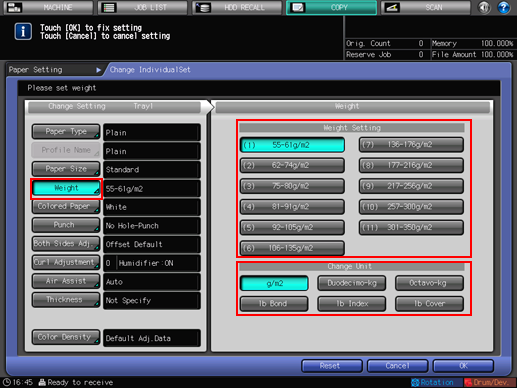
Press [Weight].
The [Weight] screen is displayed. Select the desired weight key under [Weight Setting].
The keys [(1) 55-61 g/m2] / [(1) 14-15 lb Bond], [(2) 62-74 g/m2] / [(2) 16-19 lb Bond], [(3) 75-80 g/m2] / [(3) 20-21 lb Bond], [(9) 217-256 g/m2] / [(9) 58-68 lb Bond], [(10) 257-300 g/m2] / [(10) 69-81 lb Bond], and [(11) 301-350 g/m2] / [(11) 82-93 lb Bond] are unavailable for the cover tray [PB] of Perfect Binder PB-503.
The key [(11) 301-350 g/m2] / [(11) 82-93 lb Bond] is unavailable for the upper tray[PI1] and lower tray[PI2] of Folding Unit FD-503 post inserter. In addition, when those trays are loaded with covers for perfect binding to be made on the machine mounted with Perfect Binder PB-503, Start on the control panel does not function with [(1) 55-61 g/m2] / [(1) 14-15 lb Bond], [(2) 62-74 g/m2] / [(2) 16-19 lb Bond], [(3) 75-80 g/m2] / [(3) 20-21 lb Bond], [(9) 217-256 g/m2] / [(9) 58-68 lb Bond], or [(10) 257-300 g/m2] / [(10) 69-81 lb Bond] selected.
The key [(11) 301-350 g/m2] / [(11) 82-93 lb Bond] is unavailable for the upper tray[PI1] and lower tray[PI2] of Post Inserter PI-502.
Select the desired unit key under [Change Unit]. The screen will display the paper weight in the selected unit.
Press [Colored Paper].
Select a desired Colored Paper key.
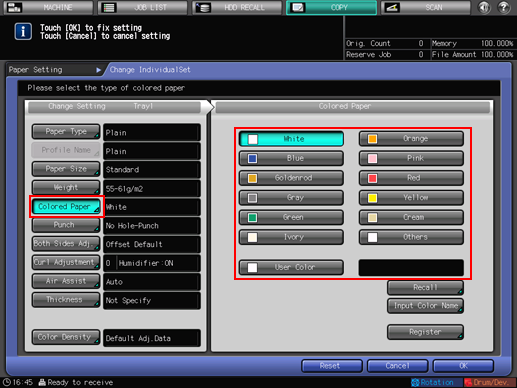
To specify a desired color name:
Press [User Color]. The [Input Colored Paper Name] screen is displayed.
Enter the desired color name. Up to 20 one-byte characters can be entered.
Press [OK].

To change the specified color name, press [Input Color Name] to display the [Input Colored Paper Name] screen and rename it.
To register a desired color name:
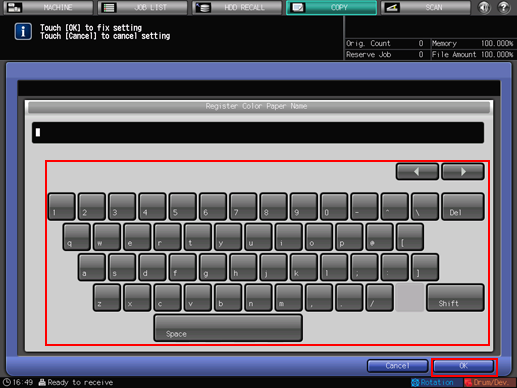
Press [Register]. The [Register Color Name] screen is displayed.
Display the number key to be registered, using [Previous] and [Next] as needed to scroll. Entries from [001] to [100] are provided on the screen.
Press the number key to be registered, then press [Add].
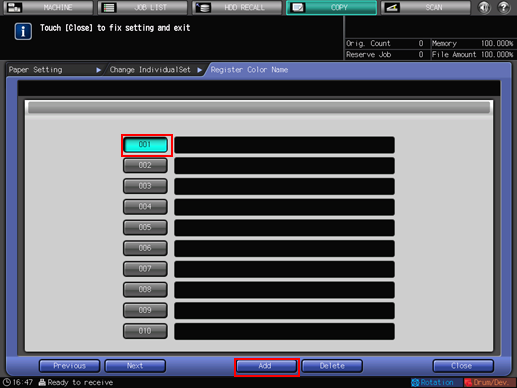
Enter the color name to be registered, then press [OK].
To delete a registered color name, press the number key to be deleted, then press [Delete].
To recall a registered color name:
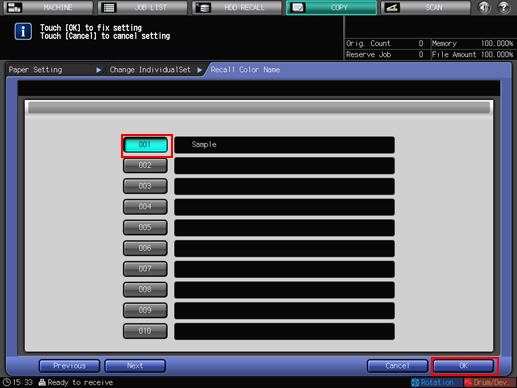
Press [Recall]. The [Recall Color Name] screen is displayed.
Display the desired number key, using [Previous] and [Next] as needed to scroll. Entries from [001] to [100] are provided on the screen.
Press the number key on the left side of the color name to be used, then press [OK].
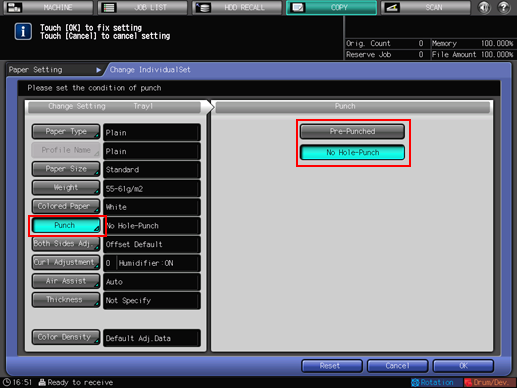
Press [Punch].
Select [Pre-Punched] when loading sheets with punched holes, and select [No Hole-Punch] when loading sheets without punched holes.
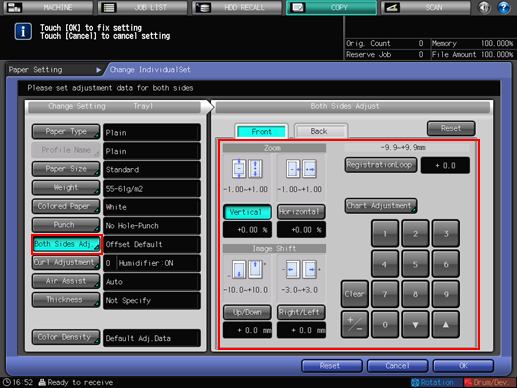
Press [Both Sides Adj.].
The [Both Sides Adjust] screen is displayed.
For details about Both Sides Adjust, refer to Both Sides Adjust.
If you change settings of [Zoom] for [Front] or [Back], [Image Shift], [Registration Loop], and [Chart Adjustment], the indication of [Both Sides Adjust] on the [Change Individual Set] screen is changed to [Offset Changed].
If you press [Clear], settings with related keys highlighted are restored to default values.
Take note of that pressing [Reset] at the upper right corner of the screen restores default values for settings with related keys not highlighted, in addition to settings with related keys highlighted.
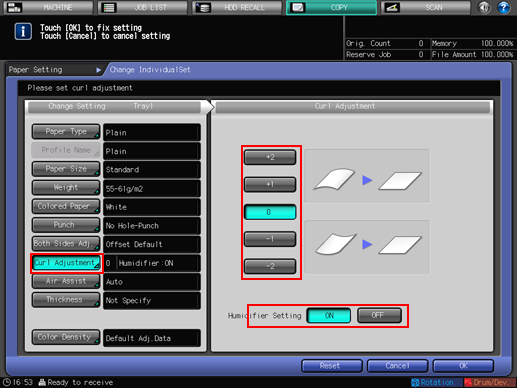
Press [Curl Adjustment].
The [Curl Adjustment] screen is displayed.
For details about Curl Adjustment, refer to Curl Adjustment: Reducing Curl (Relay Unit RU-511).
If the paper weight of [Color Specific] is set to 55 g/m2 to 135 g/m2 / 14 lb Bond to 36 lb Bond, and the paper weight of [Coated-GL], [Coated-ML], [Coated-GO], and [Coated-MO] is set to 81 g/m2 to 135 g/m2 / 22 lb Bond to 36 lb Bond, [Humidifier Setting] becomes unavailable with [ON]/[OFF] dimmed on the screen.
[Humidifier Setting] is displayed only when Humidifier HM-101 is mounted.
Press [Air Assist].
If you select [Tray 1] to [Tray 9] of Paper Feeder Unit PF-707 or Paper Feeder Unit PF-708 in step 5 and then press [Air Assist], the following [Air Assist] screen is displayed.
Select [Auto] or [Manual].
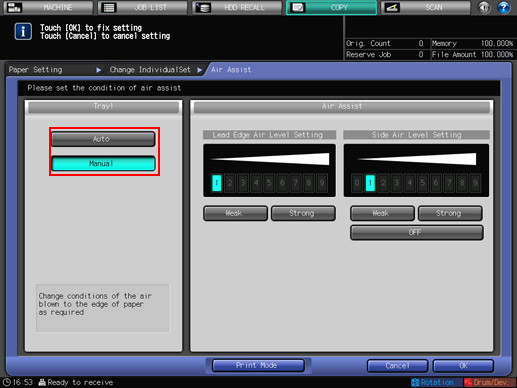
If you select [Manual], 9 air levels are available by pressing [Weak] / [Strong] in [Lead Edge Air Level Setting] and [Side Air Level Setting].
[OFF] can also be selected in Side Air Level Setting.
If you select [PB] of Perfect Binder PB-503 in step 5 and then press [Air Assist], the following [Air Assist] screen is displayed.
Select [Auto], [ON], or [OFF], as desired.
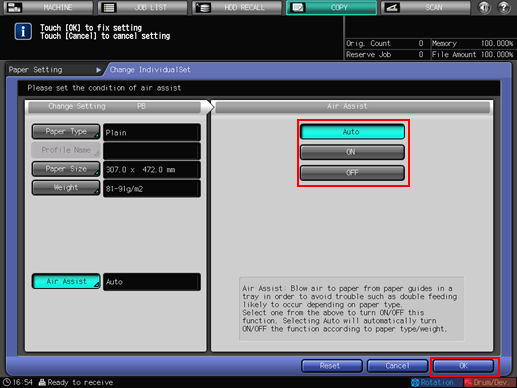
Press [OK].
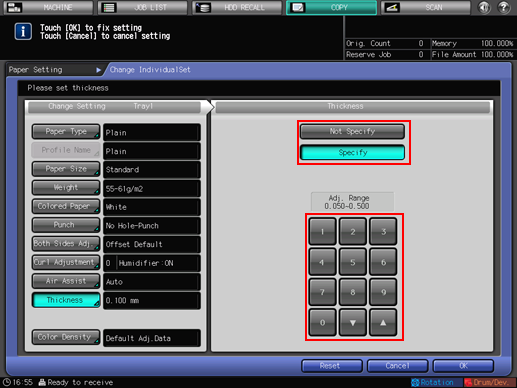
Press [Thickness].
[Thickness] is displayed when Image Controller IC-602 is mounted.
Select the desired button from under [Thickness].

Selecting [Specify] displays the touch panel keypad. Use the touch panel keypad or [
][] to enter the adjustment value. Available range is from 0.050 mm to 0.500 mm.The entered value is displayed on the right side of [Thickness] in the left side area of the screen. Entering a value less than 0.050 mm automatically sets the value to 0.050 mm.
Press [Process Adj.].

In the default setting, [Process Adjustment] is not displayed. To make the process adjustment from the Paper Setting provided on the [MACHINE] screen or [COPY] screen, contact your service representative.
For the items from [2nd Transfer Output Adj. (Front)] to [Rear Edge Erase Quantity] displayed by pressing [Next], select the button for the item you want to adjust and press the touch panel keypad, [
], [], or the keypad on the control panel to enter values.
Press [+/-] to specify the value to be positive or negative.

Press [Next] to display the setting screen.
Make settings for the following items.
[Toner Amount Save], [Dens. Adj. Per Tray (YMC)], [Dens. Adj. Per Tray (K)], [Shorten Tray Change Time (Mixed Weight Job)], [Double Feed Detection], [Mis-centering Detect JAM], [Int. Transfer Separation], [Thick BK Mode],[Feed Correction], [Fusing Air Separation Air Level Setting]
Press [OK] to complete the setting. To cancel the change, press [Cancel].
Press [Color Density].
The [Color Density] screen is displayed.
This setting is enabled when [ON] is selected for [Use Color Density Control], accessed from [Color Density Control] - [Basic Setting] on the [Adjustment Menu] screen.
For details about Color Density Control, refer to Color density control.
Press [Default Adj. Data] or [Registered Adj. Data].
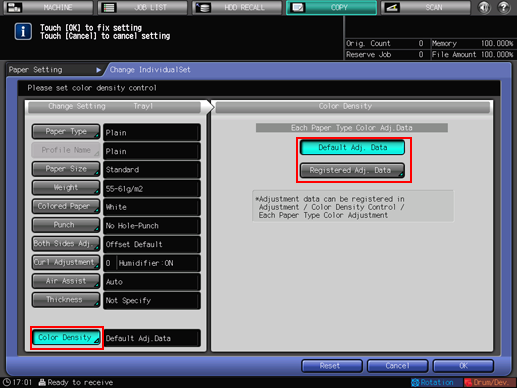
With [Default Adj. Data] selected, the machine performs Gamma Correction (Color Density Control) with reference to the adjustment data preset on the machine.
With [Registered Adj. Data] selected, the [Each Paper Type Color Adjustment List] screen is displayed.
Select the desired registration name, then press [OK]. The list displayed on the [Each Paper Type Color Adjustment List] screen indicates color sensor adjustment values per paper type registered in [Color Density Control] of the [Adjustment Menu] screen.
Press [OK].
The screen returns to the [Paper Setting] screen. The screen shows newly-specified paper conditions.
When completing the paper setting, press [Close]. The screen returns to the [MACHINE] screen or the [COPY] screen.
To register the paper conditions specified in steps 11 to 26, proceed to step 27.
Press [Register].
The [Register] screen is displayed.
To select the desired entry from the [Paper Profile] list, press [
] or [].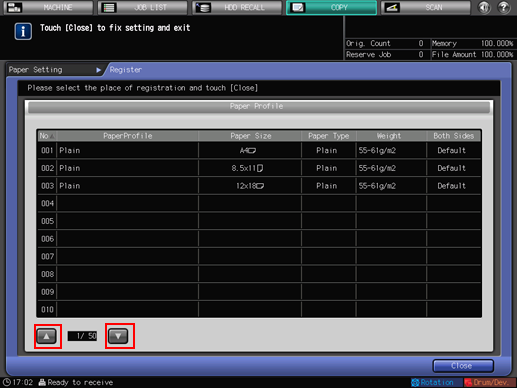
The [Paper Profile Name Setting] screen is displayed.
If an entry with a [Paper Profile] displayed is selected, the registered paper conditions are overwritten with new settings.
Enter the desired paper profile name.
Up to 25 two-byte characters or 50 one-byte characters can be entered for the paper profile name.
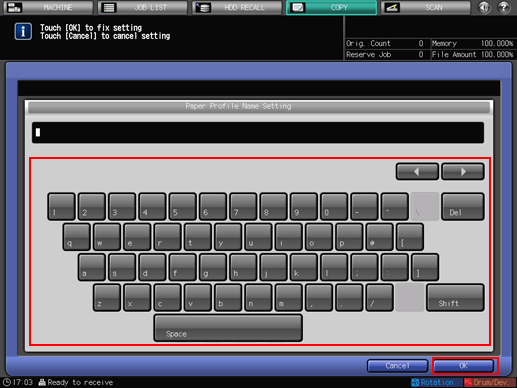
Press [OK].
The screen returns to the [Register] screen.
Press [Close].
The screen returns to the [Paper Setting] screen.
Press [Close].
The screen returns to the [MACHINE] screen or the [COPY] screen.