Deterring Unauthorized Copying
Printing a concealed security watermark ([Copy Protect])
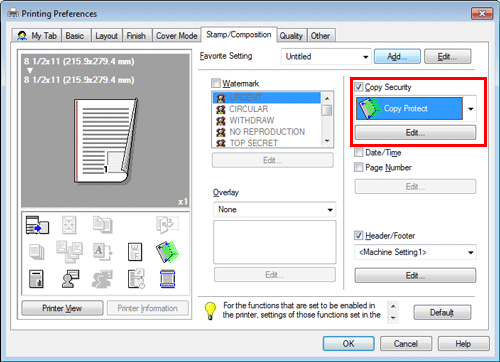
Text such as "Copy" and "Private" are printed in the background pattern as concealed text. This function is called the Copy Protect function.
When a copy-protected document is copied, the concealed security watermark appears on the entire page, thereby indicating that it is an unauthorized copy.

On the [Stamp/Composition] tab, select the [Copy Security] check box, and then select [Copy Protect].
As necessary, click [Edit...] to specify the text to be printed and the format of the text. For details, refer to [Configuring the print settings for Copy Security] .

 Tips
Tips This function is available when the Web browser function is disabled. When the optional Extension Memory is installed, this function is available regardless of whether the Web browser function is enabled or disabled.
Printing a stamp on the entire page ([Stamp Repeat])
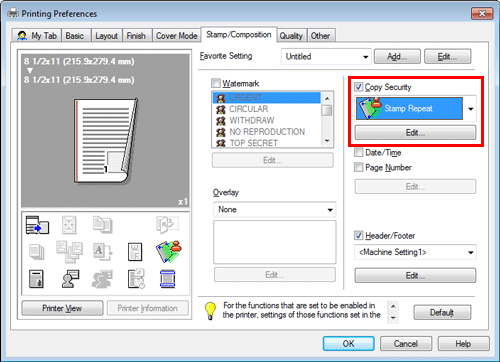
Stamp such as "Copy" and "Private" are printed on the entire page.
By printing text such as "Copy" or "Private" as a visible stamp, you can deter unauthorized copying.

On the [Stamp/Composition] tab, select the [Copy Security] check box, and then select [Stamp Repeat].
As necessary, click [Edit...] to specify the text to be printed and the format of the text. For details, refer to [Configuring the print settings for Copy Security] .

 Tips
Tips This function is available when the Web browser function is disabled. When the optional Extension Memory is installed, this function is available regardless of whether the Web browser function is enabled or disabled.
Configuring the print settings for Copy Security
When printing a copy security pattern on sheets, you can set the text to be printed and the format of the text as necessary.
 This function is available when the Web browser function is disabled. When the optional Extension Memory is installed, this function is available regardless of whether the Web browser function is enabled or disabled.
On the [Stamp/Composition] tab, check the [Copy Security] box, and then click [Edit...].

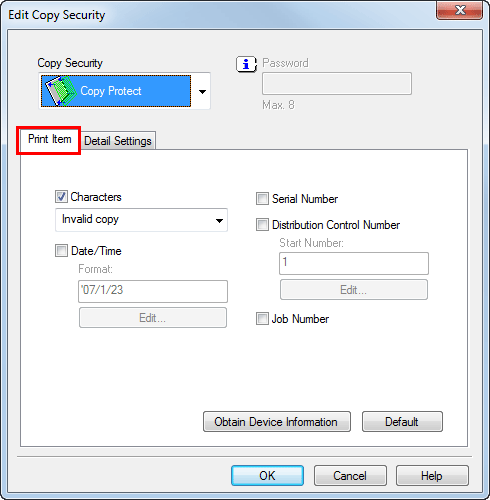
In the [Print Item] tab, select the item to be printed.
 Items that can be specified vary depending on the selected copy security function.
Settings
Description
[Characters]
Select this check box to print a text. In addition, select the text you want to print.
 You can select the text to be printed from the registered preset stamps and stamps registered by users.
 If your computer can communicate with this machine, clicking [Obtain Device Information] obtains and displays the latest stamp information registered in this machine.
[Date/Time]
Select this check box to add the print date/time.
As necessary, click [Edit...] to specify the format.
[Serial Number]
Select this check box to print the serial number of this machine.
[Distribution Control Number]
Select this check box to print copy numbers when printing multiple sets of copies.
As necessary, click [Edit...] to specify the start number and the number of digits.
[Job Number]
Select this check box to print the job numbers managed in this machine.
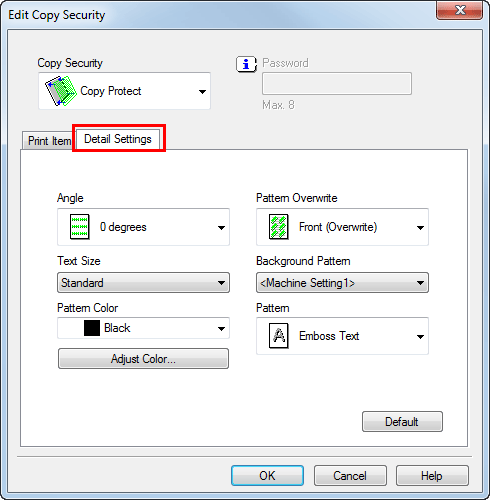
In the [Detail Settings] tab, set the print format.
 Items that can be specified vary depending on the selected copy security function.
Settings
Description
[Angle]
Select the angle of the text to be printed.
[Text Size]
Select the size of the text to be printed.
[Pattern Color]
Select the color of the copy security pattern.
As necessary, click [Adjust Color...] to adjust the density and contrast.
[Pattern Overwrite]
Select whether to compose the copy security pattern on the front or back side of the original.
[Background Pattern]
Select the copy security pattern from the background patterns registered in this machine.
[Pattern]
Select whether the text pattern is embossed or outlined when the original is subjected to unauthorized copying.
Click [OK].