
Configuring Scan or Original Settings for Network Fax Transmission
Configuring the Basic Settings such as Color and Original Size
To select the color mode to scan the original ([Color])
To display:
- [Scan/Fax]
- [Color]
Select the color mode to scan originals.
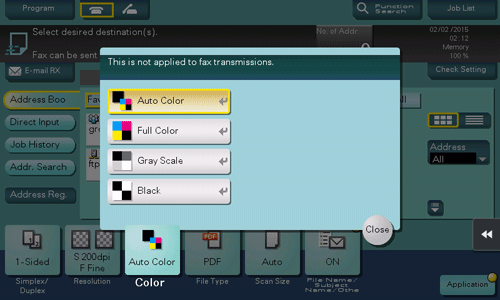
Settings | Description |
|---|---|
[Auto Color] | Scan by automatically selecting either [Full Color] or [Gray Scale] according to the original color. |
[Full Color] | Scan in full color, regardless of whether the original is in color or in black and white. Select this option to scan originals of other than black and white and scanning color photos. |
[Gray Scale] | Scan in gray scale, regardless of whether the original is in color or in black and white. Select this option to scan originals with many halftones, such as black and white photos. |
[Black] | Scan originals in white and black, no shades of gray. Select this option to scan originals with distinct black and white areas, such as line drawings. |
To specify the original size ([Scan Size])
To display:
- [Scan/Fax]
- [Scan Size]
Select the size of the original to be scanned.
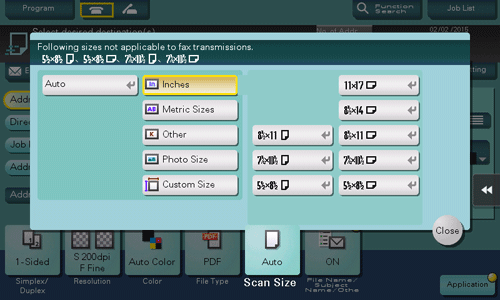
Settings | Description |
|---|---|
[Auto] | Selects a scan size automatically according to the original, and scans the original. |
[Inches] | Select this option to scan an inch-size original. Tap [Inches], and select a standard inch size. |
[Metric Sizes] | Select this option to scan a metric-size original. Tap [Metric Sizes], and select the standard metric size respectively. |
[Other] | Select this option to scan a postcard (4 6, or A6 Card) or an original other than an inch- or metric- size original. Tapping [Other] allows you to select each standard size. |
[Photo Size] | Select this option to scan photos or originals in photo size. Tap [Photo Size], and select a standard size. |
[Custom Size] | Select this option to scan originals in custom size. Enter vertical and horizontal values. |
To specify the resolution to scan the original ([Resolution])
To display:
- [Scan/Fax]
- [Resolution]
Select the resolution of the original for scanning.
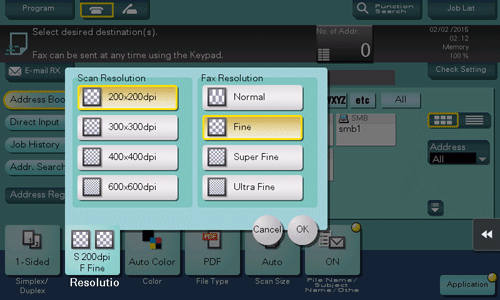
Settings | Description |
|---|---|
[Scan Resolution] | Select the resolution of the original for scan transmission. When using Scan to E-mail, SMB Send, FTP Send, WebDAV Send, or Save in User Box, select the following resolution to scan an original.
|
[Fax Resolution] | Select the resolution of the original for sending a fax. When using fax transmission, Internet fax transmission, or IP address fax transmission, select the following resolution to scan an original.
|
The finer the scan resolution is, the larger the data volume becomes, resulting in longer transmission time. To use an E-mail as a transmission method such as Scan to E-mail or Internet fax transmission, check that the data capacity are not limited.
To scan a 2-sided original ([Simplex/Duplex])
To display:
- [Scan/Fax]
- [Simplex/Duplex]
Select the surface of the original to be scanned.
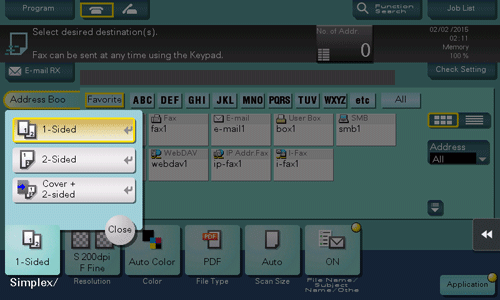
Settings | Description |
|---|---|
[1-Sided] | Tap this button to scan one side of an original. |
[2-Sided] | Tap this button to scan both sides of an original. |
[Cover + 2-sided] | Tap this button to scan only one side for the first page in the original, and scan both sides of the remaining pages. |
To change the file name of the scanned original ([File Name/Subject Name/Other])
To display:
- [Scan/Fax]
- [File Name/Subject Name/Other]
Change the file name of the scanned original.
When sending by E-mail, you can specify the subject and text of the E-mail message and change the sender E-mail address ("From" address).
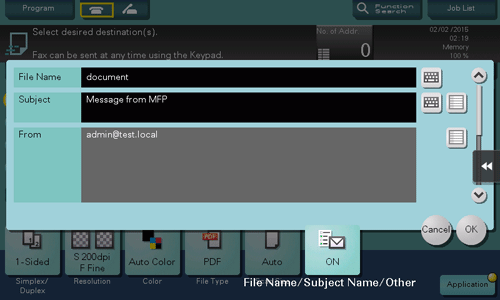
Settings | Description |
|---|---|
[File Name] | If necessary, change the file name of the scanned original. |
[Subject] | If necessary, change the subject of the E-mail. If fixed subject phrases are registered, you can select a subject from those registered. |
[From] | If necessary, change the sender E-mail address. In normal circumstances, the E-mail address of the administrator is used as sender E-mail address. If user authentication is installed on this machine, the E-mail address of the login user is used as sender E-mail address. |
[Body] | If necessary, change the message text of the E-mail. If fixed message text phrase is registered, you can select message text from those registered. |
To change a subject and message text for each Internet fax destination ([File Name/Subject Name/Other])
To display:
- [Scan/Fax]
- [File Name/Subject Name/Other]
Change the file name of the scanned original.
When sending by E-mail, you can specify the subject and text of the E-mail message and change the sender E-mail address ("From" address).

Settings | Description |
|---|---|
[File Name] | If necessary, change the file name of the scanned original. |
[Subject] | If necessary, change the subject of the E-mail. If fixed subject phrases are registered, you can select a subject from those registered. |
[From] | If necessary, change the sender E-mail address. In normal circumstances, the E-mail address of the administrator is used as sender E-mail address. If user authentication is installed on this machine, the E-mail address of the login user is used as sender E-mail address. |
[Body] | If necessary, change the message text of the E-mail. If fixed message text phrase is registered, you can select message text from those registered. |
Configuring Settings to Fit Various Types of Originals
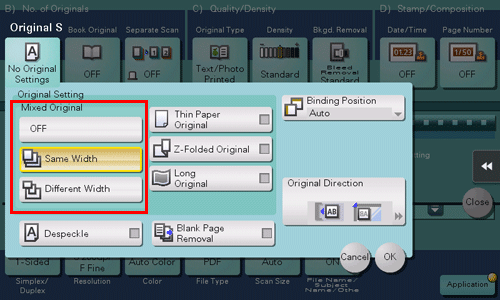
To collectively scan different sized originals using the ADF ([Mixed Original])
To display:
- [Scan/Fax]
- [Application]
- [No. of Originals]
- [Original Settings]
- [Mixed Original]
- [Original Settings]
- [No. of Originals]
- [Application]
Even for an original with pages of different sizes, by using the ADF, you can scan data while detecting the size of each page. If the widths of the originals are the same, select [Same Width]. If the widths of the originals are different, select [Different Width].
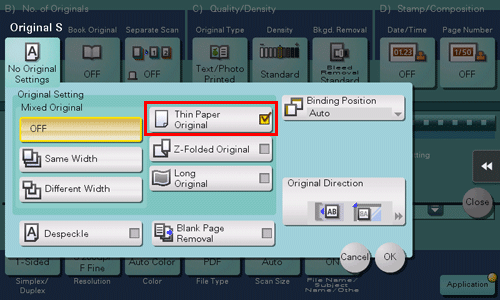
To scan an original that is thinner than plain paper using the ADF ([Thin Paper Original])
To display:
- [Scan/Fax]
- [Application]
- [No. of Originals]
- [Original Settings]
- [Thin Paper Original]
- [Original Settings]
- [No. of Originals]
- [Application]
This function reduces the transport speed of the original on the ADF to prevent the original from being caught when scanning an original that is thinner than plain paper.
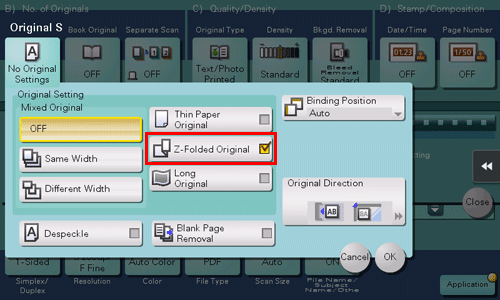
To scan a folded original using the ADF ([Z-Folded Original])
To display:
- [Scan/Fax]
- [Application]
- [No. of Originals]
- [Original Settings]
- [Z-Folded Original]
- [Original Settings]
- [No. of Originals]
- [Application]
Even the original sizes of folded originals can be detected accurately.
To scan a long original that cannot be loaded on the original glass ([Long Original])
To display:
- [Scan/Fax]
- [Application]
- [No. of Originals]
- [Original Settings]
- [Long Original]
- [Original Settings]
- [No. of Originals]
- [Application]
Select this option when loading a long original that is larger in the feeding direction than the full standard size (11 17 or A3).
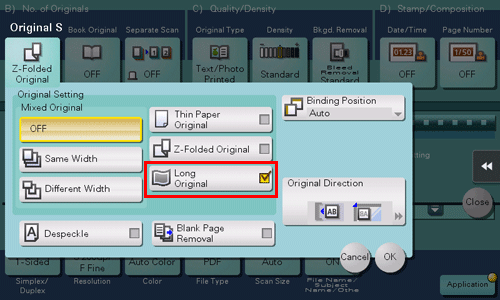
This function is available when the Web browser function is disabled. When the optional Extension Memory is installed, this function is available regardless of whether the Web browser function is enabled or disabled. Some models provide Extension Memory as standard. For details, refer to Here.
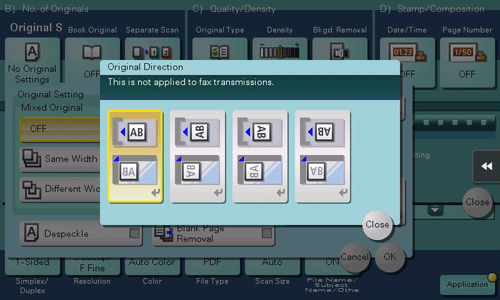
To specify the original loading direction ([Original Direction])
To display:
- [Scan/Fax]
- [Application]
- [No. of Originals]
- [Original Settings]
- [Original Direction]
- [Original Settings]
- [No. of Originals]
- [Application]
Specify the orientation of the loaded original.
To display a top-binding and double-sided original correctly without reversing an image in the vertical direction ([Binding Position])
To display:
- [Scan/Fax]
- [Application]
- [No. of Originals]
- [Original Settings]
- [Binding Position]
- [Original Settings]
- [No. of Originals]
- [Application]
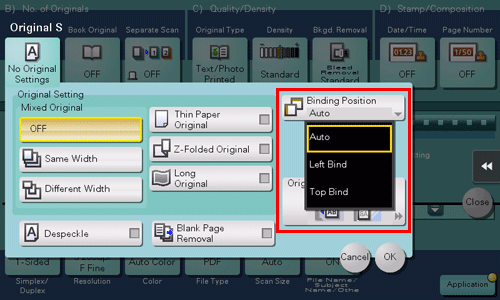
When scanning a 2-sided original, select the original binding position to prevent the binding positions being reversed between the front and rear faces.
Settings | Description |
|---|---|
[Auto] | Automatically configures the binding position of the original. When the long side of the original is 11-11/16 inches (297 mm) or less, the binding position is set to the long side of the paper. When the long side of the original exceeds 11-11/16 inches (297 mm), the binding position is set to the short side of the paper. |
[Left Bind] | Select this option when the binding position is set to the left of the original. |
[Top Bind] | Select this option when the binding position is set to the top of the original. |
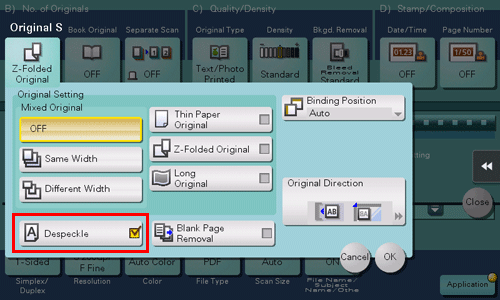
To scan an original using the ADF while removing dust on the slit glass ([Despeckle])
To display:
- [Scan/Fax]
- [Application]
- [No. of Originals]
- [Original Settings]
- [Despeckle]
- [Original Settings]
- [No. of Originals]
- [Application]
Scan an original using the ADF while removing dust from the Slit Scan Glass.
It takes longer to finish scanning, compared to the normal operation.
To split the left and right pages of a book or catalog ([Book Original])
To display:
- [Scan/Fax]
- [Application]
- [No. of Originals]
- [Book Original]
- [No. of Originals]
- [Application]
You can scan two-page spreads such as books and catalogs separately into left and right pages, or scan then as one page. If you place a book or catalog on the Original Glass, you do not need to close the ADF to scan it.
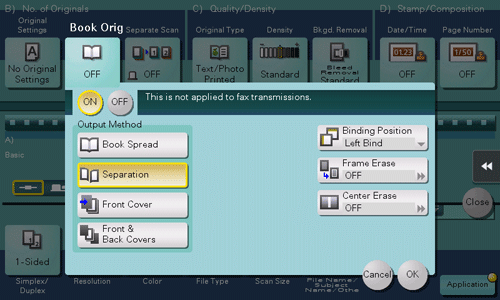
Settings | Description |
|---|---|
[ON]/[OFF] | Select [ON] to specify Book Original. |
[Output Method] | Specify the scanning method for book spread originals.
|
[Binding Position] | If [Separation], [Front Cover] or [Front & Back Covers] is selected for [Output Method], select the two-page spread binding position. Select [Left Bind] for two-page spreads of left binding, and [Right Bind] for two-page spreads of right binding. Note that if the binding position is incorrectly specified, the page order of the two-page spread is reversed between the left- and right-hand pages. |
[Frame Erase] | Erases the shadow of the surrounding that is created when the original cover cannot be closed properly due to the thickness of the original. You can erase the four sides of the original to the same width. Additionally, you can erase the four sides of the original to different widths.
|
[Center Erase] | Erases the shadow created in the center when the original cover cannot be closed correctly due to the thickness of the original. Specify the width of the area to erase by tapping [+]/[-] for the inch area and by tapping [+]/[-] or Keypad for the centimeter area. To display the Keypad, tap the input area for the numeral. |
To scan a number of originals as a single job ([Separate Scan])
To display:
- [Scan/Fax]
- [Separate Scan]
If the number of original sheets is so large that they cannot be loaded into the ADF at the same time, you can load them in several batches and handle them as one job.
You can also scan the original using both ADF and Original Glass alternately.
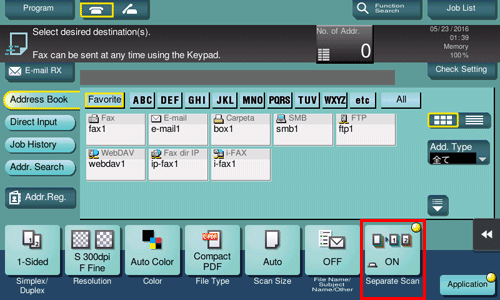
For details on the operation procedure of Serial Scan, refer to Here.
Adjusting the Image Quality or Density
To automatically adjust to the appropriate image quality for the contents of the original ([Original Type])
To display:
- [Scan/Fax]
- [Application]
- [Quality/Density]
- [Original Type]
- [Quality/Density]
- [Application]
Select the appropriate image quality level for the original and scan at the optimal level of image quality.
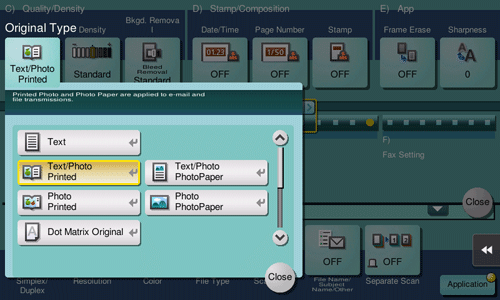
Settings | Description |
|---|---|
[Text] | Tap this button to scan an original, which consists mostly of text, at the optimum level of image quality. This function sharpens the edges of each character, creating easy-to read images. |
[Text/Photo Printed] | Tap this button to scan an original consisting primarily of text and photos at the optimum image quality level. This function sharpens the edges of each character, and reproduces smoother photos. Select this option to scan printed originals such as brochures and catalogs. |
[Text/Photo PhotoPaper] | Tap this button to scan an original consisting primarily of text and photos at the optimum image quality level. This function sharpens the edges of each character, and reproduces smoother photos. Select this option to scan originals in that include photos printed on photographic paper. |
[Photo Printed] | Tap this button to scan an original consisting of only photos at the optimum image quality level. Select this option to scan printed originals such as brochures and catalogs. |
[Photo PhotoPaper] | Tap this button to scan an original consisting of only photos at the optimum image quality level. Select this option for scanning originals printed on photographic paper. |
[Dot Matrix Original] | Tap this button to scan an original, which consists mostly of text such as thin or faint characters, at the optimum level of image quality. This function reproduces text using high pixel density, creating easy-to-read text. |
[Copied Paper] | Tap this button to scan an original with the even density, which is printed out by the copier or printer, with the optimum image quality. |
[Bar Code/Contract] | Select this option to reduce the file size when scanning the original such as a contract or bar code in black and white. Setting to [Bar Code/Contract] synchronously changes [Color] to [Black]. This option is available when the file type is set to TIFF, PDF, or XPS. |
To adjust the density to scan the original ([Density])
To display:
- [Scan/Fax]
- [Application]
- [Quality/Density]
- [Density]
- [Quality/Density]
- [Application]
Scan originals by adjusting the density according to the original.
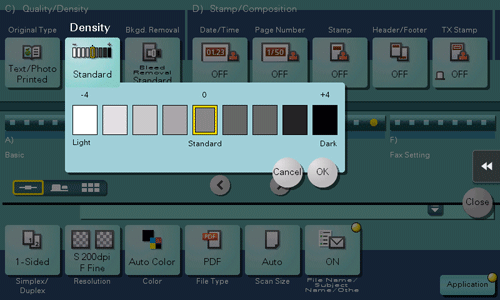
To adjust the background density of the original ([Bkgd. Removal])
To display:
- [Scan/Fax]
- [Application]
- [Quality/Density]
- [Bkgd. Removal]
- [Quality/Density]
- [Application]
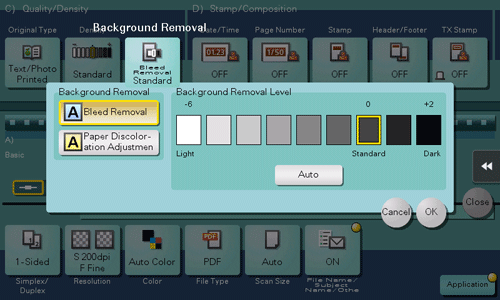
Adjust the density of the original with a colored background (newspaper, recycle paper, etc.) or the background of an original that is so thin that text or images on the back would also be scanned.
Settings | Description |
|---|---|
[Background Removal] | Tap this button to scan a thin 2-sided original or an original with a colored background at the optimal level of image quality.
|
[Background Removal Level] | Tap this button to adjust the density of the background color for an original that has a colored background. Selecting [Auto] automatically determines the density of the background color, and scans an original at the optimum background density level. |
Adding Stamp or Page Number
To add the date/time ([Date/Time])
To display:
- [Scan/Fax]
- [Application]
- [Stamp/Composition]
- [Date/Time]
- [Stamp/Composition]
- [Application]
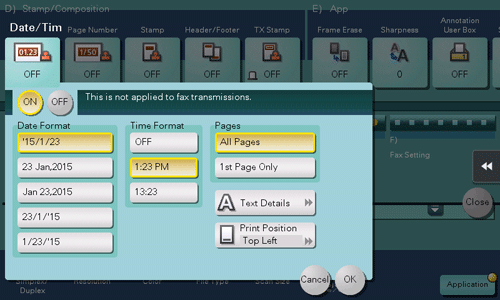
Select the stamping position and representation, and add the date and time the original is scanned. The date and time can be printed either on all pages or only on the first page.
Settings | Description |
|---|---|
[ON]/[OFF] | Select [ON] to print the date/time. |
[Date Format] | Select the date/time format. |
[Time Format] | Select the time format. If you do not want to print time, select [OFF]. |
[Pages] | Select the range of pages to print. |
[Text Details] | If necessary, select the print size, font, and text color. |
[Print Position] | If necessary, select the print position of the text. You can more finely adjust the print position in [Adjust Position]. |
This function is available when the Web browser function is disabled. When the optional Extension Memory is installed, this function is available regardless of whether the Web browser function is enabled or disabled. Some models provide Extension Memory as standard. For details, refer to Here.
To add a page number ([Page Number])
To display:
- [Scan/Fax]
- [Application]
- [Stamp/Composition]
- [Page Number]
- [Stamp/Composition]
- [Application]
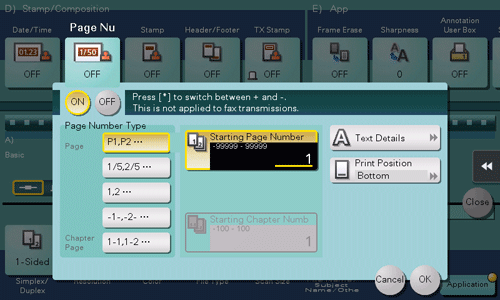
Select the stamping position and format, and add page and chapter numbers. Page and chapter numbers are printed on all pages.
Settings | Description |
|---|---|
[ON]/[OFF] | Select [ON] to print page numbers. |
[Page Number Type] | Select the format of the page number. |
[Starting Page Number] | Enter the starting page number to be printed on the first page using the Keypad. To display the Keypad, tap the input area for the numeral. For example, to print page numbers from the third page of the original, enter "-1". The first page of the original is counted as "-1", and the second page as "0", and the third page is counted as "1". In [Starting Page Number], a page number is printed on pages 1 and later. If "2" is entered, page numbers are printed from the first page of the original as "2, 3", etc. in order. The "-" (minus sign) changes to + each time you tap [*]. |
[Starting Chapter Number] | Enter the starting chapter number if an original is divided into chapters, and you want to print chapter numbers from the second chapter using the Keypad. To display the Keypad, tap the input area for the numeral. You can specify chapter numbers only when you have selected [Chapter Page] in [Page Number Type]. |
[Text Details] | If necessary, select the print size, font, and text color. |
[Print Position] | If necessary, select the print position of the text. You can more finely adjust the print position in [Adjust Position]. |
This function is available when the Web browser function is disabled. When the optional Extension Memory is installed, this function is available regardless of whether the Web browser function is enabled or disabled. Some models provide Extension Memory as standard. For details, refer to Here.
To add a stamp ([Stamp])
To display:
- [Scan/Fax]
- [Application]
- [Stamp/Composition]
- [Stamp]
- [Stamp/Composition]
- [Application]
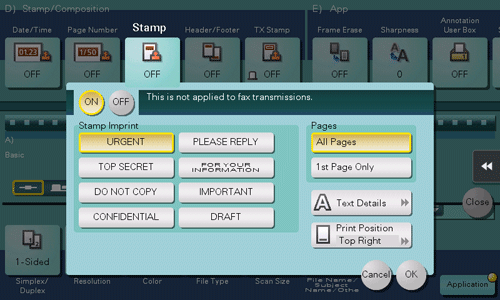
Text such as "PLEASE REPLY" and "DO NOT COPY" are printed on the first page or all pages. You can select the text to be added from the registered fix stamps and arbitrary registered stamps.
Settings | Description |
|---|---|
[ON]/[OFF] | Select [ON] to print a stamp. |
[Stamp Imprint] | Select the stamp you want to print. |
[Pages] | Select the range of pages to print. |
[Text Details] | If necessary, select the print size and text color. |
[Print Position] | If necessary, select the print position of the text. You can more finely adjust the print position in [Adjust Position]. |
This function is available when the Web browser function is disabled. When the optional Extension Memory is installed, this function is available regardless of whether the Web browser function is enabled or disabled. Some models provide Extension Memory as standard. For details, refer to Here.
To add information to the header or footer ([Header/Footer])
To display:
- [Scan/Fax]
- [Application]
- [Stamp/Composition]
- [Header/Footer]
- [Stamp/Composition]
- [Application]
Add the date, time and any other desired text in the top and bottom margins (header/footer) of the specified page. You must register the information to be added for the header and footer in advance on this machine.
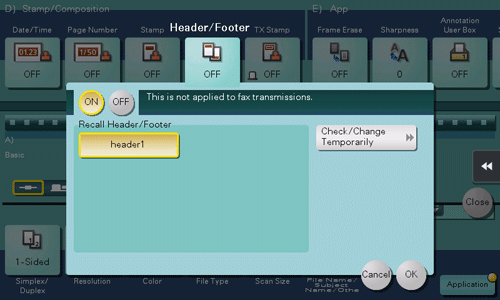
Settings | Description |
|---|---|
[ON]/[OFF] | Select [ON] to print the header/footer. |
[Recall Header/Footer] | Select the header/footer to be printed. Select the header/footer from among those registered in advance. |
[Check/Change Temporarily] | If necessary, check or temporarily change the details of the program that is selected in [Recall Header/Footer].
|
This function is available when the Web browser function is disabled. When the optional Extension Memory is installed, this function is available regardless of whether the Web browser function is enabled or disabled. Some models provide Extension Memory as standard. For details, refer to Here.
Other option settings
To add a TX stamp, which certifies that the original has been scanned, to a scanned original (TX Stamp)
To display:
- [Scan/Fax]
- [Application]
- [Stamp/Composition]
- [TX Stamp]
- [Stamp/Composition]
- [Application]
When scanning originals using the ADF, a TX Stamp is printed on a scanned original to certify that the original has been scanned. It is used when sending a fax.
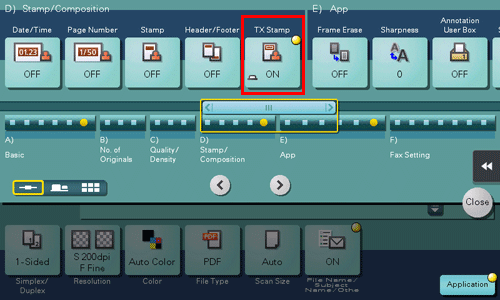
To use this function, the optional Stamp Unit is required.
The ink used for stamping is consumables. If the ink becomes faint, contact your service representative.
If [Mixed Original] is specified to scan originals, TX Stamp may not be printed on the specified position.
To scan after erasing text and shadows in the margins of an original ([Frame Erase])
To display:
- [Scan/Fax]
- [Application]
- [App]
- [Frame Erase]
- [App]
- [Application]
Erases the four sides of the original by the same width amount. You can also erase the four sides of the original to different widths.
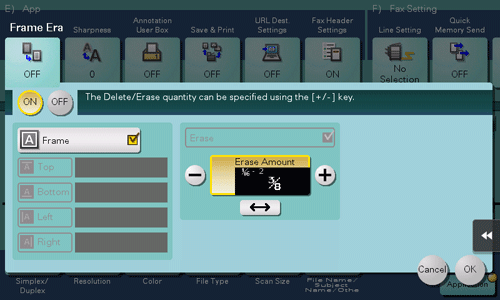
Settings | Description |
|---|---|
[ON]/[OFF] | Select [ON] to specify Frame Erase. |
[Frame] | Select this option to erase the four sides of the original to the same width. In [Erase Amount], tap [+]/[-] for the inch area, tap [+]/[-] or Keypad for the centimeter area to specify the width of the area to be erased. To display the Keypad, tap the input area for the numeral. |
[Top]/[Bottom]/[Left]/[Right] | Select this option to erase the four sides of the original to different widths. Clear the [Frame] check box, select a side ([Top], [Bottom], [Left] or [Right]) and specify the width of the area in [Erase Amount] by tapping [+]/[-] for an inch area and by tapping [+]/[-] or Keypad for a centimeter area. To display the Keypad, tap the input area for the numeral. If you do not want to erase the side, cancel the setting for [Erase]. |
To sharpen the border between text ([Sharpness])
To display:
- [Scan/Fax]
- [Application]
- [App]
- [Sharpness]
- [App]
- [Application]
Sharpen the edges of the image to improve legibility. Smoothen rough contours of an image or sharpen blurred image.
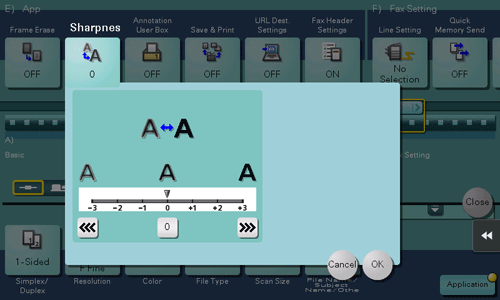
To print on this machine simultaneously with sending ([Save & Print])
To display:
- [Scan/Fax]
- [Application]
- [App]
- [Save & Print]
- [App]
- [Application]
You can print data simultaneously with Scan or Fax TX.

Settings | Description |
|---|---|
[ON]/[OFF] | Select [ON] to send and print at the same time. |
[No. of Sets] | If necessary, enter the number of copies to print. |
[Simplex/Duplex] | Select [2-Sided] to print on both sides of sheets of paper. |
[Staple] | Select the binding positions for sheet stapling.
|
To use the Staple function, the optional Finisher is required.


