Using Scan Transmission
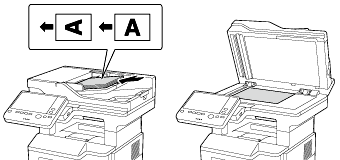
Load the original.

Tap [Scan/Fax].
Specify the size of the original to be scanned.
 The size of the original can be specified in [Scan Size] (default: [8-1/2
  11] (inch area)/[A4] (centimeter area)). If you fail to set the original size correctly, the image may be cut off.
Configure Scan option settings as necessary.
 For details on configuring option settings, refer to the respective columns of the following table.
Purpose
Reference
To configure basic options such as color and original size
To configure options to scan various types of originals such as various sizes and books
[Settings to Scan Various Types of Originals (Application Settings)]
To adjust the image quality level of the original such as colored background (newspaper, etc.) or light printing original
[Adjusting Image Quality Level/Density (Application Settings)]
To print date/time and page number
Other option settings
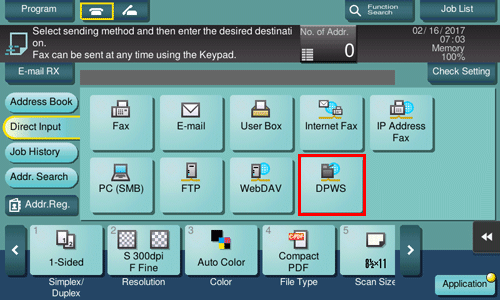
Select [Direct Input] - [DPWS].

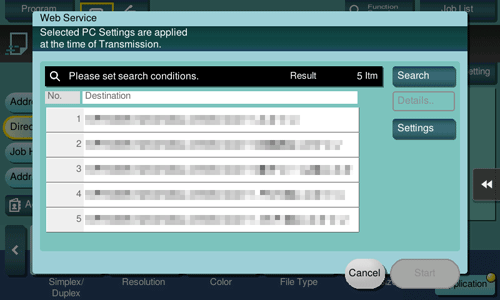
The computers on the network, in which this machine is designated as the Web service scanner, appear as the destinations.
Select a destination computer.

 By tapping [Search], you can enter a keyword included in a destination name and search for a destination.
 Tapping [Details..] displays the name and URL of a destination.
 By tapping [Settings], you can change option settings such as [Color] and [Scan Size].
Tap [Start].
 To redo operations for specifying destinations or option settings, press the Reset key.
Transmission begins.
Use the destination computer to handle the application for importing original data or check files saved by a scan transmission.
 When using a scan transmission from this machine, start the application on a destination computer to import original data, or save original data in a specific folder. For details, refer to [Computer Side: Steps Required to Use This Function] .