


Before Card Cutting
Overview
If you cut the paper into a card size with Trimmer Unit TU-510, check the following contents in advance, and change the Job Separator JS-507 settings as needed.
1. Vertical size of card
Change the Partition plate position depending on whether the vertical size of the card is 85 mm / 3.35" or more.
For details, refer to the following procedure.
2. Number of rows for card cutting
Switch the Partition plate position to the 1-row type, 2-row type, or 3-row type depending on the card cutting settings.
For details, refer to the following procedure.
Procedure (Changing the Partition plate Position in Job Separator JS-507)
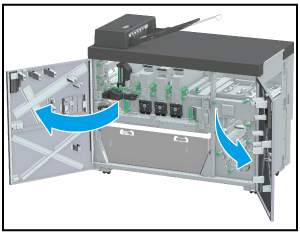
1
Open the Trimmer unit right side door and Trimmer unit left side door of the Trimmer Unit TU-510.
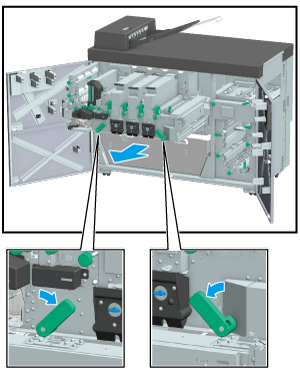
2
Tilt the Lever [TU4] to the left and the Lever [TU5] to the right, then pull out the conveyance rack.
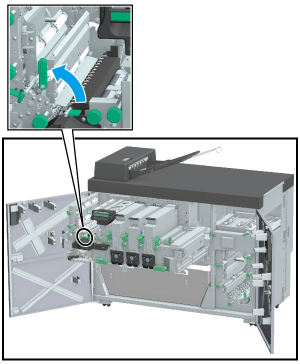
3
Move the Lock lever [TU6] as shown in the figure here, and fix the conveyance rack.

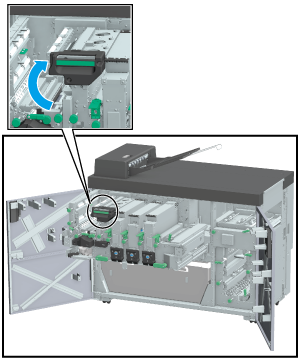
4
Hold the Lever [TU18], and open the card cutting unit to the upper left.
5
Open the Lever [TU20] the left.
6
Open the Lever [JS1] the left.
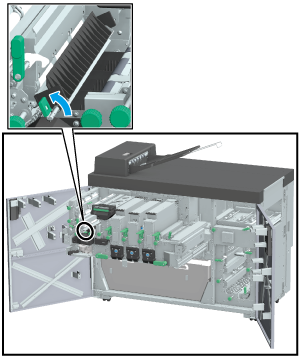
7
Reposition the Partition plate (four units).
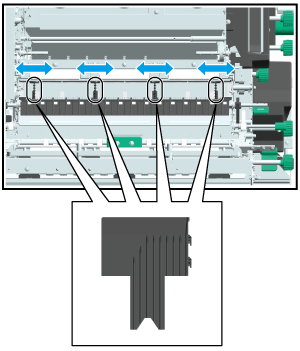
When the card size is widthwise 85 mm / 3.35", move the Partition plate to the center of the paper conveyance path.
When the card size is widthwise 86 mm / 3.39" or more, move the Partition plate to the outside of the paper conveyance path.
8
Close the Lever [JS1] and Lever [TU20]. Then, hold the Lever [TU18], and return the CD trim unit to its home position.
9
Return the Lock lever [TU6] to its home position.
10
Push the conveyance rack in the inside, and return it to its home position. Then, return the Lever [TU4] to the right and the Lever [TU5] to the left.
11
Close the Trimmer unit right side door and Trimmer unit left side door.
Procedure (Changing the Partition plate Position of Card tray)
1
Open the Card tray door of Trimmer Unit TU-510, and pull out the Card tray.
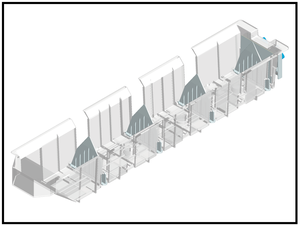
2
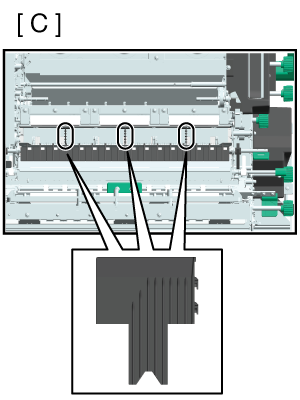
Move the two center partition plates of the Partition plate (four plates) of the Card tray.
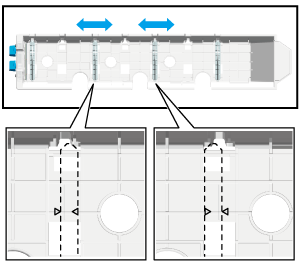
When the card size is widthwise 85 mm / 3.35", move the Partition plate to the center of the paper conveyance path (you can only see the + mark outside).
When the card size exceeds widthwise 86 mm / 3.39", move the Partition plate to the outside of the paper conveyance path (you can only see the + mark inside).
3
Return the Card tray to its home position, and close the Card tray door.
Procedure (Switching the Partition plate Position to the 1-row Type, 2-row Type, or 3-row Type)

NOTICE
- This work requires experience and may damage parts. If it is difficult to change the Partition plate, contact your service representative.
- The Card tray has different specifications depending on the production period, so the detection parts may not be attached. The Card tray of the initial production only supports the 3-row type, so if you want to perform 1- or 2-row card cutting, you will need to prepare an additional detection part. For details, contact your service representative.
- When 1-row cutting cards are stacked onto the Card tray, the stacking capacity (stability when stacked, etc.) may change depending on the shape and type of paper. For details, contact your service representative.
NOTICE
- Before starting this work, make sure that all the Trimmer Unit TU-510 doors are closed.
1
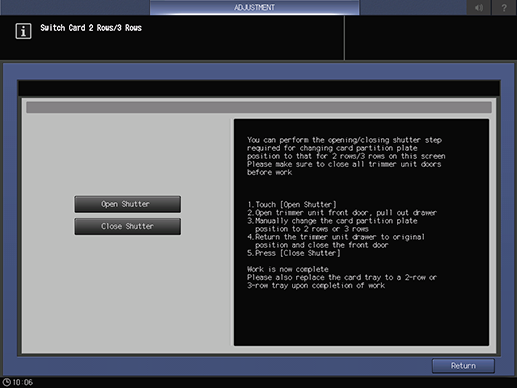
Press [Adjustment] on the [MACHINE] screen, and open [Finisher Adjustment] - [Trimmer Unit Adjustment] - [Switch Card Partition Plates].
2
Press [Open Shutter].
3
Pull out the conveyance rack and open the Job Separator JS-507, referring to steps 1 to 6 on Procedure (Changing the Partition plate Position in Job Separator JS-507).
4
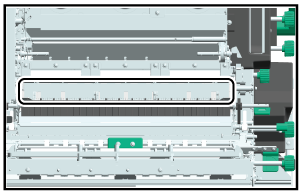
Remove all the set Partition plate once.
When switching the Partition plate to the 1-row type, proceed to Step 5.
When switching the Partition plate to 2- or 3-row type, proceed to Step 6.
When switching the Partition plate to the 1-row type while the finishing size is 293.1 mm to 330.2 mm / 11.54" to 13", proceed to Step 7. You do not need to attach the Partition plate.
5
Attach the Partition plate to the 1-row position depending on the finishing size.
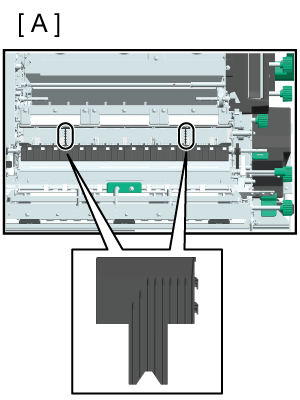
If the finishing size is 200 mm / 7.87" or less, attach the Partition plate (2 plates) as shown in Fig. A.
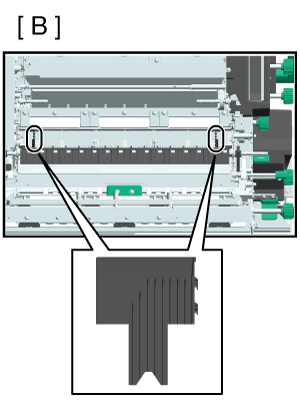
If the finishing size is 200.1 mm to 293 mm / 7.88" to 11.54", attach the Partition plate (2 plates) as shown in Fig. B.
If the finishing size is 293.1 mm to 330.2 mm / 11.54" to 13", you do not need to attach the Partition plate.
Proceed to Step 7.
6
Attach the Partition plate to the 2-row or 3-row position.

To switch to the 2-row type, attach the Partition plate (3 plates) as shown in Fig. C.
To switch to the 3-row type, attach the Partition plate (4 plates) as shown in Fig. D.
7
Return the conveyance rack to its home position, referring to steps 8 to 11 on Procedure (Changing the Partition plate Position in Job Separator JS-507).
8
Press [Close Shutter] in Touch panel.
9
Open the Card tray door of Trimmer Unit TU-510, and pull out the Card tray.
10
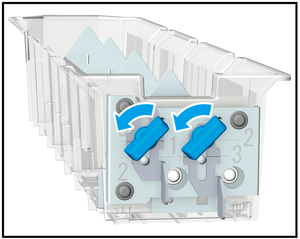
Loosen the thumbscrews (2 pieces) on the back of the Card tray by turning them counterclockwise.
11
Slide the detection parts (2 pieces) (a in the figure) into the 1-row, 2-row, or 3-row position and turn the thumbscrews clockwise to secure them in place.
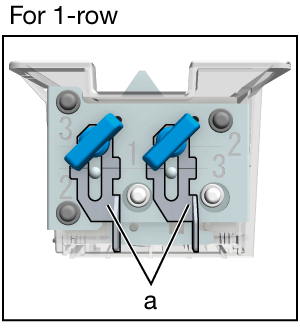
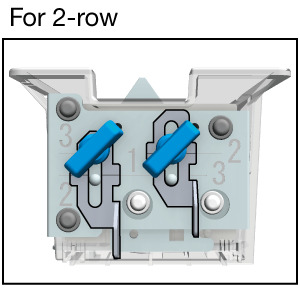
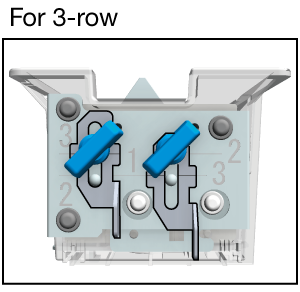
Align the position with the line of the number corresponding to the respective number of rows.
NOTICE
- Carefully check the attaching position of the detection parts and attach them carefully.
12
Remove all the set Partition plate once that are set on the Card tray.
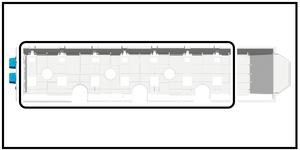
When switching the Partition plate to the 1-row type, proceed to Step 13.
When switching the Partition plate to 2- or 3-row type, proceed to Step 14.
When switching the Partition plate to the 1-row type while the finishing size is 293.1 mm to 330.2 mm / 11.54" to 13", proceed to Step 15. You do not need to attach the Partition plate.
13
Attach the Partition plate to the 1-row position depending on the finishing size.
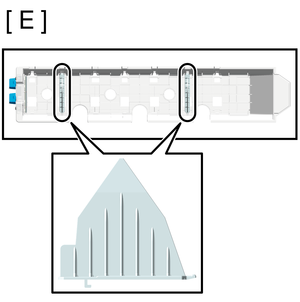
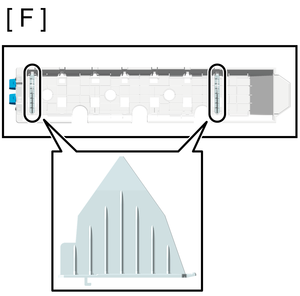
If you attached the Partition plate in the position shown in Figure A in step 5, attach the Partition plate (2 plates) as shown in Figure E.
If you attached the Partition plate in the position shown in Figure B in step 5, attach the Partition plate (2 plates) as shown in Figure F.
Proceed to step 15.
14
Attach the Partition plate to the 2-row or 3-row position.
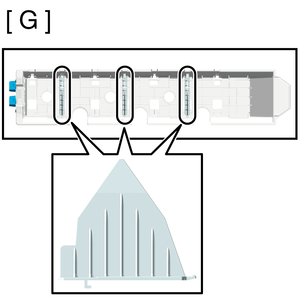
To switch to the 2-row type, attach the Partition plate (3 plates) as shown in Figure G.
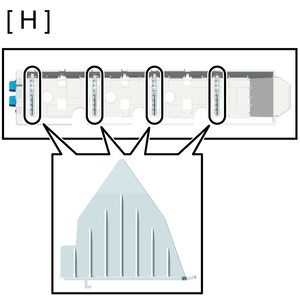
To switch to the 3-row type, attach the Partition plate (4 plates) as shown in Figure H.
15
Return the Card tray to its home position, and close the Card tray door.
 in the upper-right of a page, it turns into
  and is registered as a bookmark.