
Specifying Crop Mark
This section describes the Register Crop Mark function to be specified on the [Job Ticket Edit] screen.
Use this function to print the lines indicating the trim size (corner crop marks) along with image data stored in a hold job. Also, lines indicating the center of the image (center crop marks) can be printed on the head and foot of the page.
The crop mark can be printed with image data stored in a hold job of copy job or print job. Setting for a scan job is unavailable.
You can make the setting to eliminate the corner crop mark.
The following three types of the corner crop mark are provided to allow a selection. The line width is approximately 0.1 mm.
Type 1 | Type 2 | Type 3 |
|---|---|---|
 |  |  |
For Print Object setting, select either [Comp. Unit] or [Image Unit].
Composition Unit | Image Unit |
|---|---|
 |  |
The trim margin indicated by the corner crop mark can be specified from 0 mm to 20 mm in 0.1 mm increments. The default setting is 3 mm.
The size of the corner crop mark is 9 mm in each projection. Changing this size is unavailable.
You can make the setting to eliminate the center crop mark.
The type of the center crop mark is a cross shape only. The line width is approximately 0.1 mm.
The print position of the center crop mark can be specified on the [UTILITY] screen. For details, refer to Common Setting: Setting the Various Operations of the Machine.
The size of the center crop mark is 8.5 mm in length and 25 mm in width. Changing this size is unavailable.
The print position of the corner crop mark and center crop mark can be offset within the range from -20 mm (inward) to +20 mm (outward) in 0.1 mm increments for both X-coordinate and Y-coordinate. The default setting is 0.0 mm.
Select whether to print the corner crop mark and center crop mark on the back in 2-sided printing.
Specify whether or not to synchronize the print position of the corner crop mark and center crop mark with Page Margin.
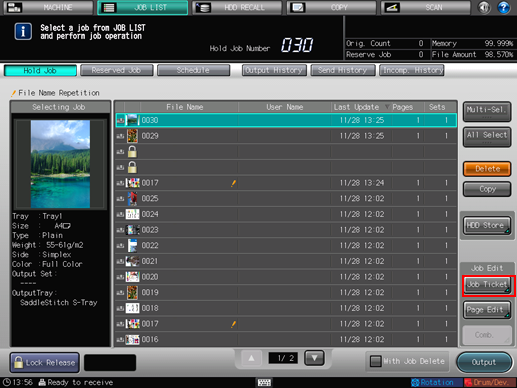
Press the [JOB LIST] tab to display the [JOB LIST] screen.
Press [Hold Job].
The [Hold Job] screen will be displayed.
Select the image file to be printed with crop marks in the [Hold Job] screen.
Press [Job Ticket].
Press [Register Crop Mark] under [Application Setting].

The Register Crop Mark dialog will be displayed.
Select either [ON] or [OFF] under [Center Crop Mark].
Select [OFF] to not print the center crop mark.

Select the type provided under [Corner Crop Mark].
Select [OFF] to not print the corner crop mark.

To specify the trim margin or offset amount, select the desired key, then use the keypad, [
 ][
][ ] to enter the numerical value.
Select either [Comp. Unit] or [Image Unit] for Print Object, if two images are included in a page.
Print Object cannot be specified if [OFF] is selected for the corner crop mark in step 7.
Select [Back Side Printing OFF] for 2-sided printing, and [Page Margin Synchronize OFF] for the job using Page Margin.
Press [OK].
Press [New Store] or [Overwrite] to save the setting.
Press [Sample Output] to output a sample set or a sheet of preview image, in order to check the print result of the setting.
You can also output a sample output by pressing Proof Copy on the control panel.
