Chargement du papier dans les magasins 1 à 4
How to load paper into Tray 1 to Tray 4
The procedure for loading paper is common between Tray 1 to Tray 4. The following explains how to load paper into Tray 1. Tray 3 and Tray 4 are optional.
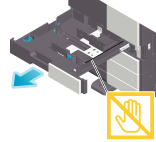
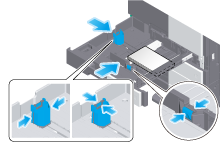
Pull out Tray 1.
 NOTICE
 Be careful not to touch the Film.
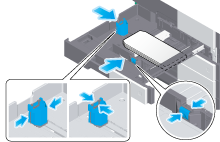
Slide the Lateral Guide to fit the size of the loaded paper.
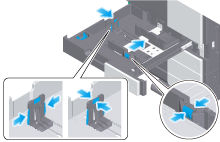
 For Tray 1, mount the Attachment on the Lateral Guide, and slide the Lateral Guide.
Load paper into the tray with the print side facing up.
 When printing on letterhead (paper where company names, preset text, and other text or images are already printed), load it with the print side facing down.For details on the available paper, refer to [Papier] .NOTICE
- Do not load an excessive number of sheets such that the top of the stack is higher than the
 mark.
mark. - If paper is curled, flatten it before loading it.
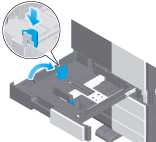
Close Tray 1.
When you change the paper type or change to custom size paper, proceed to step 5 to change the setting on this machine.
When you do not change the paper type or change to custom size paper when adding paper, you can use the current setting without making any changes.If necessary, change the paper setting of the tray on the Paper Setting screen.
The paper type is detected automatically. Intelligent media sensor (mounted in the standard) is required to use this function. For details on Intelligent media sensor, refer to [Intelligent media sensor] .To disable the automatic paper type detection, set [Paper type auto detection settings] or [Auto envelope detection sett.] to OFF. For details, refer to [Paper type auto detection settings] ( [Paper type auto detection settings] ) or [Auto envelope detection sett.] ( [Auto envelope detection sett.] ).When not using the automatic paper type detection, manually specify the paper type. For details, refer to [Modifier le type de papier] .When loading custom sized paper, change the paper type setting. For details, refer to [Spécifier le format personnalisé] .
Chargement des cartes postales
Vous pouvez charger jusqu'à 200 cartes postales dans le magasin 1. L'exemple suivant explique comment charger une carte postale de 4  6 (Cart.A6).
Sortez le Magasin 1.
Pour le magasin 1, montez l'attache sur le guide latéral.
Chargez des cartes postales dans le sens
 avec la face à imprimer vers le haut comme illustré sur la figure.
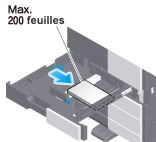 NOTICE
- Lorsque vous chargez des cartes postales dans le magasin 1, observez les points suivants.
Si les cartes postales sont gondolées, aplatissez-les avant de les charger comme indiqué sur la figure.
Faites glisser le guide latéral selon le format du papier chargé.
Fermez le Magasin 1.
Sélectionnez [4
6]([carte A6]) dans les [Formats papier proposés].
Loading envelopes
Up to 70 envelopes can be loaded into the Tray 1.
Image of a long envelope
Image of a Western-style envelope
Pull out Tray 1.
When loading envelopes of which the length is 7-3/16 inches (182 mm) or less, mount the Attachment on the Lateral Guide.
Position the flap part face down, and load envelopes as shown in the figure.
The flap side of envelopes cannot be printed on.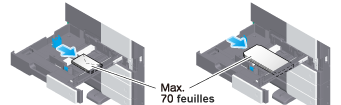 NOTICE
- When loading envelopes into the Tray 1, note the following points.
When loading envelopes, remove air from them, and securely press along the flap fold line. Otherwise, it will result in an envelope wrinkle or paper jam.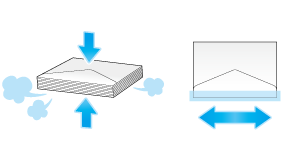 Do not use envelopes that have glue or release paper on the flap or the part covered by the flap on the body. Otherwise, the machine may be damaged or a failure may occur.
Slide the Lateral Guide to fit the size of the loaded paper.
Close Tray 1.
If necessary, change the paper setting of the tray on the Paper Setting screen.
Various sizes of envelopes are available. Specify the correct paper size for the envelopes you have loaded. For details, refer to [Modifier le format papier] .The paper type is detected automatically. Intelligent media sensor (mounted in the standard) is required to use this function. For details on Intelligent media sensor, refer to [Intelligent media sensor] .To disable the automatic paper type detection, set [Paper type auto detection settings] or [Auto envelope detection sett.] to OFF. For details, refer to [Paper type auto detection settings] ( [Paper type auto detection settings] ) or [Auto envelope detection sett.] ( [Auto envelope detection sett.] ).When not using the automatic paper type detection, manually specify the paper type. For details, refer to [Modifier le type de papier] .NOTICE- When loading envelopes with flaps opened, also select the standard size that matches them. You do not have to measure the size of the envelope with the flap opened to set the size as a custom-sized envelope.