
Easy Installation Process of the Printer Driver
Types of printer drivers
The following types of printer drivers are available. Select the printer driver that meets your printing aims.
Type | Description |
|---|---|
PCL | This is a standard driver for printing general office documents. The printing speed is faster than the PS driver. |
PS | This driver is effective for high-definition printing of data created in PostScript-supporting application software from Adobe or other vendors. This driver is often used in graphics and light printing applications where good color reproducibility is important. |
FAX | This driver enables you to send a fax simply by operating the computer without outputting paper. For details on how to use this driver, refer to [PC-FAX]. |
System environment requirements
The following system environment is required to use the printer driver.
Item | Specifications |
|---|---|
Operating system | Windows 7 Home Basic Windows 7 Home Premium * Windows 7 Professional * Windows 7 Enterprise * Windows 7 Ultimate * Windows 8.1 * Windows 8.1 Pro * Windows 8.1 Enterprise * Windows 10 Home * Windows 10 Pro * Windows 10 Enterprise * Windows 10 Education * Windows Server 2008 Standard * Windows Server 2008 Enterprise * Windows Server 2008 R2 Standard Windows Server 2008 R2 Enterprise Windows Server 2012 Datacenter Windows Server 2012 Standard Windows Server 2012 R2 Datacenter Windows Server 2012 R2 Standard Windows Server 2016 Datacenter Windows Server 2016 Standard Windows Server 2019 Datacenter Windows Server 2019 Standard * Supports the 32-bit (x86) or 64-bit (x64) environment. |
CPU | Any processor of the same or higher specifications as recommended for your operating system |
Memory | Memory capacity as recommended for your operating system Sufficient available memory space is required for your operating system and the applications to be used. |
Installing the printer driver
Install the printer driver using the installer.
Administrator privileges are required to perform this task.
Before using a USB connection, connect this machine to the computer using a USB cable. If a wizard screen appears to add new hardware, click [Cancel].
Insert the driver DVD into the DVD drive of the computer.
Make sure that the installer starts, and then proceed to step 2.
If the installer does not start, open the driver folder on the DVD, double-click [Setup.exe] (in the 32-bit environment) or [Setup64.exe] (in the 64-bit environment), and proceed to step 2.
If the [User Account Control] window appears, click [Continue] or [Yes].
Select the [Agree the Software End User License Agreement.] check box.
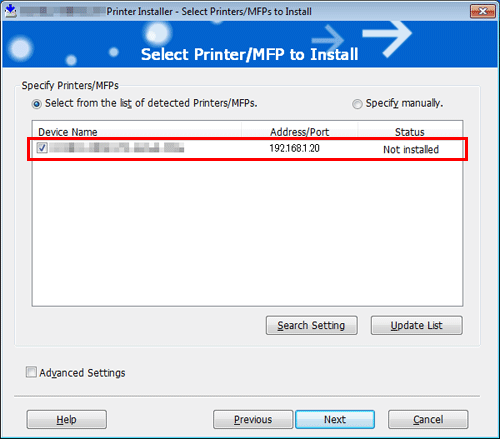
Select [Install printers/MFPs] in [Select menu to setup], and click [Next].
The connected printers are detected.
Select this machine from the list of detected printers.
If this machine is not detected, restart it.
Among the connected devices, only the target model is automatically detected and displayed. If multiple target models are displayed, check the IP addresses.
You can check the IP address of this machine in the screen that is displayed by tapping [Utility] - [Device Information].
If the connection to this machine cannot be recognized, it is not displayed in the list. In this case, select [Specify manually.] to manually specify the IP address and host name of this machine.
As needed, specify the default print type and the type of the driver you want to install.
When specifying the type of the driver you want to install, select the [Advanced Settings] check box, and also select the check box of the printer driver you want to install in [Components to Be Installed]. For features of each driver, refer to Here. The PCL driver is installed by default.
In [Print Type Default Setting], you can select whether to install the driver that has 2-sided printing specified as the default, or to install the driver that has 1-sided printing specified as the default. By default, the driver that has 2-sided printing specified as the default is installed.
Click [Next].
Check the items to be installed, and click [Install].
Change the displayed name or print a test page as needed, and click [Finish].
Setting
Description
[Review]
Displays the installed components for checking.
[Rename Printer]
Changes this machine name if necessary.
[Property]
Sets the optional operating environment of this machine. For details, refer to Here.
[Print Setting]
Changes the default print settings of this machine if necessary. For details, refer to Here.
[Print Test page]
If necessary, print a test page to check that printing process works correctly.
After installation was completed, configure initial settings for the printer driver.
For details on the initial settings for the printer driver, refer to Here.
Performing a test print
Windows provides the test printing function. Perform a test print to check that the correct printing is possible.
Open [Devices and Printers].
For information on how to display [Devices and Printers], refer to Here.
Right-click the icon of this machine, and click [Properties] (or [Printer Properties]).
In the [General] tab, click [Print Test Page].
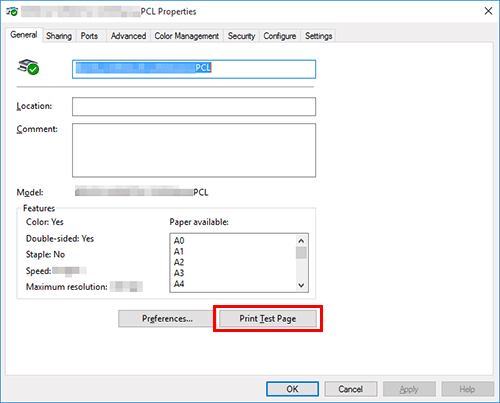
If test printing has succeeded, click [OK].
If test printing has failed, click [Troubleshoot] to find out how to solve the problem.