Cannot Copy
Description of problem | Check points | Remedy |
|---|---|---|
Copying does not start. | Are the doors of the machine securely closed? | Close the doors of the machine securely. |
Has paper of the correct size for the original been loaded into the paper tray? | Load paper of the appropriate size into the paper tray. | |
The original does not feed. | Is the ADF slightly open? | Securely close the ADF. |
Is the original one that does not meet the specifications? | Check that the original is one that can be loaded into the ADF. | |
Has the original been positioned correctly? | Position the original correctly. | |
The image is light. | Is [Light] specified for the density setting? | Tap [Density] on the copy main screen to adjust density. |
Is the paper damp? | Replace with new/dry paper. | |
The image is dark. | Is [Dark] specified for the density setting? | Tap [Density] on the copy main screen to adjust density. |
Was the original not pressed close enough against the Original Glass? | Position the original so that it is pressed closely against the Original Glass. | |
The image is partially obscured or blurry. | Is the paper damp? | Replace with new/dry paper. |
Was the original not pressed close enough against the Original Glass? | Position the original so that it is pressed closely against the Original Glass. | |
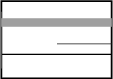
The entire area of a copy gets smudged. | Is the Original Glass dirty? | Clean the Original Glass using the dedicated cloth supplied with this machine. Peep the Original Glass from the front or oblique direction, then check that the glass surface is not dirty. For details on the cleaning method, refer to [Cleaning the Original Glass] . |
Is the Original Cover Pad dirty? | Clean the Original Cover Pad with a soft cloth dampened with a mild detergent. For details on the cleaning method, refer to [Cleaning the Original Cover Pad] . | |
Was the original printed on highly translucent material, such as diazo photosensitive paper or OHP transparencies? | Place a blank sheet of paper on top of the original. | |
Is a 2-sided original being copied? | If a thin 2-sided original is being copied, the print on the back side may be reproduced on the front side of the copy. In the Background Removal screen, select a lighter background density. For details on the background removal, refer to [Adjusting the background density of the original (Background Removal)] . | |
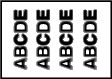
Images are tipped. | Is the original positioned correctly? | When you are using the Original Glass, align the original with the Original Scale, then correctly load the original. |
When you are using the ADF, correctly align the Lateral Guide with the size of the original. | ||
Is the original incorrectly positioned in the ADF? | If the original cannot be fed correctly through the ADF, make copies by positioning the original on the Original Glass. | |
Is the lateral guide of the paper tray correctly aligned with the paper? | Align the Lateral Guide with the edges of the paper. | |
Has curled paper been loaded into the paper tray? | Manually flatten the paper and re-load it into the paper tray. | |
An output copy is curled. | Curls may appear depending on the paper type (recycled paper, for example). | Remove the paper from the paper tray, turn it over, and then load it again. |
Replace with new dry paper. | ||
In bizhub C3851FS, you can correct curled paper to reduce curls of copied paper. For details, refer to [Paper Curl Adjustment] . | ||
The area around an image gets smudged. | Is the Original Cover Pad dirty? | Clean the Original Cover Pad with a soft cloth dampened with a mild detergent. For details on the cleaning method, refer to [Cleaning the Original Cover Pad] . |
Is the paper selected of a size larger than the original size? | Select a paper size that is the same size as the original. Otherwise, tap [Zoom] on the copy main screen to select [Auto], and perform enlarged copying at a zoom ratio matching the paper. | |
Is the size or orientation of the original different from that of the paper? | Select a paper size that is the same size as the original. Otherwise, re-load paper in the same orientation as the original. | |
Have you selected the zoom ratio for reduced copying that is suited for the paper size? | Select the zoom ratio that matches the paper size. Otherwise, tap [Zoom] on the copy main screen to select [Auto], and perform reduced copying at a zoom ratio matching the paper. | |
Cannot switch to the 2-Sided > 1-Sided or 2-Sided > 2-Sided function. | Have settings been selected that cannot be combined? | Check the combinations of the selected settings. |
On a device with account track enabled, copying would not start even after entering the password. | Did the message [The counter for the account has reached its maximum allowance.] appear? | Contact your administrator. |
Lines occur on an image. | Is the original scan area of the ADF dirty? | Clean the Original Scan Glass of the ADF using the dedicated cloth supplied with this machine. Peep the Original Scan Glass from the front or oblique direction, then check that the glass surface is not dirty. For details on the cleaning method, refer to [Cleaning the Original Scan Glass of the ADF] . |
Is the Toner Cartridge damaged? | Remove the Toner Cartridge, then check it for damage. If the Toner Cartridge is damaged, replace it. | |
Are one Imaging Unit or more damaged? | Remove Imaging Unit, then check them for damage. If necessary, replace Imaging Unit. | |
Black points occur on an image. | Is the Original Glass dirty? | Clean the Original Glass using the dedicated cloth supplied with this machine. Peep the Original Glass from the front or oblique direction, then check that the glass surface is not dirty. For details on the cleaning method, refer to [Cleaning the Original Glass] . |