
Loading Paper in Tray 1
How to load paper into Tray 1
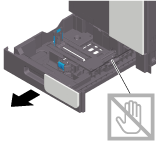
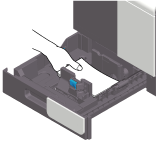
Pull out Tray 1.
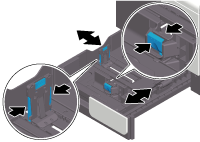
Slide the Lateral Guide to fit the size of the loaded paper.
Load paper into the tray with the print side facing up.
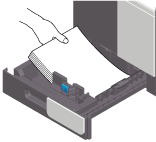
When printing on letterhead (paper where company names, preset text, and other text or images are already printed), load it with the print side facing down. Up to 20 letterhead sheets can be loaded into a tray.

For details on the available paper, refer to Here.

Do not load an excessive number of sheets such that the top of the stack is higher than the
 mark.
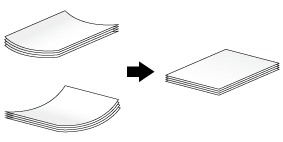
mark.If paper is curled, flatten it before loading it.
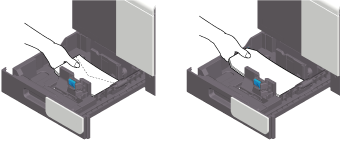
Slide the Lateral Guide to fit the size of the loaded paper.
Exercise care to ensure that there is no clearance between the Lateral Guide and paper.
Close Tray 1.
When you change the paper type or paper size, proceed to step 6 to change the setting on this machine.
When you do not change the paper type or paper size when adding paper, you can use the current setting without making any changes.Change tray paper settings on the Paper Settings screen.
When you load paper other than plain paper or change the paper size, change the paper type and paper size settings. For details, refer to Here.
When loading custom sized paper, change the paper type setting. For details, refer to Here.
Loading postcards
Up to 20 postcards can be loaded into the Tray 1. The following example explains how to load a postcard of 4 6 (A6 Card).
Pull out Tray 1.
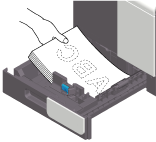
Load postcards into the tray with the print side facing up, turning the short side to the right side of the tray (paper feed port).
When loading postcards into the Tray 1, note the following points.
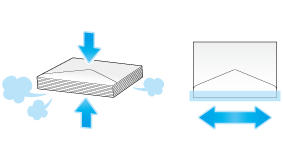
When loading curled postcards, uncurl the postcards as shown in the figure in advance.
Slide the Lateral Guide to fit the size of the loaded paper.
Exercise care to ensure that there is no clearance between the Lateral Guide and paper.
Close Tray 1.
Change tray paper settings on the Paper Settings screen.
For details, refer to Here.
Loading envelopes
Up to 30 envelopes can be loaded into the Tray 1.
Image of a long envelope
Image of a Western-style envelope
Pull out Tray 1.
Position the flap part face down, and load envelopes as shown in the figure.
The flap side of envelopes cannot be printed on.
When loading envelopes into the Tray 1, note the following points.
When loading envelopes, remove air from them, and securely press along the flap fold line. Otherwise, it will result in an envelope wrinkle or paper jam.
Do not use envelopes that have glue or release paper on the flap or the part covered by the flap on the body. Otherwise, the machine may be damaged or a failure may occur.
Slide the Lateral Guide to fit the size of the loaded paper.
Exercise care to ensure that there is no clearance between the Lateral Guide and paper.
Close Tray 1.
Change tray paper settings on the Paper Settings screen.
For details, refer to Here.
Various sizes of envelopes are available. Specify the correct paper size for the envelopes you have loaded.
When loading envelopes with flaps opened, also select the standard size that matches them. You do not have to measure the size of the envelope with the flap opened to set the size as a custom-sized envelope.