Change Serverless Pull Printing Settings
Change serverless pull printing settings.
Select a target MFP name from the MFP list, then click [Change the setting for serverless pull printing].
 If an MFP with the lock icon displayed is selected, the authentication information entry window is displayed. Enter authentication information.
Change serverless pull printing settings, enter the MFP administrator password and the OpenAPI user name and password in [Login Settings], then click [OK].
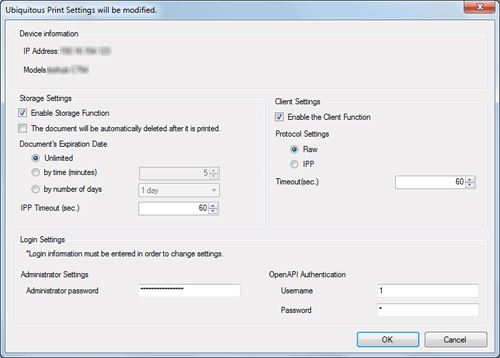 When not using the user name and password for OpenAPI authentication, only enter the administrator password.
Serverless pull printing settings are changed.
Click [OK].
Synchronizing Serverless Pull Printing Settings
Synchronize serverless pull printing settings between LK-114_SetupTool and the MFP.
When you restart LK-114_SetupTool or import the configuration file, if there is an MFP that has serverless pull printing settings different from LK-114_SetupTool, its name is displayed in red.
If the red MFP name is selected, serverless pull printing settings are displayed in [bizhub Settings] and [Group Settings].
If any settings are displayed red in [bizhub Settings], it indicates that serverless pull printing settings are different between LK-114_SetupTool and the MFP.
If any settings are displayed red in [Group Settings], it indicates that serverless pull printing group settings are not configured on the MFP while they are done in LK-114_SetupTool.
If any settings are dimmed in [Group Settings], it indicates that serverless pull printing group settings are configured on the MFP while they are not done in LK-114_SetupTool.
The following shows how to synchronize serverless pull printing settings.
Select the name of an MFP on which settings are to be synchronized, then click [Setting values will be synchronized].
This displays serverless pull printing settings of LK-114_SetupTool and the MFP, and also displays the check box for all items that have different settings.
Check the contents of [bizhub Settings] and [Setup Tool Settings], then select the check boxes of the settings to be applied.
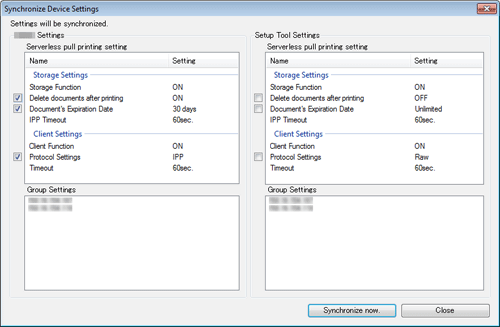
Click [Synchronize now.].
Enter the MFP administrator password and the OpenAPI user name and password, then click [OK].
When not using the user name and password for OpenAPI authentication, only enter the administrator password.Click [OK].
Configuring Settings on the Control Panel of the MFP
Configuring the storage function
Configure the storage function using the Control Panel of the MFP. If the storage function is enabled, you can store print jobs sent from a computer on the storage machine.
Tap [Utility] - [Administrator Settings] - [System Connection] - [Serverless Pull Printing Settings] - [Store Print Documents Settings], then configure the following settings.
Settings | Description |
|---|---|
[Store Print Documents Usage Settings] | Select whether to use the storage function. To use the storage function, select [Enable]. To apply setting changes, restart the MFP. If a setting is changed as shown below, [Store Print Documents Usage Settings] is forcibly set to [No Limit].
If [Store Print Documents Usage Settings] is changed from [Enable] to [No Limit], all print jobs stored on the storage machine are deleted. |
[Delete after Print Setting] | Select whether to automatically delete print jobs stored on the storage machine each time they are executed. This option is available when [Store Print Documents Usage Settings] is set to [Enable]. |
[Document Delete Time Setting] | Specify the time to automatically delete print jobs stored on the storage machine. This option is available when [Store Print Documents Usage Settings] is set to [Enable].
|
[Delete All Documents] | Deletes all print jobs stored on the storage machine. This option is available when [Store Print Documents Usage Settings] is set to [Enable]. |
 Tips
Tips If serverless pull printing settings are configured using LK-114_SetupTool, this setting is not required.
- If print jobs are executed on the client machine during a period of heavy network traffic, print jobs may not be deleted even when [Delete After Print Settings] is set to [ON]. In such a case, extend the timeout period in [Client Function Setting] - [Connection Timeout Setting].
Configuring the client function
Configure the client function using the Control Panel of the MFP. Enabling the client function allows you to execute print jobs stored on the storage machine through the MFP with the client function enabled.
Tap [Utility] - [Administrator Settings] - [System Connection] - [Serverless Pull Printing Settings] - [Client Function Setting], then configure the following settings.
Item | Specifications |
|---|---|
[Client Function Usage Settings] | Select whether to use the client function. To use the client function, select [Enable]. |
[Protocol Setting] | Select [IPP] or [Raw port] as the protocol used to connect to the storage device. This option is available when [Client Function Usage Settings] is set to [Enable]. |
[Connection Timeout Setting] | Specify the timeout to connect to the storage device. This option is available when [Client Function Usage Settings] is set to [Enable]. |
Tips- If serverless pull printing settings are configured using LK-114_SetupTool, this setting is not required.
- When the client machine uses IPP as the protocol while IPP authentication is enabled, you need to set the user name and password for authentication to all the client and storage machines that compose the target serverless pull printing group. For details on the setting procedure, refer to [IPP Authentication Settings] .