Available Operations in the [Configure] Tab
In the [Configure] tab, specify which options are installed in this machine, which paper type is assigned to a paper tray, and other information using the printer driver. You can automatically obtain information of this machine to configure settings and manually register them.
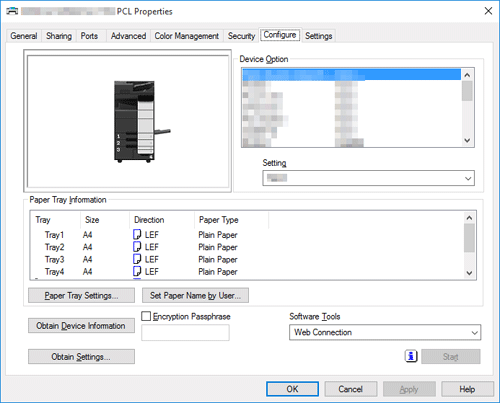
Setting | Description | |
|---|---|---|
[Device Option] | The model name, options installed on this machine, and authentication settings of this machine are displayed. When the settings of this machine cannot be obtained, you need to manually change the settings. Select an item to change from the list, and set a value in the [Setting]. | |
[Paper Tray Information] | The paper types assigned to the paper trays of this machine are displayed. When the settings of this machine cannot be obtained, you need to manually change the settings. In [Paper Tray Settings...], change the paper type assignment. | |
[Set Paper Name by User...] | Register the user paper name used in the printer driver. Set a paper name and a paper type as the custom paper name. | |
[Obtain Device Information] | The PC communicates with this machine and obtains the optional device installation information. In [Obtain Settings...], set the method of obtaining the information on this machine. | |
[Obtain Settings...] | Configure the settings to obtain the information of this machine. | |
[Auto] | Select this check box to automatically obtain the information of this machine. | |
[Destination Settings] | Set the communication method to use to obtain information from this machine.
| |
[SNMP Settings] | Configure SNMP v1/v2c and SNMP v3 communication settings.
| |
[Enter Password to acquire Device Information] | Enter the password for user authentication if the device information is password-protected against access through the driver by setting [Assign Account to Acquire Device Info] ( [Assign Account to Acquire Device Info] ) on this machine. | |
[Use proxy server] | Specify whether to conduct printing and communications using the proxy server set to the computer. | |
[Encryption Passphrase] | Select this check box when you want to set your own encryption passphrase. The encryption passphrase is used for encrypting the authentication password that is sent to this machine for executing printing. In normal circumstances, the authentication password is encrypted using the encryption passphrase registered in advance in this machine. However, you can change the encryption passphrase if necessary. To change the encryption passphrase, change the settings of this machine, then enter the preset encryption passphrase for the driver. For details on how to change the encryption passphrase, refer to [Changing the Encryption Passphrase] . | |
[Software Tools] | You can start up the software tools such as Web Connection. | |
 Tips
Tips When [Auto] in [Obtain Settings...] is enabled and the computer is unable to communicate with this machine, the computer takes a long time to display the [Properties] window or the [Printing Preferences] window.