Checking the Name and Function of Each Part in This Machine
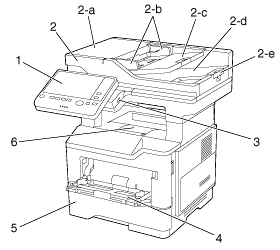
Front

No. | Name | Description |
|---|---|---|
1 | Control Panel | Used to configure various settings in this machine. |
2 | Automatic Document Feeder | Automatically feeds and scans originals by page. This unit also reverses and automatically scans 2-sided originals. This unit is referred to as ADF in the manual. |
2-a | ADF Feed Cover | Open this cover when clearing a paper jam in the ADF. |
2-b | Lateral Guide | Adjust this guide along the width of the original. |
2-c | Original Tray | Load the original face up in this tray. |
2-d | Original Output Tray | The scanned original is fed out onto this tray. |
2-e | Document Stopper | Used to prevent the output original from falling. |
3 | USB Port (Type A) USB2.0/1.1 | Used to connect an external memory unit (USB memory unit) to this machine. |
4 | Bypass Tray | Used to print data on non-standard size paper or envelopes. For details on the available types of paper, refer to [Confirm the Available Paper Types] . |
5 | Tray1 | Allows you to load up to 550 sheets. For details on the available types of paper, refer to [Confirm the Available Paper Types] . |
6 | Output Tray | Outputs printed pages. |
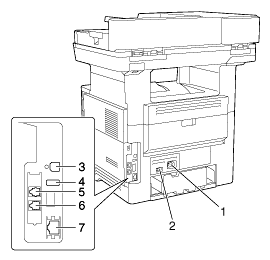
Rear side
The illustration shows the main unit with the optional Fax Kit.

No. | Name | Description |
|---|---|---|
1 | Power Connection | Connect the power cord to this inlet to supply power to this machine. |
2 | Power Switch | Press this switch to turn the machine on or off. |
3 | USB Port (Type B) | Connect to this port when using this machine as a USB-connected printer. |
4 | USB Port (Type A) | Connect to this port when using the Authentication Unit. |
5 | Jack for connecting a telephone (TEL) | Used to connect a telephone cord. |
6 | LINE (telephone line) Jack | Used to connect a general telephone subscriber line. |
7 | Ethernet (LAN) Port (1000Base-T/100Base-TX/10Base-T) | Connect to this port when using this machine as a network printer or network scanner. |
 Tips
Tips The network port of this product is following No.3 and No.7. A port is activated when a network port inserts a cable.