Layout of Web Connection screen
The Web Connection screen mainly consists of following three parts.
 Top of the screen: Displays the name of login user and the status of the machine.
- Left of the screen: Displays the function menu of Web Connection.
- Right of the screen: Displays the contents of the selected menu.
This example shows the items in [Store Address] - [Address Book] to explain sections in each screen.
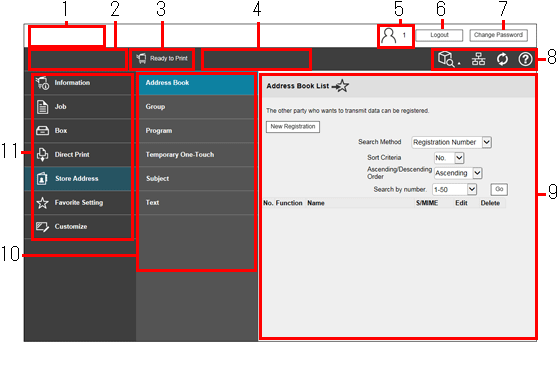
No. | Item | Description |
|---|---|---|
1 | KONICA MINOLTA logo | Click the logo to jump to the KONICA MINOLTA site (http://www.konicaminolta.com/). |
2 | Web Connection logo | Click this logo to display the version information of Web Connection. |
3 | Status display | Displays the status of this machine. Displays the status of the printer and scanner sections of this machine with icons and messages. If you click this icon when an error occurs, you can check the error status such as consumables, paper trays, or user registration information. |
4 | Message display | You can check the operating status of this machine with the message. |
5 | Login user name | Displays the login mode and user name. Click the user name when you log on as a registered user to confirm the user information. |
6 | [To Login Screen]/[Logout] | Click this button to log out of Web Connection. |
7 | [Change Password] | Changes the password of the registered user. Click this button to jump to the user password change screen. This button is enabled only when you log on as a registered user. |
8 | Device search icon | Displays the menu to access Web Connection of another device on the network.
|
Warning indicator icon | Notifies whether a network error has occurred. You can view detailed information on the error if you click this icon when an error occurs. | |
Update icon | Click this button to update the screen. | |
Help icon | Displays the online help of Web Connection. Detailed descriptions of the currently set functions can be viewed. | |
9 | Information and settings | Click the menu at the left of the screen, and the contents of that menu will appear. |
10 | Sub Menu | Displays information and settings in the category of the selected top menu. When the window size of the web browser is less than 800 pixels, click [Sub Menu], then open or close the menu. |
11 | Top Menu | Top menu items are divided into some categories depending on each item of content. The available menu categories vary depending on which optional units are installed on this machine. When the window size of the web browser is less than 800 pixels, click [Top Menu], then open or close the menu. |


