Making a Copy
Copying (basic operation flow)
This section describes the basic procedure to make a copy in Enlarge Display mode.
Load the original.
 When loading the original into the ADF, pull out the Document Stopper (1) to prevent the scanned original from falling.
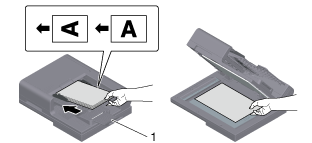
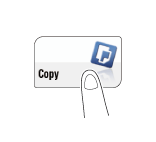
Tap [Copy] on the main menu of classic style.
Tap [Enlarge Display] in the side menu.
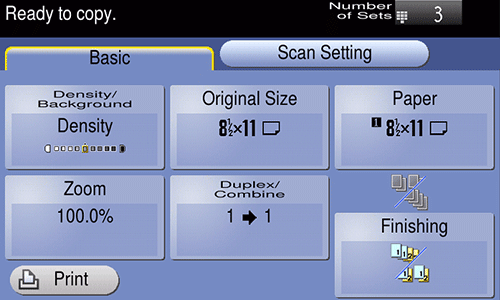
If necessary, configure copy settings.
Specify the size of the target original in [Original Size] (default: [8-1/2  11] (inch area)/[A4] (centimeter area)). If you fail to set the original size correctly, the image may be cut off.When specifying finishing for a copy job, refer to [Copy Settings (Basic)] .When specifying the original to be copied, refer to [Copy Settings (Scan Setting)] .
If necessary, specify the number of copies using the keypad.
Tapping [No. of Sets] displays the keypad.To change the number of copies, tap [C] (Clear).Use the Start key to start copying.
To cancel copy, use the Stop key to stop copying. A list of the currently stopped jobs is displayed. Select the target job from the list, and delete it.If [Ready to accept another job.] is displayed during printing, you can scan the next original.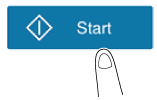
 Reference
 Configuring Enlarge Display operations ( [Configuring Enlarge Display Operations] )
Making a trial printing (Proof copy)
Before beginning actual copying, do a single test copy and check it is acceptable.
When making a large number of copies, use the proof copy function to prevent a large number of miscopies from occurring.
Load the original.
Tap [Copy] on the main menu of classic style.
Tap [Enlarge Display] in the side menu.
If necessary, configure copy settings.
When specifying finishing for a copy job, refer to [Copy Settings (Basic)] .When specifying the original to be copied, refer to [Copy Settings (Scan Setting)] .Enter the number of copies using the keypad.
Tapping [No. of Sets] displays the keypad.To change the number of copies, tap [C] (Clear).Tap [Print].
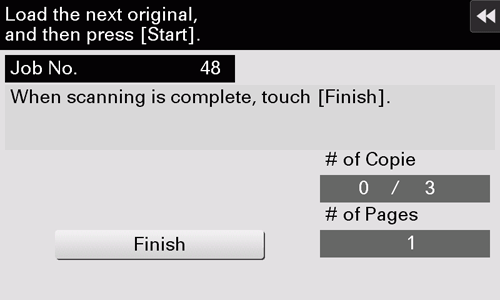
 If the original is loaded into the ADF, one copy is made. Proceed to step 10.If the original is loaded on the Original Glass, proceed to step 7.
Load the next original, and use the Start key to start scanning.
After all originals have been scanned, tap [Finish].
Use the Start key to start copying.
Copying begins for only one copy.
Check the proof copy.
When making the remaining copies, tap [Print].
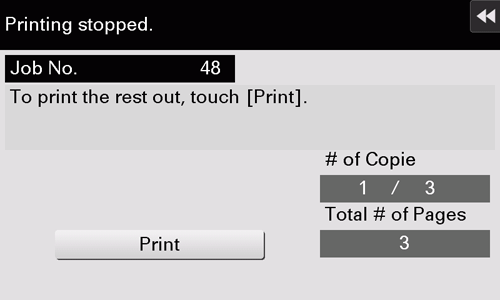
Copying begins for the remaining copies.
Copy Settings ([Basic])
- Adjusting the copy density (Density/Background)
- Adjusting the background density of the original to be scanned (Background Removal)
- Selecting the original size for scanning (Original Size)
- Specifying the paper tray (Paper)
- Enlarging or reducing an original image (Zoom)
- Using the Duplex/Combine function (Duplex/Combine)
- Setting copy finishing (Finishing)
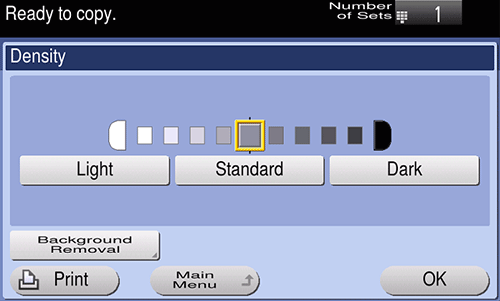
Adjusting the copy density ([Density/Background])
Adjust the density of a copy image.
Tap [Basic] - [Density/Background] to adjust the density.
Adjusting the background density of the original to be scanned ([Background Removal])
Adjust the density of the background area when copying originals with colored background (newsprints, recycle paper, etc.) or originals that are so thin that text or images on the back would be scanned.
Tap [Basic] - [Density/Background] - [Background Removal].
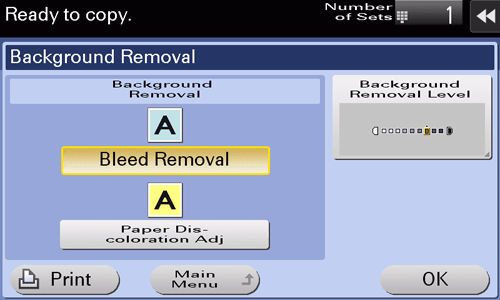
Setting
Description
[Background Removal]
Copies a thin 2-sided original or an original with a colored background, at the optimum image quality level.
- [Bleed Removal]: Select this option to prevent bleeding of the back of the paper when printing a 2-sided original that is so thin that the contents of the back side would be scanned.
- [Paper Discoloration Adj]: Select this option to scan an original with a colored background such as a map.
[Bkgd. Removal Level]
Adjusts the density of the background color for an original with a colored background. If [Auto] is selected, the density of the background color is determined automatically, and the original is copied at the optimal background density level.
Selecting the original size for scanning ([Original Size])
Select the size of the original to be scanned.
Tap [Basic] - [Original Size].
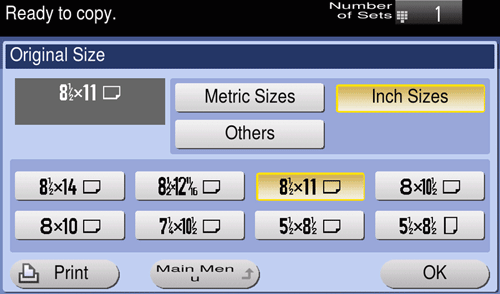
Setting
Description
[Metric Sizes]
Select this option to scan a metric-size original. Tap [Metric Sizes], and select the standard metric size respectively.
[Inch Sizes]
Select this option to scan an inch-size original. Tap [Inch Sizes], and also select a standard inch size.
[Other]
Select this option to scan a postcard (4
6 (A6 Card)) or an original other than an inch- or metric- size original. Tapping [Other] enables you to select each standard size.
Specifying the paper tray ([Paper])
This machine automatically selects paper to match the specified original size and make copies. If necessary, you can specify a size that is different from the original size or the paper type to make copies.
You can also change the size and type of paper loaded into a paper tray.
Tap [Basic] - [Paper].
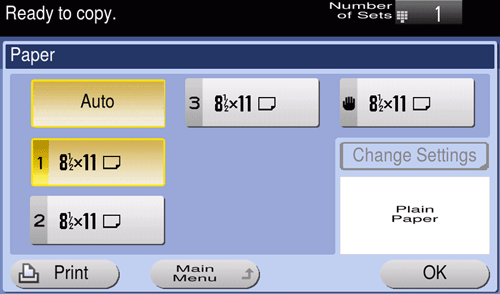
Setting
Description
[Auto]
Automatically selects paper fitting the size of the original when making a copy.
Paper Tray
Specifies the paper loaded in the paper tray when making a copy.
The displayed contents vary depending on the options installed on this machine.
[Change Settings]
If necessary, change the size and type settings of the paper loaded in the selected paper tray.
- [Paper Type]: Select the type of the paper loaded into the selected paper tray.
- [Paper Size]: Select the size of the paper loaded into the selected paper tray. This option is available when Tray 1 or Bypass Tray is selected.
When very few sheets of paper remain in the paper tray, the icon indicating remaining paper quantities appears.
Icon | Description |
|---|---|
| Indicates that very little paper remains in the paper tray. |
| Indicates that there is no paper in the paper tray. |


When paper other than plain paper or recycled paper is loaded into the paper tray, the icon indicating the paper type appears.
Icon | Paper Type |
|---|---|
| Single Side Only |
| Special Paper |
| Plain paper+ |
| Thick 1 |
| Thick 1+ |
| Thick 2 |
| Letterhead |
| Colored Paper |
| Envelopes |
| Glossy Paper 1 |
| Glossy Paper 1+ |
| Glossy Paper 2 |
| Postcards |
| Label Sheet |
| User Paper 1 |
| User Paper 2 |
| User Paper 3 |
| User Paper 4 |
| User Paper 5 |
| Plain paper (Duplex 2nd Side) |
| Plain paper+ (Duplex 2nd Side) |
| Thick 1 (Duplex 2nd Side) |
| Thick 1+ (Duplex 2nd Side) |
| Thick 2 (Duplex 2nd Side) |
| User Paper 1 (Duplex 2nd Side) |
| User Paper 2 (Duplex 2nd Side) |
| User Paper 3 (Duplex 2nd Side) |
| User Paper 4 (Duplex 2nd Side) |
| User Paper 5 (Duplex 2nd Side) |


 Tips
Tips- User paper is a special paper of which the weight and media adjustment settings are registered. For details, contact your service representative.
Enlarging or reducing an original image ([Zoom])
Copy an original image enlarged or reduced by an arbitrary zoom ratio.
You can specify the zoom ratio by automatically specifying it according to the size of the original and the paper size, by selecting from the registered zoom ratios, or by manually entering an arbitrary zoom ratio.
Tap [Basic] - [Zoom].
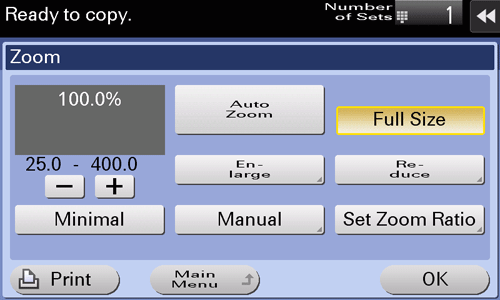
Setting
Description
[Auto]
Automatically makes a copy with the optimal zoom ratio to match the image of the original with the paper size. This is convenient because you do not need to specify the zoom ratio.
[x 1.0]
Copies an image in the original with the same size as for the original (x1.0).
[Enlarge]
Select a preset zoom when enlarging a standard-size original onto a standard-size piece of paper for copying.
[Reduce]
Select a preset zoom when reducing a standard-size original onto a standard-size piece of paper for copying.
[Minimal]
Places an original image in the center after slightly reducing the original size when copying.
Select this option when copying the entire original image, including its edges.
[Manual]
Manually specify the zoom ratios that are different in the vertical and horizontal directions.
[Set Zoom Ratio]
Makes a copy at the registered zoom ratio.
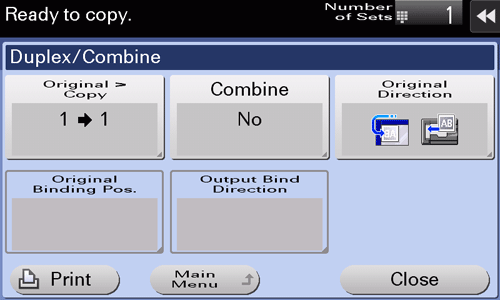
Using the Duplex/Combine function ([Duplex/Combine])
Copies an original onto both sides of paper. A two-page original is reduced and copied on the same side of a single sheet of paper.
Tap [Basic] - [Duplex/Combine].
Setting
Description
[Original > Copy]
Select a combination of original scanning side (Simplex/Duplex) and original printing side (Simplex/Duplex).
To scan a 2-sided original, specify whether to set the original to Top Bind or Left Bind/Right Bind in [Original Binding Pos.]. To make a 2-sided copy, specify whether to set a copy to Top Bind or Left Bind/Right Bind in [Output Bind Direction].
[Combine]
Select whether to reduce and copy a two-page original on the same side of a single sheet of paper.
[Original Direction]
Specify the orientation of the loaded original.
[Original Binding Pos.]
Select the original binding position when loading a 2-sided original.
- [Auto]: The binding position of the original is specified automatically. When the long side of the original is 11-11/16 inches (297 mm) or less, the binding position is set to the long side of the paper. When the long side of the original exceeds 11-11/16 inches (297 mm), the binding position is set to the short side of the paper.
- [Top]: Select this option when the binding position is set to the top of the original.
- [Left Bind]: Select this option when the binding position is set to the left of the original.
- [Right Bind]: Select this option when the binding position is set to the right of the original.
[Output Bind Direction]
Select the binding position when printing onto both sides of sheets of paper.
- [Auto]: The binding position of a copy is specified automatically. When the long side of the original is 11-11/16 inches (297 mm) or less, the binding position is set to the long side of the paper. When the long side of the original exceeds 11-11/16 inches (297 mm), the binding position is set to the short side of the paper.
- [Top]: Select this option when setting the binding position to the top of a copy.
- [Left Bind]: Select this option when setting the binding position to the left of a copy.
- [Right Bind]: Select this option when setting the binding position to the right of a copy.
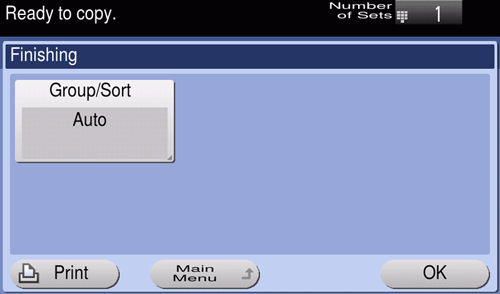
Setting copy finishing ([Finishing])
Specify how to feed out copied sheets of paper.
Tap [Basic] - [Finishing].
Setting
Description
[Group/Sort]
Select the output method when making multiple copies.
- [Auto]: Automatically switches Group and Sort depending on the number of sheets of the loaded original and the number of copies. If you load originals of multiple pages and specify multiple copies, the mode is automatically switched to Sort in order to process output. If other conditions are set, output processing is carried out in Group mode.
- [Collate (By Set)]: Feeds out copies separately one by one, for example: "12345", "12345", and "12345".
- [Group]: Feeds out copies separately page by page like "111", "222", "333", "444", and "555".
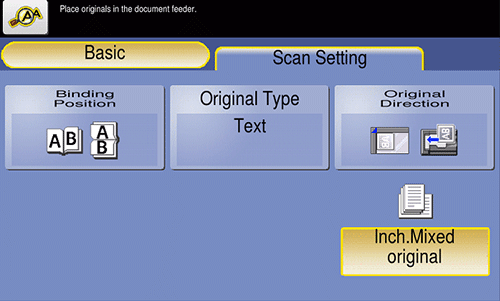
Copy Settings ([Scan Setting])
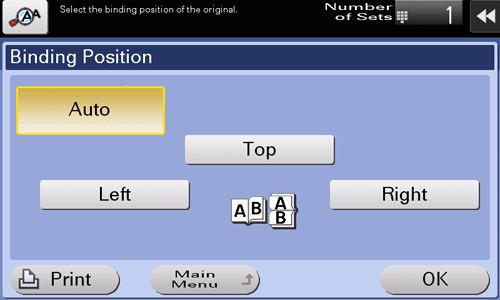
Specifying the original binding position ([Binding Position])
Specify the binding position to suit the orientation of the target original.
Tap [Scan Setting] - [Binding Position].
Setting
Description
[Auto]
Automatically configures the binding position of the original.
- When the long side of the original is 11-11/16 inches (297 mm) or less, the binding position is set to the long side of the paper.
- When the long side of the original exceeds 11-11/16 inches (297 mm), the binding position is set to the short side of the paper.
[Top]
Select this option when the binding position is set to the top of the original.
[Left]
Select this option when the binding position is set to the left of the original.
[Right]
Select this option when the binding position is set to the right of the original.
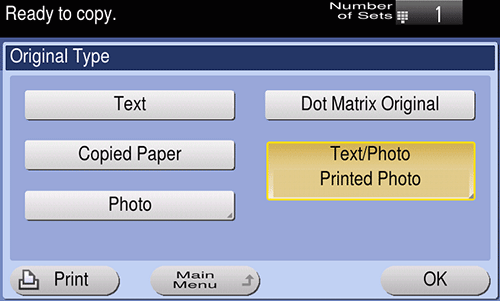
Selecting the appropriate image quality level for the original ([Original Type])
Select the optimum settings for the original to copy it at the optimum image quality.
Tap [Scan Setting] - [Original Type].
Setting
Description
[Text]
Copies an original, which consists primarily of text, at the optimum image quality level.
This function sharpens the edges of each character, creating easy-to-read images.
[Dot Matrix Original]
Copies an original, that primarily consists of text such as thin or faint characters, at the optimum image quality level.
This function reproduces text using high pixel density, creating easy-to-read text.
[Copied Paper]
Copies the original, which is output with an even density from the copier or printer, at the optimum image quality level.
[Text/Photo]
Copies the original, which consists of text and photos, at the optimum level of image quality.
This function sharpens the edges of each character and reproduces smoother photos.
- [Photo Paper]: Select this option to scan an original that contains photos printed on photographic paper.
- [Printed Photo]: Select this option to scan the printed original such as a brochure or catalog.
[Photo]
Copies an original consisting only of photos at the optimum image quality level.
- [Photo Paper]: Select this option to scan an original printed on photographic paper.
- [Printed Photo]: Select this option to scan the printed original such as a brochure or catalog.
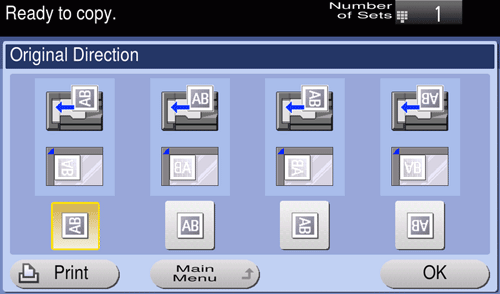
Specifying the original loading direction ([Original Direction])
When scanning a 2-sided original, specify the original loading direction so that the vertical direction of the scanned original is set correctly.
Tap [Scan Setting] - [Original Direction], and specify the original loading direction.
Scanning originals of different sizes ([Inch.Mixed original])
When an original consists of multiple pages of different sizes, the pages can be scanned at one time by using the ADF if they have the same width in the inch size.
Tap [Scan Setting] - [Inch.Mixed original].
Tips- This function is available only for the following original sizes.
8-1/2 11, 8-1/2 14, 5-1/2 8-1/2