
Adjusting the Layout for Copying
To enlarge or reduce an image for copying ([Zoom])
To display:
- [Classic Style]
- [Copy]
- [Zoom]
- [Copy]
Copy an original image enlarged or reduced by an arbitrary zoom ratio.

Setting | Description |
|---|---|
[Auto] | Automatically makes a copy with the optimal zoom ratio to match the image of the original with the paper size. This is convenient because you do not need to specify the zoom ratio. |
[+]/[-] | Enter the zoom ratio manually. |
Fixed Zoom | Select a preset zoom ratio when copying a standard-size original onto standard-size paper. The paper tray is automatically exchanged depending on the selected zoom ratio. |
[Minimal] | Places an original image in the center after slightly reducing the original size when copying. Select this option when copying the entire original image, including its edges. |
[Manual] | Specify zoom ratios individually for the lengthwise and widthwise directions for copying. Select [X] or [Y], and enter the zoom ratio. |
[Zoom Ratio] | Makes a copy at the registered zoom ratio. If you tap [Set Zoom], you can change the registered zoom ratio. |
To copy the original image to the center of paper ([Image Adjust])
To display:
- [Classic Style]
- [Copy]
- [Application]
- [Layout]
- [Image Adjust]
- [Layout]
- [Application]
- [Copy]
Copy while placed at the center of paper with the original size unchanged.

Setting | Description |
|---|---|
[ON]/[OFF] | Select [ON] to specify Image Adjust. |
[Original Size] | When the size of the original is not detected correctly, specify the size of the original you want to scan. If the machine cannot detect the size of irregular sized originals or photos, manually specify the size. |
To reverse the left and right of the original image ([Mirror Image])
To display:
- [Classic Style]
- [Copy]
- [Application]
- [Layout]
- [Mirror Image]
- [Layout]
- [Application]
- [Copy]
Copy the original image by reversing its left and right, like a reflection image on the mirror.

Setting | Description |
|---|---|
[ON]/[OFF] | Select [ON] to specify Mirror Image. |
[Original Size] | When the size of the original is not detected correctly, specify the size of the original you want to scan. If the machine cannot detect the size of irregular sized originals or photos, manually specify the size. |
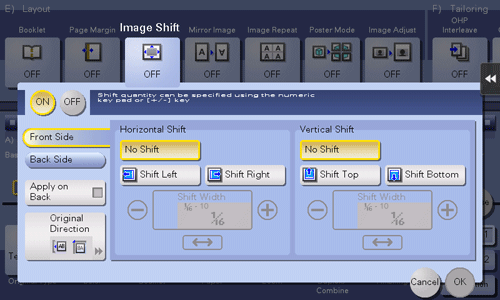
To fine-adjust the print position ([Image Shift])
To display:
- [Classic Style]
- [Copy]
- [Application]
- [Layout]
- [Image Shift]
- [Layout]
- [Application]
- [Copy]
You can fine tune the image position by shifting it in a horizontal or vertical direction according to the paper size. When an image is printed on both sides, the image position on the back side can also be fine tuned.
Setting | Description |
|---|---|
[ON]/[OFF] | Select [ON] to shift an image. |
[Front Side]/[Back Side] | Adjusts the image position on the print paper by shifting it in horizontal or vertical direction.
|
[Apply on Back] | Set this item to use the same settings as used on the front side for the rear side of the print paper. |
[Original Direction] | Specify the original loading direction so that the vertical direction of the scanned original is set correctly. |
To copy the original in the loading direction with no rotation ([Auto Rotate])
To display:
- [Classic Style]
- [Copy]
- [Application]
- [No. of Originals]
- [Auto Rotate]
- [No. of Originals]
- [Application]
- [Copy]
In general use, this machine automatically rotates the original image according to the paper direction to make a copy. Turning [Auto Rotate] OFF as needed enables you to make a copy without rotating the original image. This function is available when you want to copy only a part of the original.
