
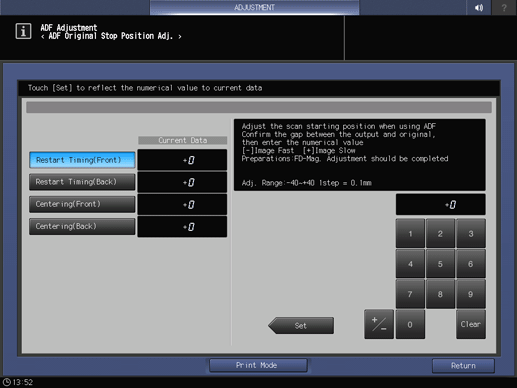
[ADF Original Stop Pos. Adj.]
Overview
Adjust the position to start scanning on the ADF and the image centering in the crosswise direction.
Scanning accuracy is maintained by making regular adjustments.

NOTICE
To make correct adjustments, configure the following setting in advance.
- To adjust the scanning start position: Perform [FD-Mag. Adjustment] in [ADF Adjustment].
- To adjust the image centering: Perform [Centering Adjustment] in [Printer Adjustment].

Reference
- For details about [FD-Mag. Adjustment] in [ADF Adjustment], refer to [FD-Mag. Adjustment].
- For details about [Centering Adjustment] in [Printer Adjustment], refer to [Centering Adjustment].
Setting Procedure (Adjustment of Scanning Start Position)
1
Select [Restart Timing(Front)] or [Restart Timing(Back)].
2
Press [Print Mode].
The setting screen is displayed.
3
Load A4 paper into the paper tray, and select that paper tray.
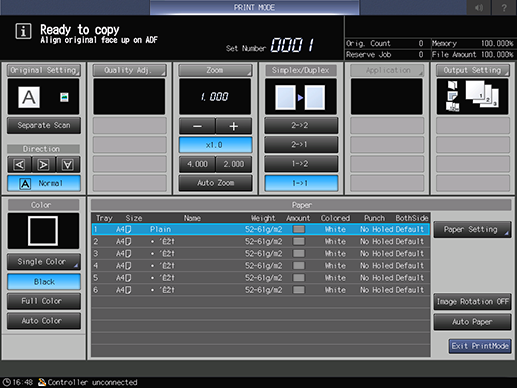
[Simplex/Duplex] is selected automatically, so do not change this setting.
4
Load a test chart into the ADF tray with the front side facing up, and press Start on the Control panel.
The test chart is scanned and a sample is printed out.
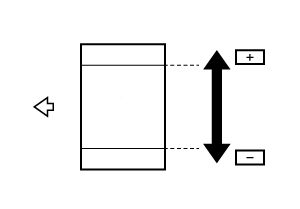
5
Check the misalignment by comparing the output paper with the chart.
Standard value: 0 mm ^ 1.0 mm
6
If any adjustments are required, press [Exit PrintMode] to return to the setting screen.
7
Use the on-screen keypad to enter the numeric value.

Use [+ / -] to select the plus or minus of the numeric value. To change [Current Data], press [Set].
[Adj. Range:-40~+40 1step = 0.1mm]
8
Repeat steps 2 to 7 until the desired result is obtained.
Setting Procedure (Image Centering Adjustment)
1
Select [Centering(Front)] or [Centering(Back)].
2
Press [Print Mode].
[Simplex/Duplex] is selected automatically, so do not change this setting.
3
Load A4 paper into the paper tray, and select that paper tray.
4
Load a test chart into the ADF tray with the front side facing up, and press Start on the Control panel.
The test chart is scanned and a sample is printed out.
5
Check the misalignment by comparing the output paper with the chart.
Standard value: 0 mm ^ 2.0 mm
6
If any adjustments are required, press [Exit PrintMode] to return to the setting screen.
7
Use the on-screen keypad to enter the numeric value.
Use [+ / -] to select the plus or minus of the numeric value. To change [Current Data], press [Set].
[Adj. Range:-44~+44 1step = 0.1mm]
8
Repeat steps 2 to 7 until the desired result is obtained.
 in the upper-right of a page, it turns into
  and is registered as a bookmark.