
Paper Setting: Registering the Paper Conditions
Register the frequently used paper setting as a paper profile. You can make print settings of the tray by calling the paper profile.
This section describes how to select a paper size and register the paper profile.

-
You can also register paper profiles using [Reg./Del. Paper Set.] on the [MACHINE] screen. For details, refer to Register/Delete Paper Setting: Registering/Deleting Profile.
-
For details about the paper setting of the paper tray, how to register a currently used paper setting as a paper profile, and how to call a paper profile, refer to Paper Setting: Setting Paper for Tray.
Paper setting consists of the following 10 conditions that can be specified as desired.
|
Setting item |
Description |
Setting options |
|---|---|---|
|
Paper Type |
The following five paper types are provided according to the plainness of paper. |
Plain, Fine, Book/News, Embossed, Blank Insert |
|
Profile Name |
Enter the desired paper profile name. |
You can enter up to 50 one-byte characters (25 two-byte characters). |
|
Paper size |
Selecting Standard allows you to select the standard size of paper. Selecting Custom allows you to enter the desired dimensions from the screen. This setting can also be made by recalling a custom size previously registered. To specify tab paper, select either A4T |
Standard: Custom: Widthwise 95 mm to 331 mm, Lengthwise 139 mm to 488 mm / Widthwise 3.74" to 13.03", Lengthwise 5.47" to 19.21" Tab Paper: A4T Don't Care: * SRA4 |
|
Weight |
Select one from 13 types provided on the screen. The unit of weight can be switched. The unit used to register the condition is also used to display that condition on the [MACHINE] screen and the [COPY] screen when called. |
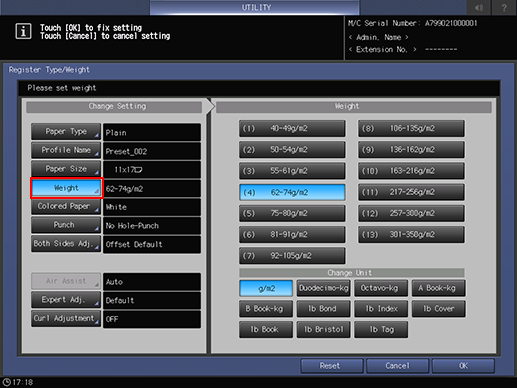
Weight Setting: 40-49 g/m2 / 10-13 lb Bond 50-54g/m2 / 14-15 lb Bond 55-61g/m2 / 16-17 lb Bond 62-74g/m2 / 18-19 lb Bond 75-80g/m2 / 20-21 lb Bond 81-91g/m2 / 22-24 lb Bond 92-105g/m2 / 25-28 lb Bond 106-135g/m2 / 29-36 lb Bond 136-162 g/m2 / 37-43 lb Bond 163-216g/m2 / 44-57 lb Bond 217-256g/m2 / 58-68 lb Bond 257-300g/m2 / 69-81 lb Bond 301-350g/m2 / 82-93 lb Bond Change Unit: g/m2, kg (A-Book), kg (B-Book), kg (Duodecimo), kg (Octavo), lb (Bond), lb (Index), lb (Cover), lb (Book), lb (Bristol), lb (Tag) |
|
Colored Paper |
Specify the color of paper. This prevents erroneous printing on papers in mixed colors. |
White, Blue, Goldenrod, Gray, Green, Ivory, Orange, Pink, Red, Yellow, Cream, Clear White, Other, User Color |
|
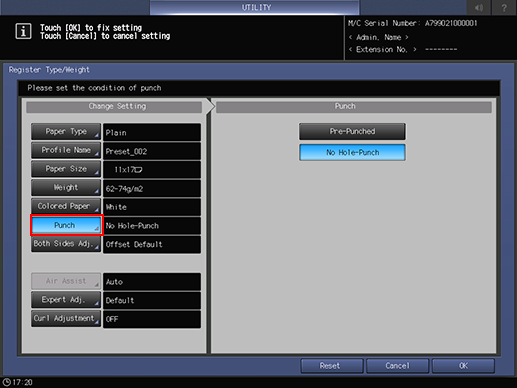
Punch |
Specify whether or not the paper is punched. When pre-punched paper is used, selecting [Punch] for [Output Setting] has no effect. |
Pre-Punched, No Hole-Punch |
|
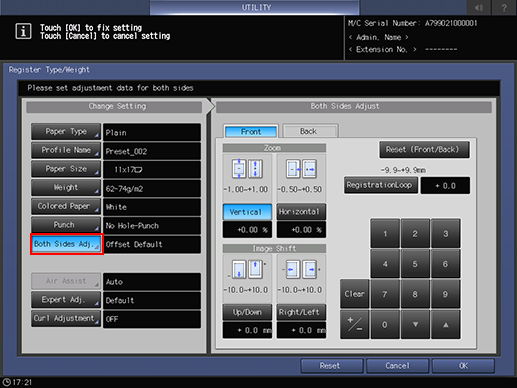
Both Sides Adjust |
Specify magnification ratios (vertical, horizontal) and image shift amounts (up/down, right/left) for both front and back pages in order to align the images printed on front and back pages in duplex printing. Also, Gap or Chart Adjustment can be used for adjustment. It is advisable to perform Both Sides Adjust for every paper to be used, as the shrinkage ratio differs according to the paper type, paper brand, or difference in temperature of storage location. This option also allows you to adjust the registration loop before using the Both Sides Adjust function. |
Vertical Zoom: Front/Back -1.00 to +1.00 (1 step = 0.01%) Horizontal Zoom: Front/Back -0.50 to +0.50 (1 step = 0.01%; however, it is 0.05% if [ Image Shift Up/Down: Front/Back -10.0 mm to +10.0 mm (1 step = 0.1 mm) Image Shift Right/Left: Front/Back -10.0 mm to +10.0 mm (1 step = 0.1 mm) Registration Loop: Front/Back -9.9 mm to +9.9 mm (1 step = 0.1 mm) |
|
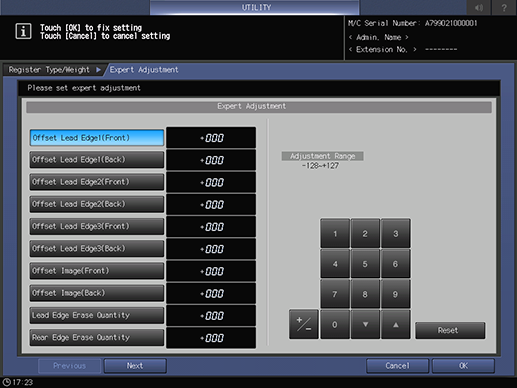
Expert Adjustment |
Configure settings for the following items: Transfer Offset Adjustment, Lead Edge Erase Quantity, Rear Edge Erase Quantity, Fusing Temperature Adjustment, Process Speed Setting, Lead Edge Transfer Setting, Mis-centering Detect JAM, Mis-centering Adjustment Setting, and Fusing PPM Down Setting For details about the Expert Adjustment function, refer to Details of Expert Adjustment. |
Offset Lead Edge 1 (Front): -128 to +127 Offset Lead Edge 1 (Back): -128 to +127 Offset Lead Edge 2 (Front): -128 to +127 Offset Lead Edge 2 (Back): -128 to +127 Offset Lead Edge 3 (Front): -128 to +127 Offset Lead Edge 3 (Back): -128 to +127 Image Offset (Front): -128 to +127 Image Offset (Back): -128 to +127 Lead Edge Erase Quantity: 0 to +200 Rear Edge Erase Quantity: 0 to +200 Fusing Temperature Adjustment: -15 to +15 Process Speed Setting: Default, High Speed, Low Speed Lead Edge Transfer Setting: Lead Edge Image, Auto, Separation, Separation (+1), Separation (+2), Separation (+3) Mis-centering Detect JAM: Detect, Not Detect Correct Mis-centering: ON, OFF Fusing PPM Down: ON (Manual), ON (Auto), OFF |
|
Curl Adjustment |
Select whether or not to correct the curl (arc-like distortion) of output paper. Adjustment can be made to paper of weight between 40 g/m2 to 256 g/m2 / 10 lb Bond to 68 lb Bond. |
Correct Upward, OFF |
Paper Type Descriptions
|
Paper name |
Description |
|---|---|
|
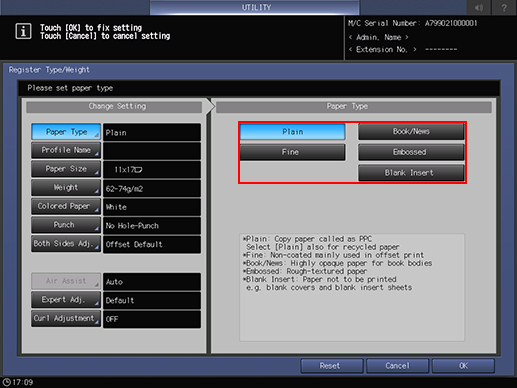
Plain |
The plain paper is used for copying/printing in general and is called "PPC paper." It is usually not recycled paper. Select [Plain] for the plain paper or recycled paper to be used in monochrome copying/printing. |
|
Fine |
The fine paper is non-coated paper generally used for offset printing. This paper type has a high degree of whiteness and used for various purposes. Select [Fine] for the paper having such characteristics as mentioned above. |
|
Book/News |
The book/news paper is generally used for a body part of a book, having characteristics such as high opacity to prevent prints to be seen from the back, or being cream-colored for ease of reading. Select [Book/News] for the paper having such characteristics as mentioned above. |
|
Embossed |
Embossed refers to a type of paper with coarse surface and low fixability. Select [Embossed] for the paper having such characteristics as mentioned above. Fine paper types such as cotton paper are included in this category. |
|
Blank Insert |
The blank insert is not a category provided according to the plainness of paper, but used for the paper only to be fed without being printed. When using With Cover/Blank or Blank mode of Insert Sheet, select [Blank Insert] for the tray loaded with paper already printed and only to be fed through, or paper to be used as blank pages. |
Adding/Editing the Paper Conditions Registration
-
Follow the procedure on User Setting to display the [User Setting Menu] screen.
-
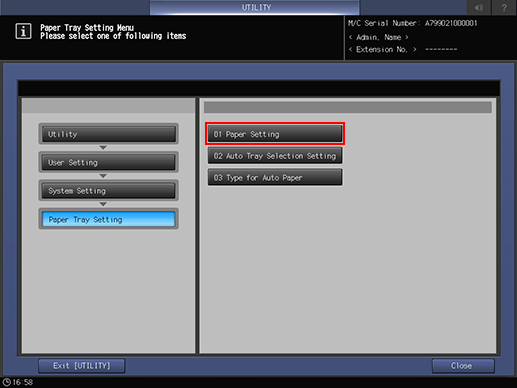
Press [System Setting] on the [User Setting Menu] screen, and then press [Paper Tray Setting] and [Paper Setting] in sequence.
-
Press [Paper Profile Setting].
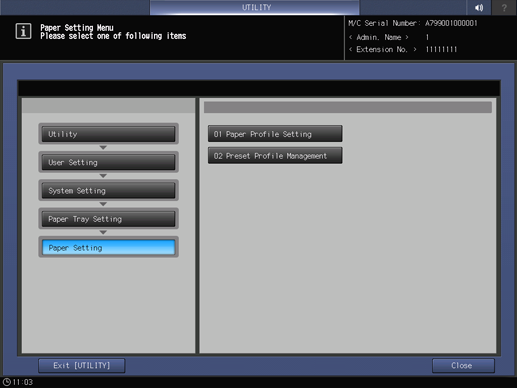
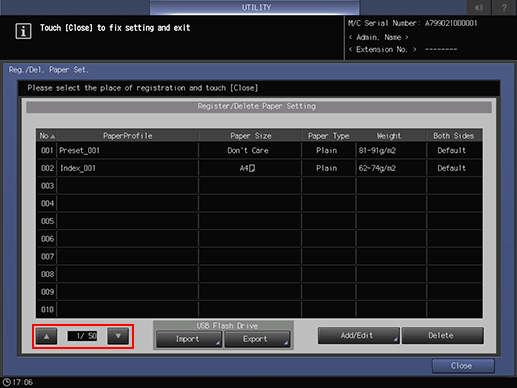
The [Register/Delete Paper Setting] screen is displayed.
-
Select the destination to register paper conditions.
Use the scroll buttons [
 ] or [
 ] to display the desired destination, select that row, then
press [Add/Edit].
] to display the desired destination, select that row, then
press [Add/Edit].-
To edit the paper conditions previously registered, select that row.
The [Register Type/Weight] screen is displayed.
-
-
Select one of the buttons under [Paper Type].
-
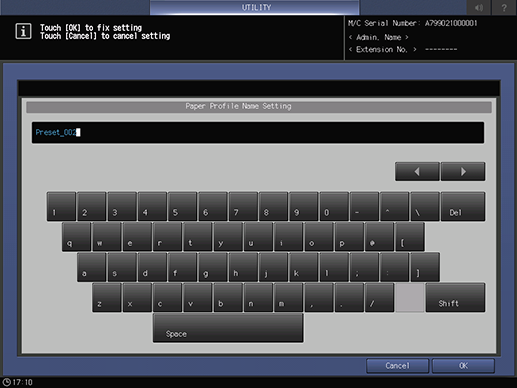
Press [Profile Name].
-
Enter the desired paper profile name. You can enter up to 50 one-byte characters (25 two-byte characters).
-
Press [OK].
-
-
Press [Paper Size].
The [Paper Size] screen is displayed.
-
Select the desired button from [Standard], [Custom], [Tab Paper], [Don't Care].
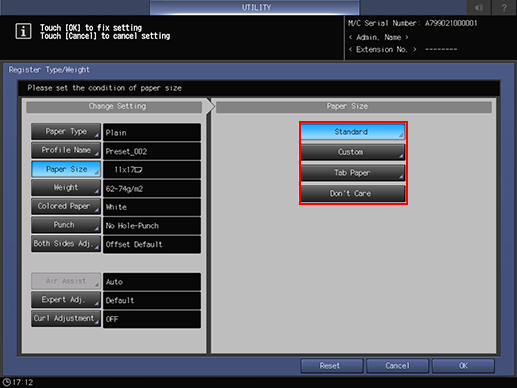
Proceed to step 8 if you selected [Standard].
Proceed to step 9 when selecting [Custom].
Proceed to step 10 when selecting [Tab Paper].
Proceed to step 11 for setting [Don't Care].
-
Pressing [Standard] displays the [Standard Size Setting] screen.
Select the desired standard size button.
-
Press [OK].
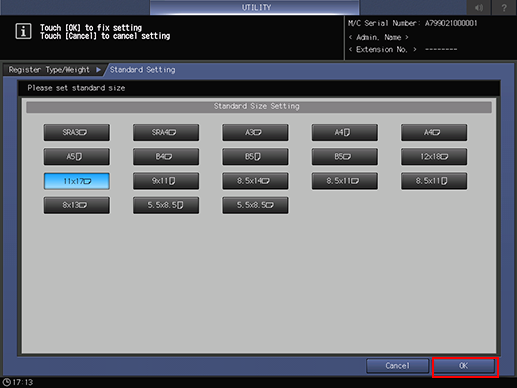
Proceed to step 11.
-
-
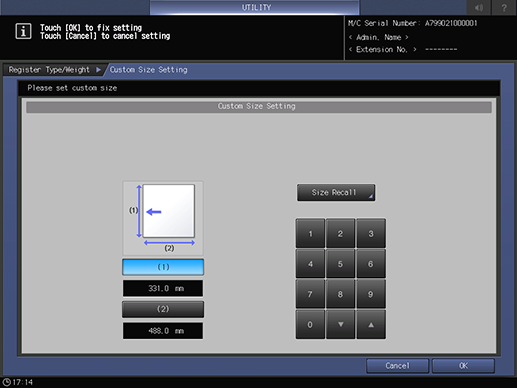
Selecting [Custom] displays the [Custom Size Setting] screen.
To specify a custom size:
-
Press [(1)], then use the touch panel keypad, [
][] to enter the
desired lengthwise dimension.
-
Press [(2)], then use the touch panel keypad, [
][] to enter the
desired widthwise dimension.
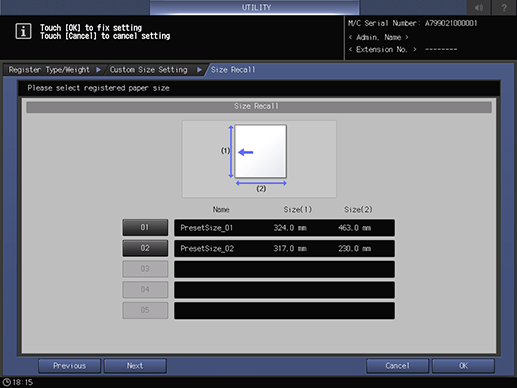
To recall a registered custom size:
-
Press [Size Recall]. The [Size Recall] screen is displayed.
-
Use [Previous] and [Next] to scroll to the desired custom size. Entries from [01] to [20] are provided on the screen.
-
Press the number button of the custom size to be used, then press [OK].
Proceed to step 11.
-
-
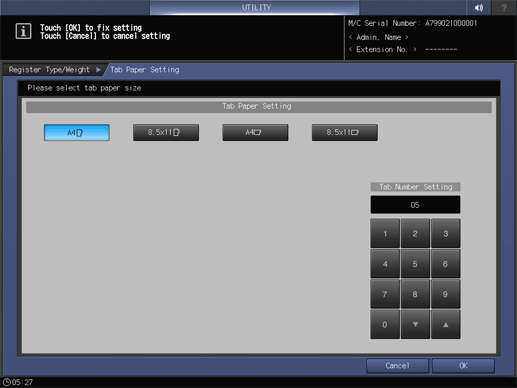
Selecting [Tab Paper] displays the [Tab Paper Setting] screen.
Select the desired size from A4T
 , A4T
, A4T  ,
8.5
,
8.5 11T , and 8.511T .
Use the touch panel keypad, [
][] to enter the number of tabs. Setting range for the number of
tabs is from 1 to 15.Press [OK].
-
Press [Weight].
-
The [Weight] screen is displayed. Select the desired weight key under [Weight].
-
Select the desired unit button under [Change Unit]. The screen displays the paper weight in the selected unit.
-
-
Press [Colored Paper].
Select a desired Colored Paper key.
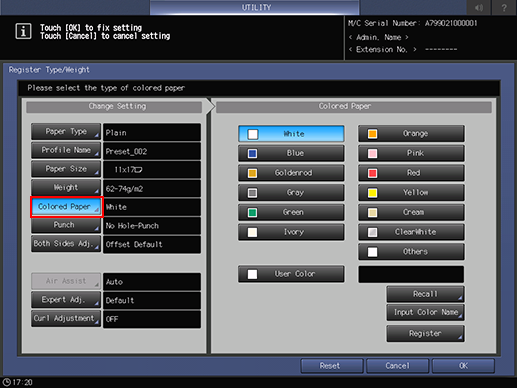
To specify a desired color name:
Press [User Color]. The [Input Colored Paper Name] screen is displayed.
Enter the desired color name. Up to 20 one-byte characters can be used.
Press [OK].
-
To change the specified color name, press [Input Color Name] to display the [Input Colored Paper Name] screen and rename it.
To register a desired color name:
Press [Register]. The [Register Color Name] screen is displayed.
Display the number key to be registered, using [Previous] and [Next] as needed to scroll. Entries from [001] to [100] are provided on the screen.
Press the number key to be registered, then press [Add].
Enter the color name to be registered, then press [OK].
-
To delete a registered color name, press the number key to be deleted, then press [Delete].
To recall a registered color name:
Press [Recall]. The [Recall Color Name] screen is displayed.
Display the desired number key, using [Previous] and [Next] as needed to scroll. Entries from [001] to [100] are provided on the screen.
Press the number key on the left side of the color name to be used, then press [OK].
-
-
Press [Punch].
Select [Pre-Punched] for punched paper, or select [No Hole-Punch] for paper without punch holes.
-
Press [Both Sides Adj.].
For details about Both Sides Adjust, refer to Both Sides Adjust Screen.
-
If you change the [Zoom] setting for [Front] or [Back], [Image Shift] setting, or [Registration Loop setting], the Both Sides Adjust indication changes to [Offset Changed].
-
If you press [Reset], all Both Sides Adjust settings are restored to default values.
-
-
Press [Expert Adjustment].
-
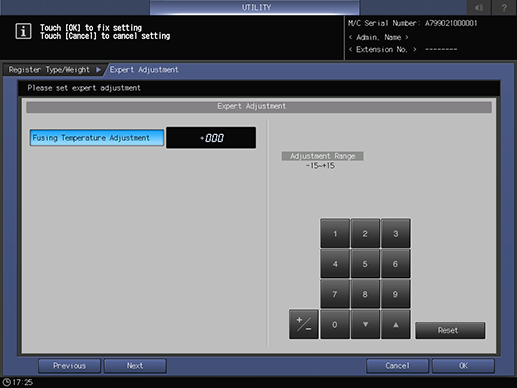
In [Fusing Temperature Adjustment] that is displayed by pressing [Next] in [Offset Lead Edge 1 (Front)], select the desired adjustment item button, then use the keypad on the screen, press the [
] or [] key, or press the
keypad on the control panel to enter the numeric
value.
-
Press [+/-] to specify the value to be positive or negative.
-
Press [Next] to display the setting screen.
-
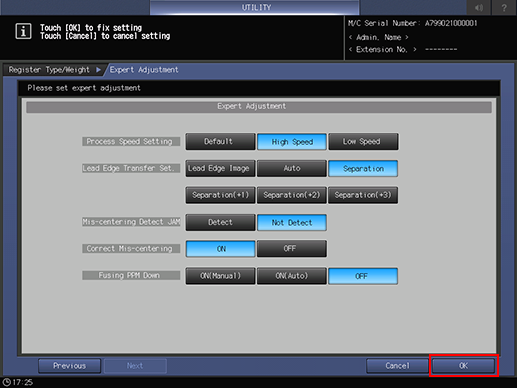
Make settings for the following items.
[Process Speed Setting], [Lead Edge Transfer Setting], [Mis-centering Detect JAM], [Correct Mis-centering], [Fusing PPM Down]
-
Press [OK] to complete the setting. To cancel the change, press [Cancel]. In either case, the screen returns to the [Register Type/Weight] screen.
-
-
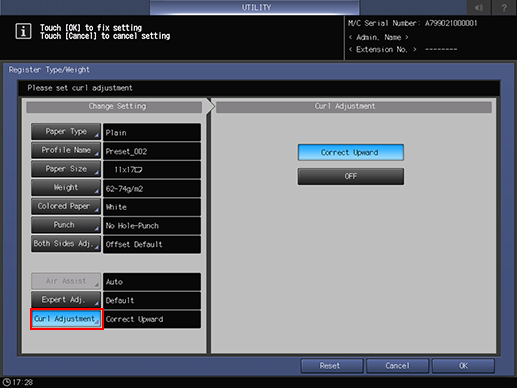
Press [Curl Adjustment].
-
Select [Correct Upward] to correct the curl of output paper. Adjustment can be made to paper of weight between 40 g/m2 to 256 g/m2 / 10 lb Bond to 68 lb Bond.
-
-
Press [OK] on the [Register Type/Weight] screen. The screen returns to the [Reg./Del. Paper Set] screen.
-
Press [Close] to return to the [Paper Tray Setting Menu] screen.
Deleting the Paper Conditions
-
Follow the procedure on User Setting to display the [User Setting Menu] screen.
-
Press [System Setting] on the [User Setting Menu] screen, and then press [Paper Tray Setting] and [Paper Setting] in sequence.
-
Press [Paper Profile Setting].
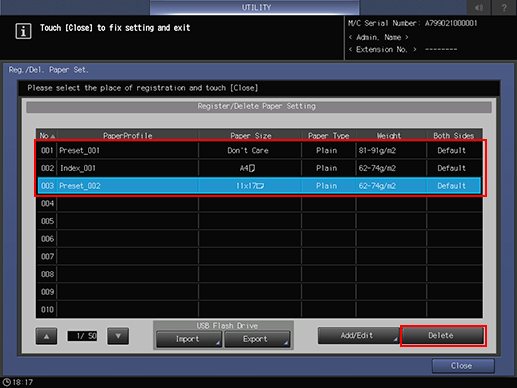
The [Register/Delete Paper Setting] screen is displayed.
-
Select the row to be deleted from the list of paper conditions, then press [Delete].
-
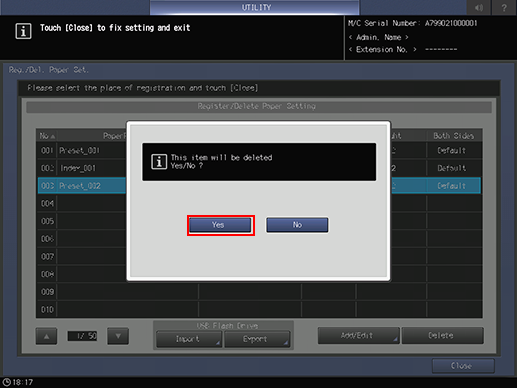
Press [Yes] on the confirmation dialog.
-
Or, press [No] to cancel.
-
-
Press [Close] to return to the [Paper Tray Setting Menu] screen.
USB Import/Export Function for Paper Setting
The USB Import/Export function saves the paper setting data registered on this machine to USB flash drive and registers the data to another machine of the same model. To import or export paper setting data, you need to connect USB flash drive to a USB port previously. The number of USB flash drive that can be connected is one.
-
When using the importing [All] option, all the data of paper size and paper setting stored on the USB flash drive is imported and the data registered on the machine is overwritten.
-
When using the importing [individual] option, the paper setting data you select is imported and the data is newly stored or overwritten on the machine. With the [New Store] option, up to 500 data, together with the number of the data that has already been registered on the machine, can be imported (The remaining data after reduction of the registered data from 500 can be imported). With the [Overwrite] option, up to 500 data can be imported.
-
The export function saves the entire paper setting data of a machine to a USB flash drive.
Importing Paper Setting Data
-
Follow the procedure on User Setting to display the [User Setting Menu] screen.
-
Press [System Setting] on the [User Setting Menu] screen, and then press [Paper Tray Setting] and [Paper Setting] in sequence.
-
Press [Paper Profile Setting].
The [Register/Delete Paper Setting] screen is displayed.
-
Press [Import].
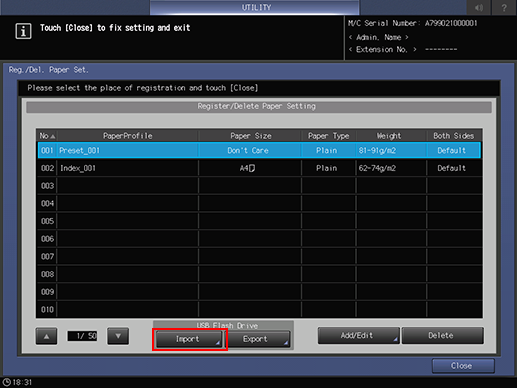
The [USB Import] screen is displayed.
-
Select the data to import, then press [All] or [Individual].

-
When pressing [All], go to step 5.
-
When pressing [Individual], go to step 6.
-
 mark is
displayed on the left side of the file name of the data which cannot be imported.
mark is
displayed on the left side of the file name of the data which cannot be imported.
-
-
Press [Import] to change all data.
-
The confirmation dialog is displayed. Press [Yes] to confirm. To cancel, press [No].
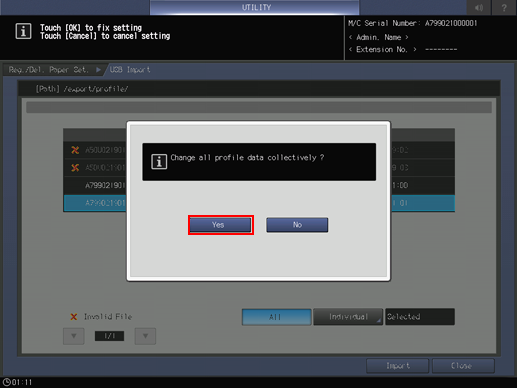
In each case, the screen returns to the [Register/Delete Paper Setting] screen.
-
-
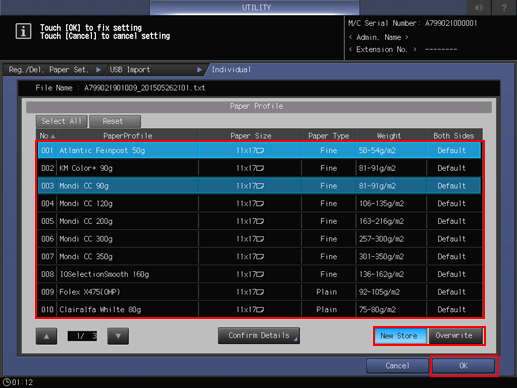
When the [Individual] screen is displayed, select paper setting data to import.
-
To select all data, press [Select All]. To cancel selecting all data, press [Reset].
-
To display details of the selected data, press [Confirm Details].
-
-
Select [New Store] or [Overwrite].
-
With New Store, the data is imported to the blank number of paper setting on the machine.
-
With Overwrite, the data is imported to the same number of paper setting on the machine.
-
-
Press [OK].
The screen returns to the [USB Import] screen.
-
Press [Import].
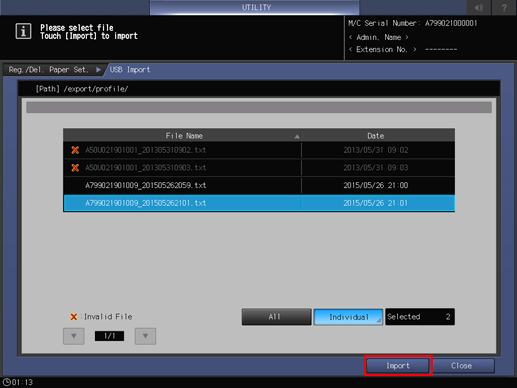
The confirmation dialog is displayed.
-
Press [Yes] to confirm. To cancel, press [No] (The confirmation dialog varies depending on whether to select [New Store] or [Overwrite]. The following shows an example of the screen for [New Store]).
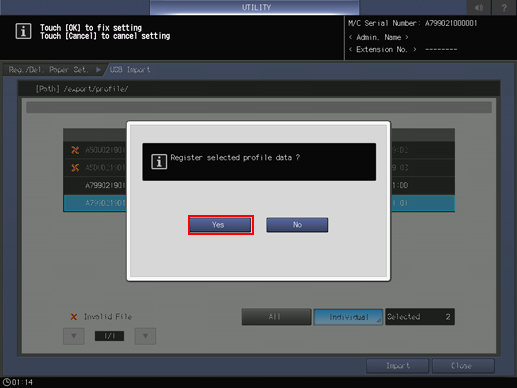
In each case, the screen returns to the [Register/Delete Paper Setting] screen.
Exporting Paper Setting Data
-
Follow the procedure on User Setting to display the [User Setting Menu] screen.
-
Press [System Setting] on the [User Setting Menu] screen, and then press [Paper Tray Setting] and [Paper Setting] in sequence.
-
Press [Paper Profile Setting].
The [Register/Delete Paper Setting] screen is displayed.
-
Press [Export].
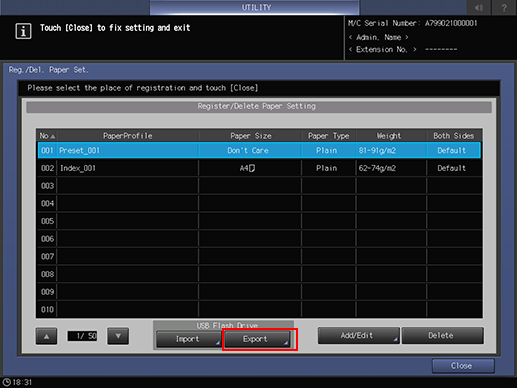
The screen for entering the file name of the exported paper setting data is displayed.
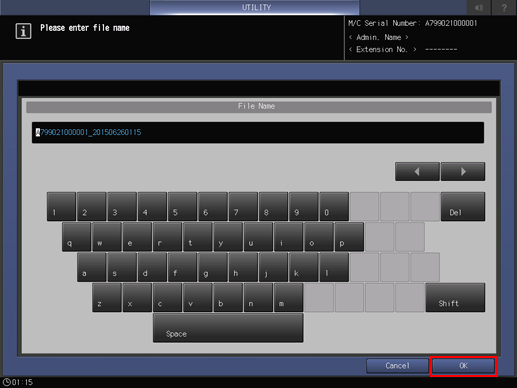
-
Enter the file name, and then press [OK].
-
The default file name is displayed in the following order.
machine number (13-digit)_year (4-digit) month (2-digit) day (2-digit) hour (2-digit) minute (2-digit)
-
Up to 60 one-byte characters can be entered for the file name.
-
When not changing the file name, press [OK] without entering any characters.
-