
Saving a File to a User Box on this Machine to Share it in the Office ([Public], [Personal], [Group])
To register a User Box to be Shared in the Office
Create User Box
Up to 1000 User Boxes can be created.
Tap [Utility] - [One-Touch/User Box Registration] - [Create User Box] - [Public/Personal User Box] - [New].
The administrator can perform the same actions by selecting [Administrator Settings] - [One-Touch/User Box Registration].
Enter the registered information, then tap [OK].
For details on registration information, refer to Here.
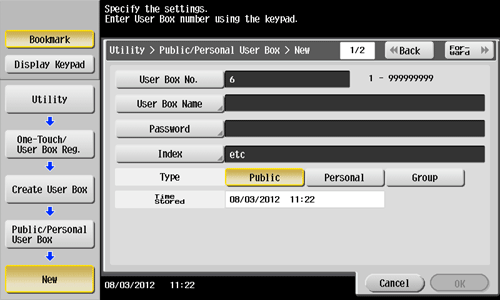


You can also register boxes using Web Connection. For details, refer to Here.
To save a shared file to a User Box
Save File in a User Box
Save (basic operation flow)
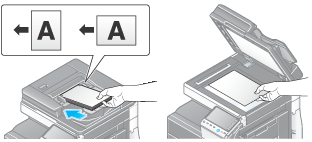
Load the original.
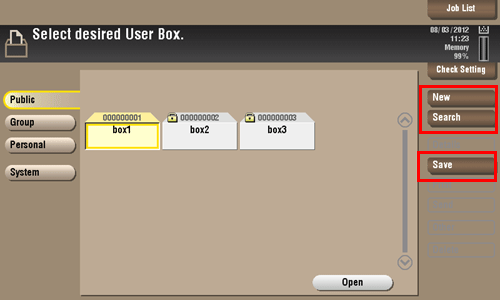
Tap [User Box].

Select a User Box in which to save a file, then tap [Save].
This example uses the Public User Box for explanatory purposes. To use a Personal User Box or a Group User Box, tap [Personal] or [Group] and select the desired box.
Tap [New], to create a User Box. For details, refer to Here.
To search for a User Box in which to save a file, tap [Search]. For details, refer to Here.
Set file save options if necessary.
For detailed optional settings, refer to Here.
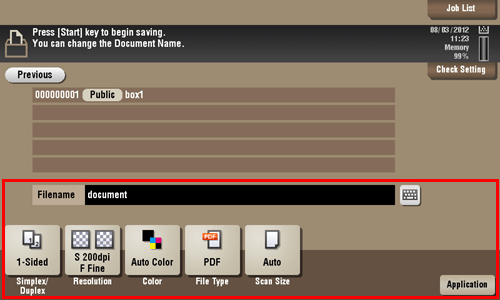
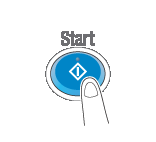
Press the Start key.
The file is saved.

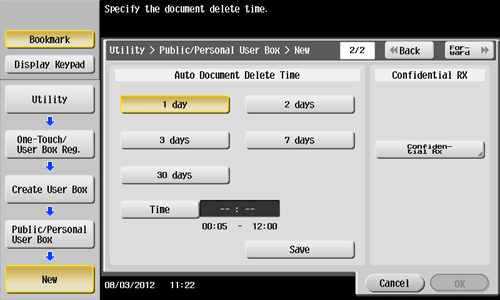
Up to 200 files can be stored in a User Box.
A total of 10000 pages can be stored in all User Boxes.
A total of 3000 files can be stored in all User Boxes.
If files stored in a User Box are not used, they are deleted automatically when the [Auto Document Delete Time] has passed (Default: [1 day]).
Save files in Copy mode
You can read a document in Copy mode and save its data in the User Box.
For details, refer to Here.
Save file in Fax/Scan mode
You can read the original data in Fax/Scan mode and save it in a User Box.
For details, refer to Here.
Save files from a PC
When specifying to print using the printer driver, you can specify a User Box number and store the print data in the box.
For details, refer to Here.
Save file from a USB memory
You can save a file stored on a USB memory in a User Box.
For details, refer to Here.
Save file from Bluetooth device
You can save files from Bluetooth-enabled mobile phone, smartphone, and tablet PC in a User Box.
For details, refer to Here.
The optional Local Interface Kit EK-605 is required to use the Bluetooth devices.
An interface setup by the service representative is required to use Bluetooth devices. For details, contact your service representative.
To print a file saved in a User Box
Print File in a User Box
Print (Basic operation flow)
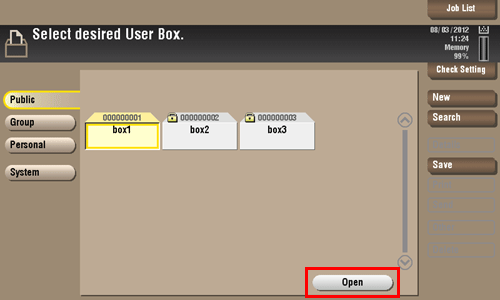
Tap [User Box].
Select the desired User Box, then tap [Open].
This example uses the Public User Box for explanatory purposes. To use a Personal User Box or a Group User Box, tap [Personal] or [Group] and select the desired box.
If the box is password protected, tap [Open] and enter the password.
You can also open the desired User Box by tapping it twice.
Select a file to print, then tap [Print].
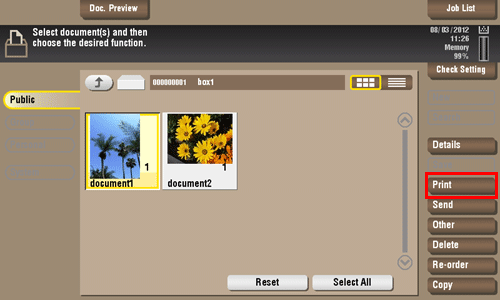
Long-tap the file to display the menu icon that is controllable, and you can drag and drop. For details, refer to Here.
Set print options if necessary.
For detailed optional settings, refer to Here.
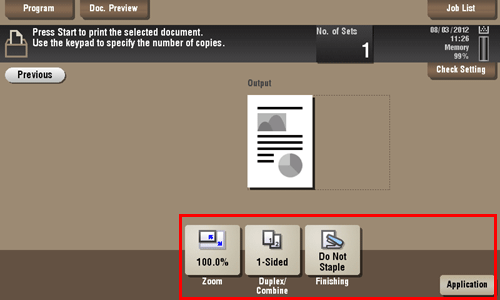
If necessary, enter the number of copies using the Keypad.
To display the Keypad, tap the number of copies.
If the [10 Keypad] is assigned to the Register key, pressing the Register key enables you to display the Keypad on the Touch Panel to enter data.
To retype the number of copies, tap [C].

Press the Start key.
Printing starts.
Print multiple files at the same time (Combine)
When printing multiple files at the same time, you can combine those files and handle them as a single job. This is called the Combine printing.
Using this function, you can reduce the print time and improve the efficiency as you can skip to repeat printing files one by one.
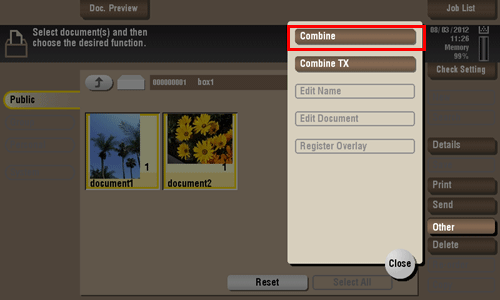
Tap [User Box].
Select the desired User Box, then tap [Open].
This example uses the Public User Box for explanatory purposes. To use a Personal User Box or a Group User Box, tap [Personal] or [Group] and select the desired box.
If the box is password protected, tap [Open] and enter the password.
You can also open the desired User Box by tapping it twice.

Select files for Combine printing, then tap [Other] - [Combine].
Change the order of printing files (Combine sequence) if necessary, then tap [OK].
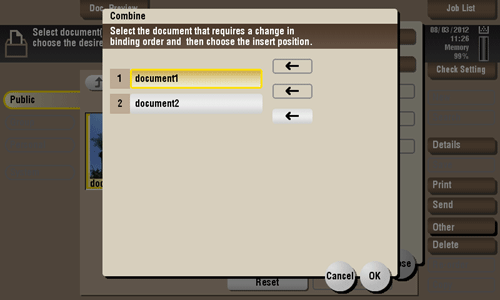
If you print a file containing a watermark first, the watermark will also be printed on the second and subsequent files.
Also, if you print a file that does not have a watermark first, the second and subsequent files will be printed without watermarks even if they have watermarks.
Set print options if necessary.
For detailed optional settings, refer to Here.
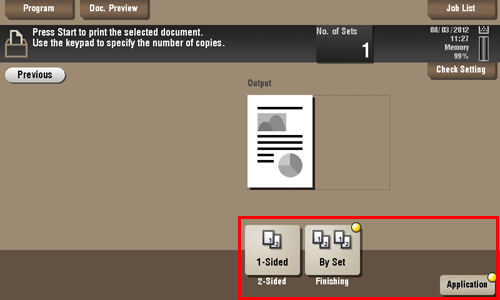
If necessary, enter the number of copies using the Keypad.
To display the Keypad, tap the number of copies.
If the [10 Keypad] is assigned to the Register key, pressing the Register key enables you to display the Keypad on the Touch Panel to enter data.
To retype the number of copies, tap [C].
Press the Start key.
Printing starts.
To send a file saved in a User Box to an E-mail address or computer on the network
To operate a User Box on this machine through a computer
Operate a User Box via Web Connection
Open User Box
Log in to the Web Connection user mode, and open a User Box.
Access to the Web Connection, using the Web browser.
For details on how to access the Web Connection, refer to Here.
Log in to the user mode.
For details on how to login to the user mode, refer to Here.
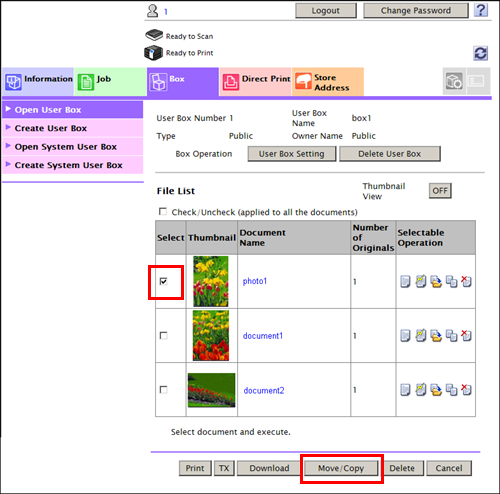
Click [Box] - [Open User Box].
The User Boxes existing in this machine (Public, Personal, and Group User Boxes) are listed.
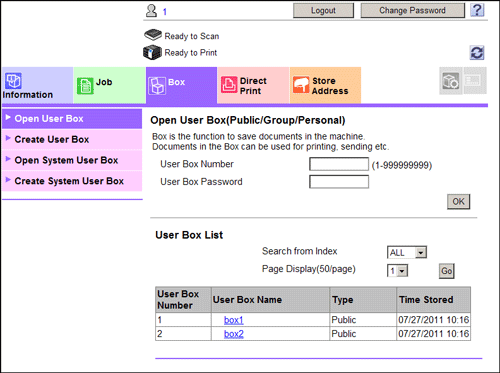
Click and select a User Box to open from the list.
You can also open a desired User Box by entering its number directly in the [User Box Number] column.
If the box is password protected, you need to enter the password.
Print files in a User Box
If a file can be printed, a check box is shown in the [Select] column. Also, symbol  is shown in the [Selectable Operation] column.
Select the check box of file you wish to print, and click [Print].
Or, click
shown in the [Selectable Operation] column.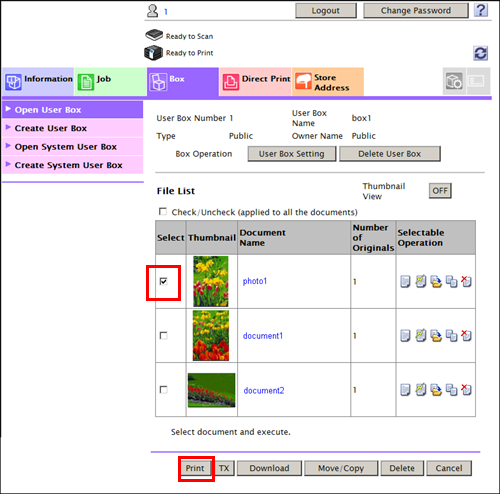
Set the print options if necessary.
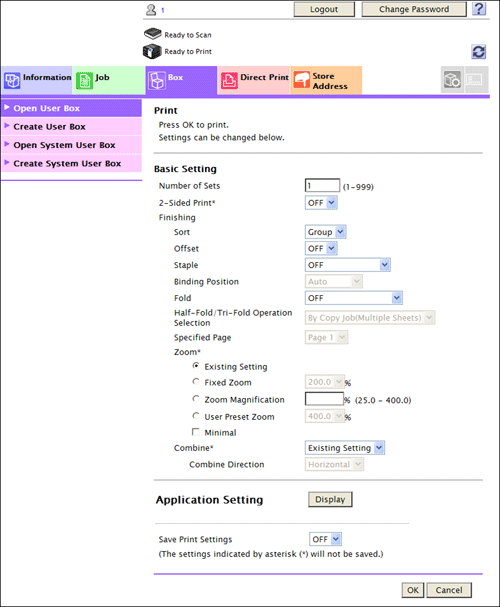
Settings
Description
[Change order]
This option is displayed when multiple files are selected.
You can change the print sequence if necessary. Select files and change their print sequence by clicking [Top]/[Up]/[Down]/[Bottom]/[Undo].
To display files as thumbnails, click [Thumbnail View].
[Combine]
This option is displayed when multiple files are selected.
You can combine multiple files into a single file and print them at the same time. If you select multiple files and set [OFF], you cannot use the [Basic Setting] and [Application Setting] options.
[Basic Setting]
You can set a number of copies, 2-sided Print, and Finishing if necessary.
[Application Setting]
Configure more detailed setting such as Page Margin or Stamp. When using this function, click [Display].
[Save Print Settings]
Specify to save the current print settings or not.
This option is not displayed when multiple files are selected.
Click [OK].
Printing starts.
Click [OK].
The file list screen appears again.
Send files in a User Box
If a file can be sent, a check box is shown in the [Select] column. Also, symbol  is shown in the [Selectable Operation] column.
Select the check box of file you wish to send, and click [TX].
Or, click
in the [Selectable Operation] column.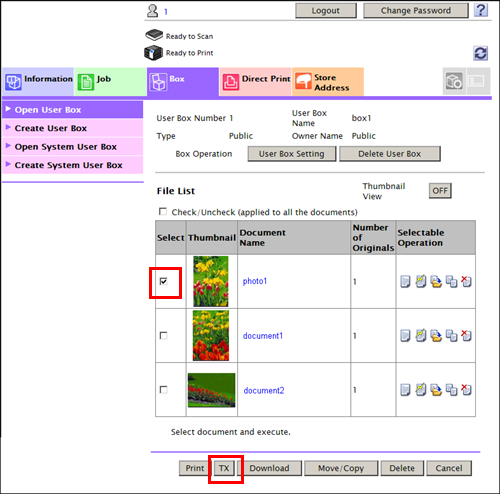
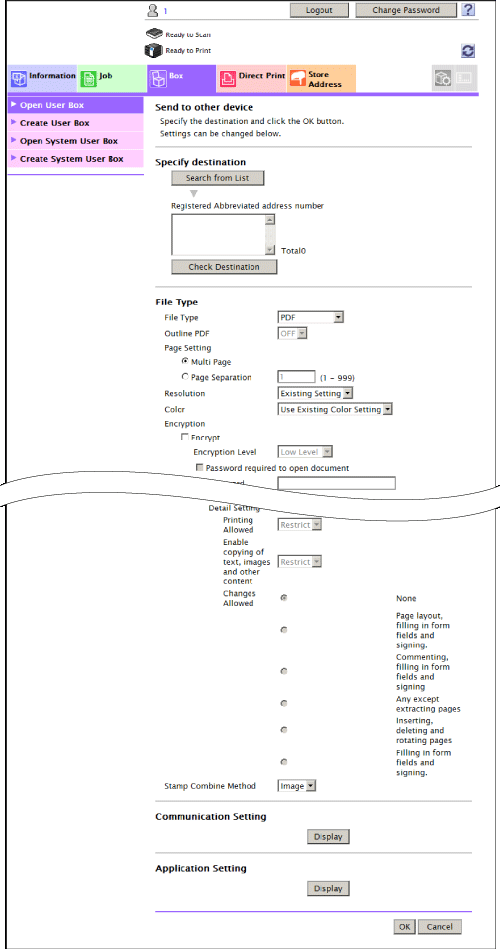
Configure send settings.
Settings
Description
[Specify destination]
Click [Search from List], and select the destination from the Address Book. When checking the destination list, click [Check Destination].
[Change order]
This option is displayed when multiple files are selected.
You can change the file transfer sequence if necessary. Select files and change their print sequence by clicking [Top]/[Up]/[Down]/[Bottom]/[Undo].
To display files as thumbnails, click [Thumbnail View].
[Combine]
This option is displayed when multiple files are selected.
You can combine multiple files into a single file and send them at the same time. If you select multiple files and set [OFF], you cannot use the [File Type], [Communication Setting], and [Application Setting] options.
[File Type]
Specify the file type and encryption contents for a file to be sent.
[Communication Setting]
Configure E-mail settings or specify the URL notification destination. When using this function, click [Display].
[Application Setting]
Configure more detailed setting such as Stamp or Send & Print. When using this function, click [Display].
Click [OK].
Sending starts.
Click [OK].
The file list screen appears again.
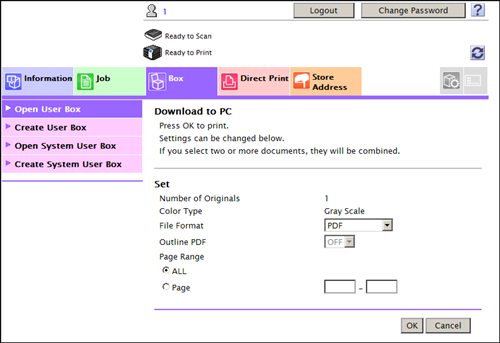
Download files in a User Box to the PC
If a file can be downloaded, a check box is shown in the [Select] column. Also, symbol  is shown in the [Selectable Operation] column.
The size of the file to be downloaded at one time is up to 400 MB.
If the file size exceeds 400 MB, use [Page Range] to specify specific pages to be downloaded to ensure that the file size is less than 400 MB.
Select the check box of file you wish to download, and click [Download].
Or, click
in the [Selectable Operation] column.
Set the download options.
Settings
Description
[Change order]
This option is displayed when multiple files are selected.
You can change the file storage sequence if necessary. Select files and change their print sequence by clicking [Top]/[Up]/[Down]/[Bottom]/[Undo].
To display files as thumbnails, click [Thumbnail View].
[File Format]
Select a type of file to save.
[Page Range]
You can download all pages of file or the specified range of pages to the PC.
Click [OK].
When [Preparation for download has been completed.] has appeared, click [Download].
The File Download page appears.
Click [Save].
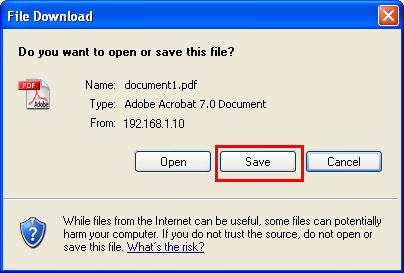
Specify the storage location and file name, and click [Save].
Click [Back].
The file list screen appears again.
Move or copy files in a User Box to another User Box
If a file can be moved or copied to another User Box, a check box is shown in the [Select] column. Also, symbol  is shown in the [Selectable Operation] column.
Select the check box of file you wish to move or copy, and click [Move/Copy].
Or click
in the [Selectable Operation] column.You cannot select multiple files.
Set the move or copy options.
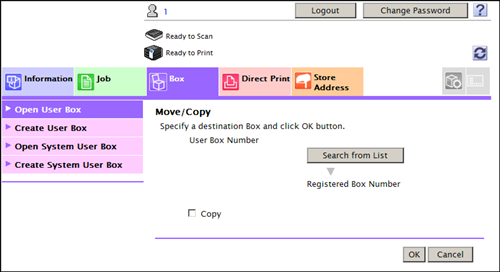
Settings
Description
[User Box Number]
Select the destination User Box from the box list.
[Copy]
Select this check box to copy a file to the selected User Box.
Click [OK].
The file is moved or copied to the destination User Box.
Click [OK].
The file list screen appears again.
Delete files from a User Box
If a file can be deleted, a check box is shown in the [Select] column. Also, symbol  is shown in the [Selectable Operation] column.
Select the check box of file you wish to delete, and click [Delete].
You can select or deselect all files by checking the [Check/Uncheck (applied to all the documents )] box.
Or, click
in the [Selectable Operation] column.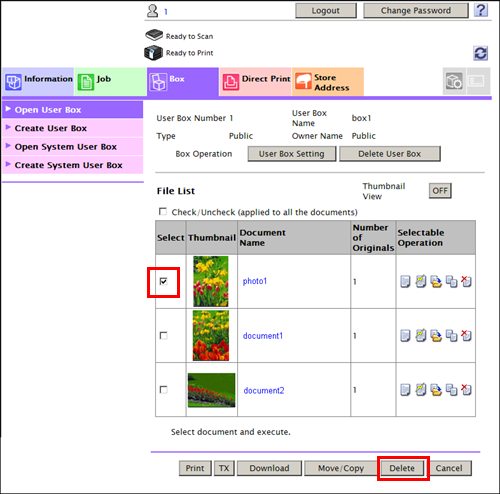
Check the name of file to delete, and click [OK].
When you select multiple files and display them as thumbnails, click [Thumbnail View].
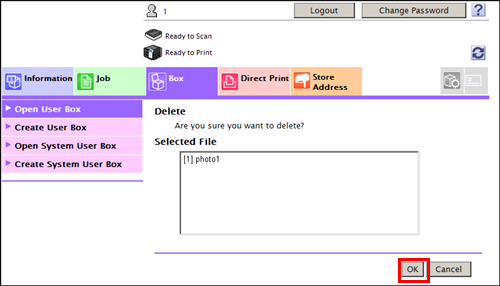
Click [OK].
The file is deleted, and the file list screen appears again.